
Introduction
A Xerox drum cartridge error can bring your workflow to a frustrating halt, displaying cryptic messages on your printer’s screen just when you need to print something important. Whether you’re working from home, managing an office, or running a small business, understanding how to identify and fix this common printer issue can save you time, money, and unnecessary stress. The drum cartridge is a critical component that transfers toner onto paper, and when it malfunctions or reaches the end of its life, your Xerox printer will alert you immediately. In this comprehensive guide, you’ll discover exactly what causes these errors, how to diagnose the problem accurately, and step-by-step instructions to replace your drum cartridge like a pro—no technical expertise required.
What Is a Xerox Drum Cartridge Error?
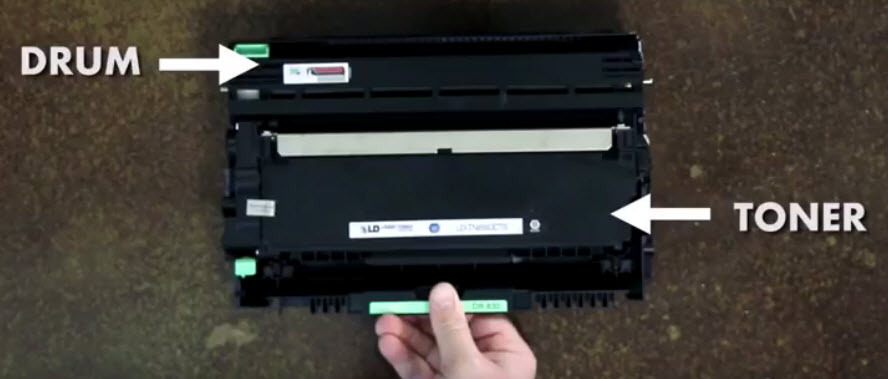
A Xerox drum cartridge error is a notification that appears on your printer’s display panel indicating a problem with the imaging drum unit. The drum cartridge is a cylindrical component inside your laser printer that holds an electrical charge and attracts toner particles to create images and text on paper. Unlike the toner cartridge that holds the ink powder, the drum is responsible for the actual transfer process.
These errors typically occur when the drum reaches its maximum page yield (usually between 10,000 to 50,000 pages depending on your model), becomes physically damaged, or isn’t properly installed. Common error messages include “Replace Drum Soon,” “Drum End Soon,” “Drum Cartridge Error,” or simply a flashing drum icon on the control panel.
Understanding this distinction is crucial because many users confuse toner cartridges with drum cartridges. While toner needs frequent replacement, drums last much longer but are equally essential for print quality. When you encounter a xerox drum cartridge error, your printer is essentially telling you that the drum can no longer function effectively, which will result in faded prints, streaks, spots, or complete printing failure if ignored.
7 Steps to Identify and Replace Your Xerox Drum Cartridge

Step 1: Identify the Specific Error Message
The first thing you need to do when facing a drum cartridge issue is to carefully read the exact error message displayed on your Xerox printer. Different messages indicate different levels of urgency. A “Drum End Soon” warning means you still have some time before replacement becomes critical, while “Replace Drum Now” indicates immediate action is required.
Check your printer’s LED panel or touchscreen display. Write down the exact wording of the error message, as this will help you find specific solutions in your user manual or online resources. Some Xerox models also provide error codes (like 016-757 or 016-752) that correspond to specific drum-related issues. You can reference these codes on the official Xerox support website for model-specific guidance.
Step 2: Verify Your Printer Model and Compatible Drum
Not all Xerox drum cartridges are universal. Before purchasing a replacement, you must identify your exact printer model. Look for the model number on the front panel, back of the printer, or underneath the device. Common Xerox models that use replaceable drums include the WorkCentre series, Phaser series, and VersaLink series.
Once you have your model number, check your printer’s manual or the Xerox website to find the compatible drum cartridge part number. For example, a Xerox WorkCentre 3215 uses a different drum than a Phaser 3260. Using an incompatible drum will not only fail to resolve the xerox drum cartridge error but could potentially damage your printer. Always purchase genuine Xerox drums or certified third-party alternatives that specifically list your model as compatible.
Step 3: Gather Your Replacement Supplies
Before you begin the replacement process, gather everything you’ll need to complete the job efficiently. You’ll require your new drum cartridge (still in its protective packaging until you’re ready to install), a soft lint-free cloth, and possibly a small vacuum or compressed air for cleaning.
Prepare a clean, flat workspace with adequate lighting. Place newspaper or a protective cloth on your work surface because toner powder can be messy if accidentally spilled. Have your printer manual handy for reference, though most drum replacements follow similar procedures. Wash your hands before starting to prevent oils from transferring to the drum surface, which could affect print quality.
Step 4: Power Down and Access the Drum Compartment
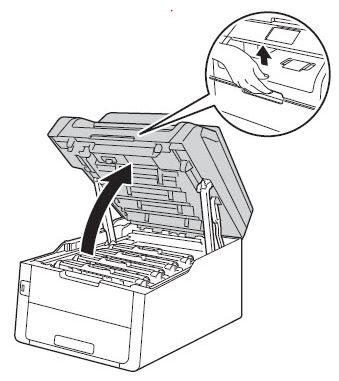
Safety comes first when working with any electronic device. Turn off your Xerox printer completely and unplug it from the power source. Wait at least five minutes before opening the printer, as internal components can remain hot after use.
Open the front cover or top cover of your printer—the exact location varies by model but is typically clearly marked. You’ll see the toner cartridge sitting on top of or attached to the drum unit. Most Xerox printers require you to remove the toner cartridge first before accessing the drum. Gently pull out the toner cartridge using the handle or designated grip area and set it aside on your protective cloth. You should now see the drum cartridge, which is usually a longer, cylindrical unit with a green or blue colored surface.
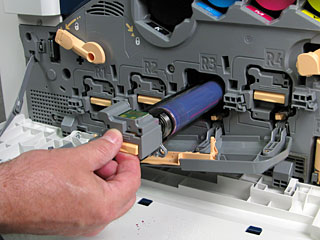
Step 5: Remove the Old Drum Cartridge Carefully
Locate the release levers, buttons, or tabs on either side of the drum unit. These mechanisms vary by model—some have blue levers you squeeze together, others have buttons you press simultaneously. Consult your manual if the release mechanism isn’t obvious.
Once released, carefully slide the drum cartridge straight out toward you. Handle it gently by the frame edges, never touching the green or blue drum surface itself, as oils from your skin can cause permanent print defects. Place the old drum immediately into a bag or its replacement box for proper disposal or recycling. Many office supply stores and manufacturers offer drum recycling programs, making it environmentally responsible to return your used cartridge.
Step 6: Install the New Drum Cartridge Properly
Unpack your new drum cartridge and remove all protective packaging materials, including any orange or blue protective strips, sealing tape, and plastic covers. Read any included instructions as some drums have specific preparation steps. Do not expose the drum to direct sunlight or bright light for extended periods.
Align the new drum cartridge with the tracks or guides inside the printer compartment. Slide it in smoothly until you hear or feel a click indicating it’s fully seated. The drum should fit snugly without forcing. Reinstall the toner cartridge on top of or alongside the drum unit (depending on your model configuration), ensuring it also clicks into place. Close the printer cover securely.
Step 7: Reset the Drum Counter and Test Print
After physical installation, most Xerox printers require you to reset the drum counter to clear the error message. Plug in your printer and power it on. Access the settings menu using the control panel buttons or touchscreen. Navigate to “Machine Settings” or “Tools,” then look for “Drum Cartridge Reset” or “Reset Supplies.”
Follow the on-screen prompts to confirm the drum replacement. This tells the printer to start counting from zero with the new drum. Once reset, print a test page to verify everything works correctly. Check for clear text, even toner distribution, and no streaks or spots. If the xerox drum cartridge error persists after proper installation, you may have received a defective drum or there could be an unrelated printer issue requiring professional service.
Understanding Drum Life and When to Replace
Drum cartridges have a significantly longer lifespan than toner cartridges, but they don’t last forever. Most Xerox drums are rated for 10,000 to 30,000 pages, though some high-capacity models reach 50,000 pages or more. The actual lifespan depends on several factors including print volume, paper quality, environmental conditions, and whether you print primarily text or graphics-heavy documents.
Your printer typically starts displaying warning messages when the drum reaches about 90% of its rated capacity, giving you time to order a replacement. Some users attempt to extend drum life by resetting the counter without actually replacing the drum. While this temporarily clears the error, it doesn’t address the underlying wear on the drum surface. Continuing to use a worn drum results in progressively worse print quality, including faded areas, repeating marks at regular intervals, and gray backgrounds.
Monitor your print quality regularly. If you notice declining quality even with adequate toner levels, your drum may need replacement regardless of page count estimates. Investing in a quality replacement drum ensures consistent, professional-looking documents and prevents the frustration of recurring errors.
Common Mistakes and Troubleshooting Tips
Mistake 1: Confusing Toner and Drum Cartridges Many users mistakenly replace the toner cartridge when they receive a drum error, or vice versa. These are separate components with different functions and lifespans. Always read the error message carefully and consult your manual to identify which part needs replacement.
Mistake 2: Touching the Drum Surface The photosensitive drum surface is extremely delicate. Even clean fingers can leave oils that create permanent print defects appearing as smudges or spots. Always handle drums by their plastic frames and never touch the green or blue cylindrical surface.
Mistake 3: Exposing the Drum to Light Drum cartridges are sensitive to light, especially direct sunlight and bright fluorescent lights. Prolonged exposure can damage the photosensitive coating and reduce drum life. Unpack and install drums quickly, and store unused drums in their original sealed packaging in a cool, dark place.
Mistake 4: Forgetting to Remove Protective Seals New drum cartridges often have multiple protective covers, strips, and sealing tapes. If you miss removing any of these before installation, your printer won’t function properly and may display continued errors. Carefully inspect the new drum and follow all unpacking instructions.
Mistake 5: Not Resetting the Drum Counter Physical replacement alone doesn’t clear the error on most Xerox printers. You must manually reset the drum counter through the printer’s menu system. Failure to do this means the error will reappear immediately even with a brand new drum installed.
Troubleshooting Persistent Errors: If errors continue after proper replacement and reset, try powering off the printer completely for 60 seconds, then restarting. Check that all cartridges are fully seated by removing and reinstalling them. Inspect for any packing materials left inside the printer. If problems persist, contact Xerox technical support as there may be a sensor issue or other mechanical problem requiring professional repair.
Frequently Asked Questions
Q1: How often should I replace my Xerox drum cartridge? Drum replacement frequency depends on your print volume and printer model. Most Xerox drums last between 10,000 to 30,000 pages. Your printer will display warning messages when replacement is needed. For average office use (1,000 pages monthly), expect drum replacement every 10-30 months.
Q2: Can I use third-party or compatible drum cartridges? Yes, many compatible drums work well and cost less than genuine Xerox parts. However, ensure they’re specifically listed as compatible with your exact printer model. Compatible drums may void warranties, so check your warranty status first. Quality varies among third-party manufacturers, so research reviews before purchasing.
Q3: What’s the difference between drum and toner cartridges? Toner cartridges contain the powder ink that creates the actual print. Drum cartridges are the cylindrical components that transfer toner onto paper using electrical charges. Toner requires frequent replacement (every 1,500-3,000 pages typically), while drums last much longer (10,000-50,000 pages).
Q4: Why does my printer show drum error after I just replaced it? This usually happens because the drum counter wasn’t reset after installation. Access your printer’s menu and reset the drum counter. Alternatively, protective seals may still be on the drum, it may not be fully seated, or you might have received a defective unit that needs returning.
Conclusion
Dealing with a xerox drum cartridge error doesn’t have to be complicated or expensive when you understand the process. By following the seven straightforward steps outlined in this guide—identifying the error, verifying compatibility, careful removal and installation, and properly resetting the counter—you can resolve most drum-related issues yourself without calling a technician. Remember that drum cartridges are different from toner, last significantly longer, and require gentle handling to maintain print quality. Regular monitoring of your print output and responding promptly to warning messages will keep your Xerox printer running smoothly and producing professional documents. Whether you choose genuine Xerox drums or compatible alternatives, proper installation and maintenance ensure optimal performance. Keep this guide handy for future reference, and you’ll be prepared to tackle drum cartridge errors confidently whenever they appear, minimizing downtime and maximizing productivity in your home or office.
Fix Canon Printer Flashing Orange Light: Quick Diagnosis Guide Read More


