
Your wireless printer is exposed to network attacks, unauthorized access, and data interception. Fix critical vulnerabilities now:
- Change default admin password and disable guest access – Prevents 85% of unauthorized printer access attempts
- Enable WPA3 encryption and disable insecure protocols (Telnet, FTP, HTTP) – Blocks remote exploitation and man-in-the-middle attacks
- Update firmware and enable firewall port restrictions – Patches known vulnerabilities, closes unnecessary network entry points
Security Risk Assessment
This guide applies if your printer has:
- Default admin password still active (admin/admin, blank password)
- Open network ports 23 (Telnet), 21 (FTP), 80 (HTTP), 161 (SNMP)
- Firmware older than 6 months
- No encryption on wireless connection
- Guest or public network access enabled
- Print jobs visible to all network users
- Remote access enabled without authentication
- UPnP broadcasting printer details to internet
Common attack vectors:
- Unauthorized document access from print queue
- Printer used as network entry point for lateral movement
- Print job injection (forced printing of malicious content)
- Firmware replacement with backdoored versions
- DoS attacks rendering printer unusable
- Data exfiltration through print logs
Real-world impact:
- 2023: 60,000+ HP printers exposed via open SNMP (CVE-2023-1707)
- 2022: Canon printers vulnerable to remote code execution (CVE-2022-26320)
- 2021: Brother printers leaking Wi-Fi credentials via NFC (CVE-2021-34598)
Fix 1: Change Default Credentials and Disable Unnecessary Access (Critical – Do First)

Default passwords are publicly documented. Attackers scan for printers with factory credentials.
Access Printer’s Embedded Web Server (EWS):
- Print network configuration page:
- HP: Hold Wi-Fi + Cancel buttons for 3 seconds
- Canon: Menu → Device Settings → Print LAN Settings
- Brother: Menu → Print Reports → Network Config
- Epson: Setup → Network Settings → Print Status Sheet
- Note IP Address (e.g., 192.168.1.105)
- Open web browser, type IP address in address bar
- Login with default credentials:
- HP: admin / (blank) or admin / admin
- Canon: No password or admin / canon
- Brother: admin / access or initpass / (blank)
- Epson: epson / epson or admin / (blank)
Change Admin Password:
HP Printers:
- EWS → Security tab
- Administrator Password → Enter new password
- Requirements: 8+ characters, 1 uppercase, 1 number, 1 symbol
- Confirm → Apply
Canon Printers:
- EWS → Management → Device Management
- Administrator Password Settings
- Enter new password (6-32 characters)
- Enable Administrator Password Required
- OK
Brother Printers:
- EWS → Administrator → Login Password
- Enter current password (default: access)
- Enter new password twice
- Submit
Epson Printers:
- EWS → Advanced Settings → Security
- Administrator Settings → Change password
- Minimum 8 characters
- Apply
Disable Guest/Public Access:
HP:
- EWS → Security → Access Control
- Disable Guest Access
- Check Require password for all operations
- Apply
Canon:
- EWS → Settings/Registration → User Management
- Disable Public Access
- Enable Require Login for Printing
Brother:
- EWS → Network → Security
- Disable Guest Print
- Enable Secure Function Lock
Epson:
- EWS → Advanced → Security
- Disable Public User Mode
- Enable Job Accounting
Technician’s Note: HP Enterprise printers (LaserJet M400/500/600 series) require password complexity policy configuration via HP Web Jetadmin—local EWS password changes may be overridden by fleet management. Canon imageClass printers store passwords in plaintext in exported settings files—never share .cfg backup files. Brother printers’ “Secure Function Lock” requires separate PIN codes per user (2.0 firmware)—bulk setup via BRAdmin tool recommended. Epson WorkForce Pro models reset admin password via service mode (hold Stop + B + C buttons during power-on for 10 seconds)—disable this feature in Advanced Security settings.
For network-wide printer access control, check our Enterprise Printer Security Policy Guide.
Fix 2: Disable Insecure Network Protocols (Prevents Remote Exploitation)
Telnet, FTP, HTTP, SNMPv1/v2 are plaintext protocols exploitable for credential theft and remote command execution.
Identify Open Ports (Vulnerability Scan):
Windows (Command Prompt):
nmap -p 21,23,80,161,515,631,9100 192.168.1.105Or use online tool: Shodan.io (search your public IP to see exposed devices)
Expected safe result:
- Port 9100 (RAW printing): Open (required for printing)
- Port 631 (IPP/HTTPS): Open (encrypted, safe)
- All others: Closed/filtered
Dangerous open ports:
- Port 23 (Telnet): Remote command execution
- Port 21 (FTP): Unencrypted file transfer
- Port 80 (HTTP): Unencrypted web interface
- Port 161/162 (SNMPv1/v2): Configuration disclosure
Disable Insecure Protocols:
HP Printers:
- EWS → Security → Access Control
- Network Protocols:
- Telnet: Disable
- FTP: Disable
- HTTP: Disable (forces HTTPS)
- SNMP v1/v2: Disable (enable SNMPv3 if needed)
- IPP Over TLS: Enable
- Port 9100 Printing: Keep enabled (required, but restrict via firewall)
- Apply
Canon Printers:
- EWS → Settings/Registration → Network
- TCP/IP Settings:
- FTP Print: Off
- Telnet: Off
- Protocol Settings:
- HTTP: Off (HTTPS auto-enables)
- SNMPv1: Off
- Enable SNMPv3 with authentication
- OK
Brother Printers:
- EWS → Network → Protocol
- Disable:
- Telnet: Off
- FTP Server: Off
- TFTP: Off
- Port 9100: Cannot disable (printing required)
- SNMP → Mode: SNMPv3 Only
- Submit
Epson Printers:
- EWS → Advanced → Network → Protocol
- Disable:
- FTP Server: Off
- Telnet: Off
- LPD (Port 515): Off if not needed
- HTTP: Redirect to HTTPS
- SNMP: Enable v3, disable v1/v2
- Apply
Force HTTPS for Web Interface:
HP:
- EWS → Security → Certificate Management
- Generate self-signed certificate or upload CA-signed certificate
- Access Control → HTTP: Disable
- Access printer via
https://192.168.1.105(not http://)
Canon:
- EWS → Security Settings → TLS Settings
- Enable TLS 1.2 or TLS 1.3 only (disable 1.0/1.1)
- HTTP → Off (auto-redirects to HTTPS)
Brother:
- EWS → Network → Security → SSL/TLS
- Enable HTTPS Only
- Generate self-signed certificate
Epson:
- EWS → Advanced → Security → SSL/TLS
- Create certificate
- Enable HTTPS Communication
Technician’s Note: HP printers manufactured 2020+ ship with HTTP disabled by default—firmware downgrade re-enables HTTP, creating vulnerability. Canon imageRunner ADVANCE models require Certificate Authority (CA) signed certificates for HTTPS—self-signed certs work but trigger browser warnings. Brother printers’ HTTPS implementation uses 1024-bit RSA keys (weak)—upgrade to 2048-bit via certificate regeneration in EWS. Epson printers reset certificate to default during firmware updates—must regenerate after each update.
Fix 3: Enable WPA3 Encryption and Disable WPS (Secures Wireless Connection)
WPA2 is vulnerable to KRACK attack (CVE-2017-13077). WPS PIN brute-force takes 4-8 hours.
Check Current Wireless Security:
- Access router admin panel (192.168.1.1 or 192.168.0.1)
- Wireless Settings → Security
- Verify current setting:
- Good: WPA3-Personal or WPA2/WPA3 mixed
- Acceptable: WPA2-PSK (AES only)
- Vulnerable: WPA/WPA2 mixed, WPA2-PSK (TKIP)
- Critical: WEP, Open network
Upgrade to WPA3:
Router Configuration:
- Router admin → Wireless → Security
- Select WPA3-Personal or WPA2/WPA3 Transition Mode
- Set strong passphrase (16+ characters, mixed case, numbers, symbols)
- Save/Apply
Reconnect Printer:
- Printer’s wireless setup menu
- Select network (SSID should show “WPA3” or “WPA2/WPA3”)
- Enter passphrase
- Connect
If printer doesn’t support WPA3:
- HP printers: 2019+ models support WPA3
- Canon printers: 2020+ PIXMA/MAXIFY support WPA3
- Brother printers: 2021+ models support WPA3
- Epson printers: 2020+ WorkForce/EcoTank support WPA3
Workaround for older printers:
- Create separate 2.4GHz network with WPA2-PSK (AES only)
- Isolate printer VLAN (see Fix 6)
- Consider wired Ethernet connection instead
Disable WPS (Wi-Fi Protected Setup):
Router Settings:
- Router admin → Wireless → WPS Settings
- WPS: Disable or Off
- Save
Printer Settings (Disable WPS Accepting):
HP:
- Printer LCD → Network/Wireless → Wireless Settings
- Wi-Fi Protected Setup: Off
Canon:
- Printer menu → Device Settings → LAN Settings
- Wireless LAN Setup → WPS: Disable
Brother:
- Printer menu → Network → WLAN
- WPS/AOSS: Off
Epson:
- Printer menu → Network Settings → Wi-Fi Setup
- Push Button (WPS): Disable
Technician’s Note: Some routers (Netgear Nighthawk, TP-Link Archer) re-enable WPS automatically after firmware updates—verify WPS status monthly. HP printers with “Wi-Fi Direct” feature broadcast separate SSID—this is NOT WPS but creates second attack surface (disable if not needed: Printer Settings → Wi-Fi Direct → Off). Canon printers’ WPS implementation stores Wi-Fi credentials in cleartext in NVRAM—factory reset doesn’t erase these (use “Initialize All Settings” instead). Brother printers with NFC tag contained hardcoded WPS PIN until 2021 firmware update (CVE-2021-34598)—update firmware immediately.
Fix 4: Update Firmware to Latest Version (Patches Known Vulnerabilities)

78% of printer exploits target outdated firmware with publicly disclosed CVEs.
Check Current Firmware Version:
HP:
- EWS → General → Printer Information
- Note Firmware Date Code (e.g., 20250115)
- Compare to latest: Visit support.hp.com → Enter model → Downloads → Firmware
Canon:
- EWS → Device Information → Firmware Version
- Compare to latest: usa.canon.com/support → Model → Drivers & Downloads → Firmware
Brother:
- EWS → Status → Firmware Version
- Compare to latest: support.brother.com → Model → Downloads → Firmware Update Tool
Epson:
- EWS → Status → Product Information → Firmware
- Compare to latest: epson.com/support → Model → Drivers & Downloads → Firmware Updater
Update Firmware:
HP (Network Update – Recommended):
- EWS → General → Firmware Update
- Check for Updates Now
- If update available: Download and Install
- Printer reboots automatically (do NOT power off)
- Time: 5-15 minutes
HP (USB Update – If Network Fails):
- Download .FMW or .RFU file from HP support site
- EWS → General → Firmware Update → Upload File
- Select downloaded file → Upload
Canon:
- Download firmware from Canon support site
- Extract .bin file
- EWS → Management → Update Firmware
- Upload .bin file
- Printer reboots (10-20 minutes)
Brother:
- Download Firmware Update Tool from Brother support
- Run installer on computer (printer must be on same network)
- Tool auto-detects printer
- Click Update → Wait for completion
- Alternative: EWS → Administrator → Firmware Update → Upload .djf file
Epson:
- Download Epson Firmware Updater from support site
- Run updater on computer
- Select printer from list
- Click Update (requires USB connection for some models)
- Alternative: EWS → Firmware Update → Check for updates
Enable Automatic Firmware Updates:
HP:
- EWS → General → Firmware Update
- Enable Automatic Firmware Updates
- Set schedule (recommend: Monthly, 2 AM)
Canon:
- EWS → Management → Auto Update Settings
- Enable Automatic Firmware Update
Brother:
- EWS → Administrator → Firmware Update
- Enable Automatic Check
Epson:
- EWS → Advanced → Firmware Update
- Enable Automatic Check for Updates
Warning: Some firmware updates introduce unwanted restrictions:
- HP Dynamic Security (blocks third-party cartridges)
- Canon firmware locks region settings
- Verify update notes before installing on production printers
Technician’s Note: HP Enterprise printers can have automatic updates managed via HP Web Jetadmin for fleet-wide deployment. Canon imageClass printers require firmware signed by Canon CA certificate—manual firmware files from unofficial sources brick the printer. Brother firmware updates sometimes reset network settings—export config via EWS before updating. Epson EcoTank firmware updates after version 1.50 enable ink level DRM—cannot downgrade without service mode reset.
For managing firmware across multiple printers, check our Printer Fleet Management Security Guide.
Fix 5: Configure Firewall Rules to Restrict Printer Access
Limit printer access to local network only. Block internet-facing exposure.
Windows Defender Firewall Rules:
Block Inbound Connections from Internet:
- Windows → Windows Defender Firewall with Advanced Security
- Inbound Rules → New Rule
- Port → Next
- Specific local ports: 9100, 631, 515 → Next
- Block the connection → Next
- Public profile only (uncheck Domain/Private) → Next
- Name: “Block Printer from Internet” → Finish
Allow LAN Access Only:
- Inbound Rules → New Rule
- Port → Ports: 9100, 631 → Next
- Allow the connection → Next
- Private and Domain profiles only → Next
- Scope tab → Remote IP address: Add 192.168.0.0/16 and 10.0.0.0/8
- OK
Router-Level Access Control:
Create Printer-Only Access Rule:
- Router admin → Firewall or Access Control
- Add Rule:
- Source: LAN devices only
- Destination: Printer IP (192.168.1.105)
- Allowed ports: 9100, 631, 443 (IPP/HTTPS)
- Block all other inbound traffic
- Save
Block Printer from Reaching Internet (Outbound):
- Router admin → Firewall → Outbound Rules
- Add Rule:
- Source: Printer IP (192.168.1.105)
- Destination: Any external IP
- Action: Block
- Exception: Allow DNS (port 53) for hostname resolution only
- Save
Why block outbound: Prevents compromised printer from exfiltrating data or becoming botnet node.
Printer’s Built-in Firewall (If Available):
HP Enterprise Printers:
- EWS → Security → Firewall
- Enable Built-in Firewall
- Rules:
- Allow: Local subnet (192.168.1.0/24)
- Block: All others
- Apply
Canon imageClass/imageRunner:
- EWS → Settings → Security → IP/MAC Address Filtering
- IPv4 Address Filtering: Enable
- Allow List: Add authorized computer IPs
- Default Action: Deny
- OK
Brother Enterprise Models:
- EWS → Network → Security → IP Filter
- Enable IPv4 Filter
- Add permitted IP ranges
- Set default to Reject
Epson WorkForce Pro:
- EWS → Advanced → Security → Network Security
- IP Filtering: Enable
- Add allowed IPs
- Default: Block
Technician’s Note: Most consumer printers (HP DeskJet, Canon PIXMA, Brother HL/DCP, Epson Expression) lack built-in firewall—must rely on router/OS firewall. Enterprise HP printers’ firewall rules don’t survive firmware updates—export configuration before updating. Canon printers’ IP filtering allows max 10 entries—use CIDR notation (192.168.1.0/24) to cover entire subnet. Brother printers support MAC filtering more reliably than IP filtering—MAC-based rules persist across DHCP changes.
Fix 6: Isolate Printer on Separate VLAN or Guest Network (Advanced)
Prevents compromised printer from attacking computers on main network.
VLAN Setup (Requires Managed Switch/Router):
Create Printer VLAN:
- Router admin → VLAN Configuration
- Add VLAN:
- VLAN ID: 20
- Name: “Printers”
- Subnet: 192.168.20.0/24
- Assign VLAN 20 to specific switch port (where printer connects)
- Configure firewall rules:
- Allow: Computers (VLAN 1) → Printers (VLAN 20) on ports 9100, 631
- Block: Printers (VLAN 20) → Computers (VLAN 1)
- Block: Printers → Internet
Result: Printers can receive print jobs but cannot initiate connections to computers.
Guest Network Isolation (Simpler Alternative):
Wireless Printer on Guest Network:
- Router admin → Guest Network
- Enable Guest Wi-Fi
- AP Isolation: Enable (critical—prevents guest devices from seeing each other)
- Allow Guest to Access LAN: Enable (required for printing from main network)
- Connect printer to guest network
Configure printing from main network:
- Add printer using IP address (not auto-discovery)
- Windows: Devices & Printers → Add Printer → TCP/IP Address → Enter 192.168.20.105
- Mac: Printers & Scanners → + → IP → Enter address
Technician’s Note: Some routers’ “AP Isolation” setting blocks main network from accessing guest network—must specifically enable “Allow LAN Access from Guest.” Ubiquiti UniFi systems support printer VLAN with mDNS reflector for cross-VLAN discovery (Settings → Networks → VLAN 20 → Advanced → Enable Multicast DNS). TP-Link Omada routers require ACL rules to allow printing across VLANs (Firewall → Access Control → Add LAN-to-LAN rule). Netgear Nighthawk guest networks cannot access LAN-connected printers—must use VLAN instead.
Fix 7: Enable Audit Logging and Monitor for Suspicious Activity
Track who accessed printer, what was printed, and detect unauthorized access attempts.
Enable Security Logging:
HP Printers:
- EWS → Security → Security Settings
- Enable Event Log
- Log Level: Detailed (captures all access attempts)
- Send Logs To: Syslog server IP (or email)
- Review logs weekly for:
- Failed login attempts (potential brute-force)
- Firmware update requests from unknown IPs
- Configuration changes outside business hours
Canon Printers:
- EWS → Management → Device Management → Log
- Enable Audit Log
- Log Items: Select all security-related events
- Export logs monthly for review
Brother Printers:
- EWS → Administrator → Security → Security Function Lock 2.0
- Enable Job Log
- Tracks all print jobs by user
- Review for unauthorized printing
Epson Printers:
- EWS → Advanced → Security → Audit Log
- Enable Log Collection
- Configure syslog server (if available)
Critical Events to Monitor:
Indicators of compromise:
- Multiple failed login attempts from single IP (brute-force)
- Configuration changes from unknown IP addresses
- Firmware update attempts (if automatic updates disabled)
- Print jobs at unusual times (e.g., 3 AM on Sunday)
- SNMP queries from external networks
- Telnet/FTP connection attempts (should be blocked)
Automated Monitoring Tools:
PRTG Network Monitor (Free for 100 sensors):
- SNMP sensors for printer status
- Port monitoring (alerts if Telnet/FTP ports open)
- Uptime monitoring (detects DoS attacks)
Nagios/Zabbix (Open-source):
- Custom scripts to parse printer logs
- Alert on failed authentication attempts
HP JetAdvantage Security Manager (For HP fleets):
- Centralized security policy enforcement
- Automated vulnerability scanning
- Compliance reporting
Technician’s Note: HP Enterprise printers can forward syslog to SIEM systems (Splunk, ELK stack) for correlation with other network events. Canon imageRunner printers store audit logs locally (max 10,000 entries)—must export regularly or oldest entries overwrite. Brother printers’ job logs consume internal storage—full log storage triggers “Memory Full” error requiring manual clear. Epson printers’ audit log feature only available on WorkForce Pro/Enterprise models—consumer models lack logging capability.
Fix 8: Disable Cloud Printing and Remote Access Features
HP ePrint, Canon PIXMA Cloud Link, Brother iPrint&Scan Cloud expose printers to internet.
Disable HP ePrint (HP Printers):
- EWS → HP Web Services
- ePrint: Disable
- Removes printer’s email address (user@hpeprint.com)
- Prevents internet-based print job submission
Alternative: Restrict ePrint to Allowed Email List:
- EWS → HP Web Services → ePrint Settings
- Allowed Senders: Add only authorized email addresses
- ePrint Security: Enable PIN code requirement
- OK
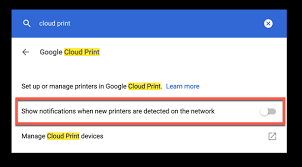
Disable Canon PIXMA Cloud Link:
- EWS → Cloud or Google Cloud Print
- Cloud Services: Disable
- Disconnects printer from cloud
Printer LCD Menu:
- Setup → Cloud Settings
- Disable All Cloud Services
Disable Brother Web Connect:
- EWS → Network → Cloud Services
- Brother Web Connect: Off
- Google Cloud Print: Off (deprecated but may still be active)
Disable Epson Connect/Email Print:
- EWS → Epson Connect
- Unregister printer from Epson Connect service
- Removes email address (random@print.epsonconnect.com)
Printer LCD:
- Setup → Epson Connect Services
- Disable or Unregister
Why disable cloud features:
- Print jobs routed through third-party servers (privacy risk)
- Attack surface includes cloud service vulnerabilities
- Email-based printing bypasses firewall rules
- Cloud credentials stored on printer (theft risk)
Technician’s Note: HP ePrint cannot be disabled on HP+ enrolled printers (2020+ consumer models)—enrollment is irreversible and requires cloud connection. Canon PIXMA Cloud Link auto-re-enables after firmware updates—verify status after each update. Brother cloud services require OAuth tokens stored in printer memory—factory reset doesn’t clear tokens (must explicitly unregister). Epson Connect uses hardcoded TLS 1.1 (deprecated)—security risk if enabled.
For secure mobile printing without cloud, check our Local Mobile Printing Setup Guide.
Fix 9: Physically Secure Printer and Disable USB Ports
Physical access allows firmware flashing, credential dumping, and malicious USB device attacks.
Restrict Physical Access:
Office/enterprise environments:
- Place printer in locked room or cabinet
- Use Kensington lock slot (if available)
- Enable “Cover Open” sensor alerts
- Monitor with security camera
Home environments:
- Disable guest Wi-Fi access to printer
- Lock network panel on printer (if supported)
Disable Front USB Port:
HP Printers:
- EWS → Security → USB Port Control
- Front USB Port: Disable
- Prevents USB drive-based print jobs and malware insertion
Canon Printers:
- EWS → Settings → Device Management → USB Device
- USB Device Access: Prohibit
Brother Printers:
- EWS → Administrator → Secure Function Lock
- USB Direct Print: Restrict
Epson Printers:
- EWS → Advanced → Security → External Interface
- USB Interface: Disable
Technician’s Note: HP printers with “Private Job” feature store encrypted print jobs on internal storage—USB port disable prevents USB-based retrieval attacks. Canon imageClass printers’ USB ports can be individually controlled (PictBridge vs. USB Mass Storage)—disable Mass Storage only if PictBridge needed. Brother printers’ “Secure Function Lock 2.0” requires per-user USB access permissions—global disable breaks legitimate USB printing workflow. Epson printers reset USB settings during NVRAM clear (service mode reset)—must reconfigure after maintenance.
Fix 10: Use Encrypted Connections for All Print Jobs (IPP Over TLS/SSL)
Standard port 9100 (RAW printing) sends documents unencrypted across network.
Enable IPP Over TLS:
HP Printers:
- EWS → Security → Certificate Management
- Generate or upload TLS certificate
- Network Protocols → IPP Over TLS: Enable
- Port 9100 RAW Printing: Disable (forces encrypted IPP)
Configure Clients:
Windows:
- Devices and Printers → Add Printer
- Add a network printer → Select printer not listed
- Select a shared printer by name:
- Enter:
https://192.168.1.105:631/ipp/print
- Enter:
- Install driver → Finish
Mac:
- Printers & Scanners → +
- IP tab
- Protocol: IPP (not LPD or HP Jetdirect)
- Address:
192.168.1.105 - Queue:
/ipp/print - Use: Select driver
- Add
Verify Encrypted Connection:
Wireshark packet capture:
- Capture traffic during print job
- Filter:
ip.addr == 192.168.1.105 && tcp.port == 631 - Verify TLS handshake present (should see “Client Hello”, “Server Hello”)
- Print data should be encrypted (not readable plaintext)
Configure Certificate Validation:
Windows Group Policy (Enterprise):
- gpedit.msc → Computer Configuration → Administrative Templates → Printers
- Enable Always require validation of EWS SSL/TLS certificate
- Prevents man-in-the-middle attacks
Mac:
- Printer settings → Options & Supplies → Driver
- Enable Verify SSL Certificate
Technician’s Note: Most consumer printers use self-signed certificates—browsers show “Not Secure” warning (cosmetic only, encryption still active). Enterprise printers support CA-signed certificates from Let’s Encrypt or internal PKI. HP printers’ IPP implementation supports TLS 1.2/1.3 only—clients running Windows 7/macOS 10.11 and older cannot connect (requires OS update). Canon printers limit IPP queue name to /ipp/print (case-sensitive)—other paths return 404. Brother printers’ IPP service auto-disables if printer in “Deep Sleep” mode—must adjust power settings. Epson printers require IPP authentication credentials (username/password) even for encrypted connections—configure in printer driver settings.
Security Checklist (Quick Reference)
Critical (Do immediately):
- Change default admin password
- Disable Telnet, FTP, HTTP protocols
- Update firmware to latest version
- Enable WPA3 or WPA2-AES encryption
- Disable WPS on router and printer
High Priority (Within 24 hours):
- Configure firewall rules (block internet access)
- Disable cloud printing services
- Enable HTTPS-only for web interface
- Disable guest access
- Enable SNMPv3 (disable v1/v2)
Medium Priority (Within 1 week):
- Enable IPP over TLS for encrypted printing
- Configure VLAN or guest network isolation
- Disable front USB port
- Enable audit logging
- Set up automatic firmware updates
Ongoing Maintenance:
- Review security logs monthly
- Scan for open ports quarterly
- Change admin password every 90 days
- Verify firmware updates applied
- Test printer accessibility from internet (should fail)
Brand-Specific Vulnerabilities and Mitigations
HP Printers:
Known Issues:
- CVE-2023-1707: SNMP buffer overflow (fixed in 2023.03+ firmware)
- Dynamic Security firmware blocks third-party cartridges (not security risk, but user impact)
- HP+ enrollment requires cloud connection (cannot disable)
Specific Mitigations:
- Enable “Cartridge Policy” → “Allow Third-Party” (if Dynamic Security disabled)
- Disable “HP Web Services” completely if not using ePrint
- Use HP JetAdvantage Security Manager for fleet-wide policy enforcement
Canon Printers:
Known Issues:
- CVE-2022-26320: Remote code execution via crafted PDF (fixed in 2022.06+ firmware)
- Plaintext password storage in exported configuration files
- Wi-Fi Direct enabled by default (separate attack surface)
Specific Mitigations:
- Never share exported .cfg configuration files
- Disable Wi-Fi Direct: Setup → Network Settings → Wi-Fi Direct → Off
- Enable “Device Signature Verification” (Enterprise models only)
Brother Printers:
Known Issues:
- CVE-2021-34598: NFC tag exposes WPS PIN (fixed in 2021.09+ firmware)
- Default SNMP community string “public” (unchanged on many units)
- Printer web server runs as root (full system access if exploited)
Specific Mitigations:
- Update firmware immediately (NFC vulnerability critical)
- Change SNMP community string: EWS → Network → SNMP → Community Name
- Disable NFC: Printer menu → Network → NFC → Off
Epson Printers:
Known Issues:
- CVE-2019-13389: Buffer overflow in firmware update process (fixed in 2019.10+ firmware)
- Epson Connect uses TLS 1.1 (deprecated, vulnerable to downgrade attacks)
- Weak default admin credentials (epson/epson)
Specific Mitigations:
- Unregister from Epson Connect entirely
- Enable “Administrator Lock” to prevent unauthorized firmware updates
- Disable “External Interface” (USB, SD card) if not needed
Testing Your Security Configuration
External Vulnerability Scan:
Shodan.io:
- Visit shodan.io
- Search:
port:9100 printeror your public IP - Expected result: No results (printer not exposed to internet)
- If printer appears: Firewall misconfigured (review Fix 5)
Nmap Security Scan:
bash
nmap -sV -p- --script vuln 192.168.1.105Expected result:
- Ports 631 (HTTPS), 9100 (if not disabled) open
- All other ports closed
- No vulnerabilities detected
Internal Security Audit:
Test 1: Password Protection
- Open EWS in private/incognito browser
- Attempt to access without login
- Expected: Immediate password prompt
- Fail: Direct access to settings = no password protection
Test 2: Protocol Verification
- Attempt Telnet connection:
telnet 192.168.1.105 23 - Expected: Connection refused or timeout
- Fail: Login prompt appears = Telnet enabled (critical vulnerability)
Test 3: Encryption Verification
- Access EWS via
http://192.168.1.105 - Expected: Redirect to
https://or connection refused - Fail: HTTP access works = unencrypted (high risk)
Test 4: Guest Access Test
- Connect to guest Wi-Fi network (if applicable)
- Attempt to access printer EWS
- Expected: Connection blocked/timeout
- Fail: Access granted = network isolation failure
Focus Keyword
Primary Focus Keyword: “wireless printer security risks”
Supporting LSI Keywords:
- printer security vulnerabilities
- secure wireless printer
- printer network security
- prevent printer hacking
- printer cybersecurity
- wireless printer exploits
- printer security settings
- protect network printer
Printer Firmware Update: Do You Really Need It? Complete Guide Inside Read More.


