

Introduction
Solving printer paper jams is one of the most common yet frustrating challenges every printer owner faces. Whether you’re rushing to print an important document for a meeting or trying to complete a last-minute project, a paper jam can bring your productivity to a grinding halt.
Paper jams occur when sheets of paper get stuck inside your printer’s paper path, preventing normal printing operations. While these mechanical hiccups seem intimidating, most paper jams can be resolved quickly with the right approach and techniques.
Understanding how to properly clear paper jams not only saves you time and money but also prevents potential damage to your printer’s delicate internal mechanisms. With the proper knowledge and careful handling, you can transform this common printer problem from a major headache into a minor inconvenience that you can resolve in just a few minutes.
What Is a Printer Paper Jam?
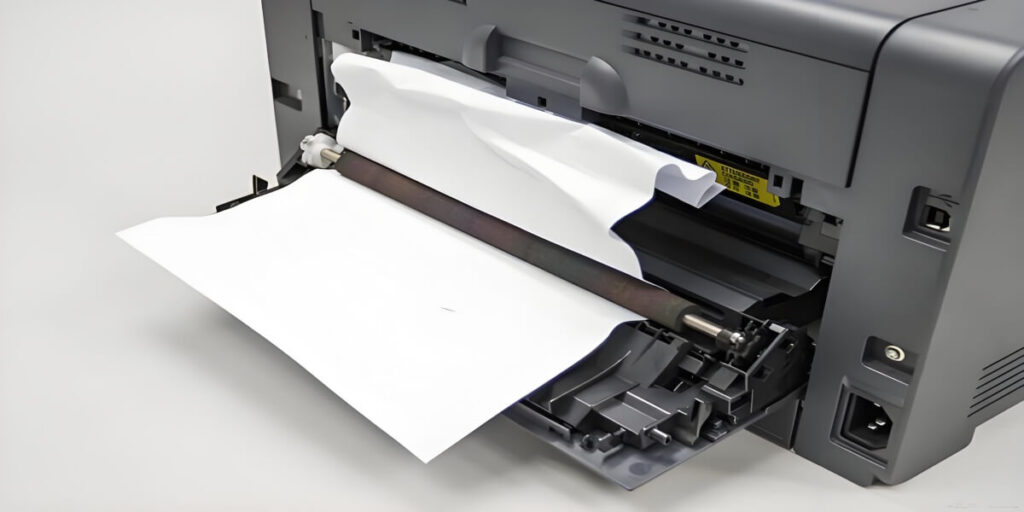
A printer paper jam occurs when paper becomes stuck or trapped within the printer’s internal paper path, preventing the normal flow of documents through the printing mechanism. This mechanical obstruction stops the printer’s operation and typically triggers error messages or warning lights on the printer’s display panel.
Paper jams can happen at various points along the paper’s journey through your printer. Common jam locations include the paper input tray, the printer’s internal rollers, the fuser unit area, or the output tray. Each location presents unique challenges and requires specific removal techniques.
Modern printers use complex systems of rollers, guides, and sensors to move paper through the printing process. When paper becomes misaligned, wrinkled, or torn during this journey, it can disrupt the entire mechanism. The printer’s sensors detect this disruption and halt operations to prevent damage to both the document and the printer itself.
Understanding your specific printer model’s paper path is crucial for effective jam removal. Different printer types—inkjet, laser, or multifunction devices—have varying internal configurations that affect how and where jams typically occur.
8 Essential Steps for Solving Printer Paper Jams
Step 1: Power Off and Unplug Your Printer
Before attempting any paper jam removal, completely power off your printer and unplug it from the electrical outlet. This safety measure prevents accidental activation of moving parts while your hands are inside the printer. Wait at least 10-15 minutes for laser printers to cool down, as internal components can become extremely hot during operation.
Never attempt to clear jams while the printer is powered on, as this can cause serious injury or damage to the printer’s delicate mechanisms.
Step 2: Open All Accessible Printer Compartments
Systematically open every accessible compartment, panel, and tray on your printer. This includes the front cover, rear access panel, paper trays, and any side panels. Most modern printers have multiple access points designed specifically for jam removal.
Take photos of each opened compartment before proceeding, as this will help you remember how to properly close everything once the jam is cleared. Remove any loose paper from all trays to provide better access to jammed areas.
Step 3: Locate the Jammed Paper
Carefully examine all open areas to identify where the paper is stuck. Use a flashlight or your smartphone’s light to illuminate dark areas inside the printer. Look for torn pieces, crumpled paper, or sheets that are only partially visible.
Common jam locations include the paper pickup area, around the drum unit, near the fuser (in laser printers), or in the output path. Don’t assume you’ve found all jammed paper after locating the first piece—multiple sheets may be stuck in different areas.
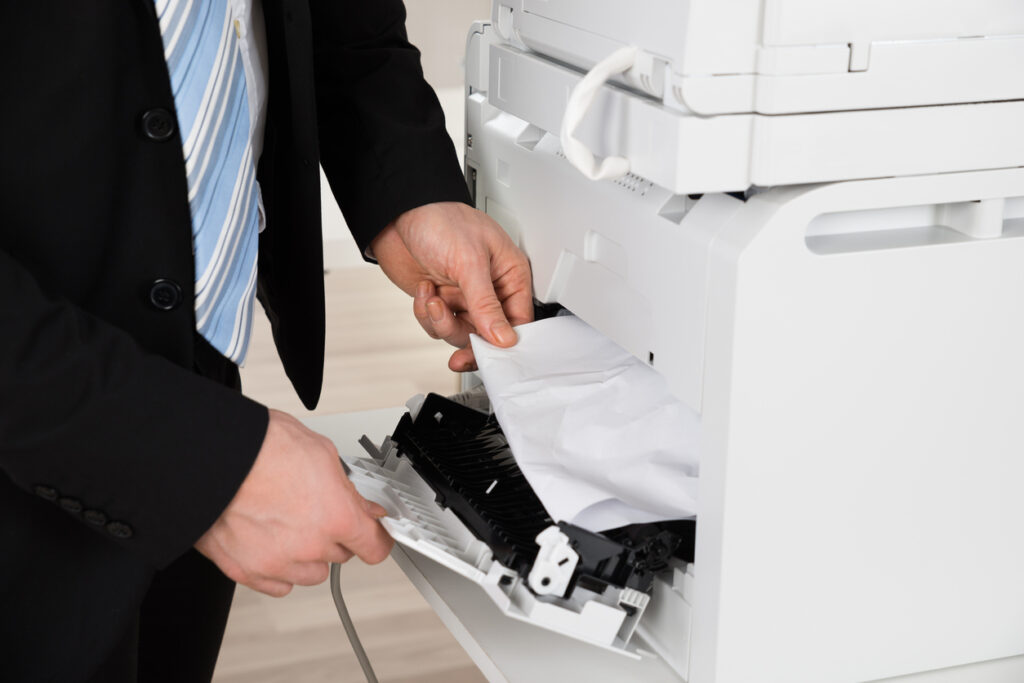
Step 4: Remove Paper Following the Paper Path Direction
When removing jammed paper, always pull in the direction of the normal paper path. For most printers, this means pulling paper forward and out through the front or rear of the printer. Pulling paper backward against its natural path can cause tearing and leave fragments inside the printer.
Grasp the paper firmly with both hands and pull slowly and steadily. If you encounter significant resistance, stop immediately and look for additional obstruction points. Forcing paper removal can damage rollers, guides, or other internal components.
Step 5: Check for Paper Fragments and Debris
After removing the main jammed sheet, thoroughly inspect all accessible areas for small paper fragments, torn pieces, or other debris. Even tiny paper scraps can cause future jams or print quality issues.
Use a lint-free cloth slightly dampened with water to gently clean accessible rollers and paper guides. Remove any dust, paper particles, or ink residue that may have accumulated. Be particularly careful around delicate components like drum units or print heads.
Step 6: Inspect and Adjust Paper Guides
Examine the paper guides in your input tray to ensure they’re properly positioned for your paper size. Misaligned guides are a leading cause of recurring paper jams. The guides should touch the paper edges without bending or creasing the sheets.
Check that you’re using the correct paper size settings in both your printer’s menu and your computer’s print dialog. Mismatched settings can cause the printer to expect different paper dimensions than what’s actually loaded.
Step 7: Reload Paper Properly
When reloading paper, fan the sheets to separate them and prevent static buildup that can cause multiple sheets to feed together. Load only the recommended amount of paper—overfilling trays is a common cause of jams.
Ensure the paper is straight and evenly aligned in the tray. Curved, wrinkled, or damaged paper should be discarded, as these sheets are likely to jam again during printing.
Step 8: Test Print and Monitor Operation
After closing all compartments and reconnecting power, run a test print using a simple document. Monitor the printer closely during the first few print jobs to ensure smooth operation. If jams recur immediately, there may be hidden paper fragments or mechanical issues requiring professional attention.
Check your printer’s display panel for any error messages or warnings that might indicate ongoing problems with the paper path or other systems.

Additional Tools and Insights for Solving Printer Paper Jams
Several tools can make paper jam removal easier and more effective. A small flashlight or LED headlamp provides better visibility inside dark printer compartments. Needle-nose pliers can help grasp small paper fragments in hard-to-reach areas, but use them carefully to avoid damaging delicate components.
Compressed air canisters are excellent for blowing out paper dust and debris from inaccessible areas. However, use short bursts and avoid spraying moisture-sensitive components like circuit boards or laser printer drums.
Keep a printer maintenance kit that includes lint-free cloths, isopropyl alcohol for cleaning rollers, and cotton swabs for detailed cleaning. Regular maintenance significantly reduces paper jam frequency.
Some printer manufacturers provide specialized jam-clearing tools with their devices. These tools are designed specifically for your printer model and can access areas that fingers cannot reach safely.
Consider investing in a printer stand or cart that provides better access to all printer compartments, making future jam removal faster and easier.
Common Mistakes When Solving Printer Paper Jams
One of the most dangerous mistakes is attempting to clear jams while the printer is still powered on. This can result in serious injury from moving parts or damage to the printer’s mechanisms. Always power off and unplug the device first.
Many users make the error of pulling paper backward against the normal paper flow direction. This approach often tears the paper, leaving fragments that are difficult to remove and can cause future jams. Always follow the natural paper path when removing stuck sheets.
Forcing paper removal when encountering resistance is another critical mistake. If paper won’t move easily, there’s likely another obstruction point or the paper is caught on a component. Stop and reassess rather than applying more force.
Ignoring small paper fragments is a recipe for recurring jams. Even tiny pieces can interfere with sensors or cause mechanical problems. Take time to thoroughly inspect and clean all accessible areas after removing the main jammed sheet.
Using inappropriate tools like knives, scissors, or metal objects inside the printer can cause permanent damage to delicate components. Stick to your hands and appropriate cleaning tools designed for printer maintenance.
Finally, many users reload the same damaged or wrinkled paper that caused the original jam. Always inspect paper before reloading and discard any sheets that show signs of damage or wear.
Frequently Asked Questions
Q: Why do paper jams keep happening in my printer? A: Recurring jams often result from using damaged paper, incorrect paper size settings, overfilled trays, or worn printer components. Check your paper quality, verify size settings, and ensure proper tray loading. If problems persist, professional service may be needed.
Q: Can I prevent paper jams from occurring? A: Yes! Use high-quality paper appropriate for your printer, avoid overfilling trays, keep paper stored in dry conditions, regularly clean your printer, and ensure paper guides are properly adjusted for your paper size.
Q: What should I do if paper tears during jam removal? A: Stop immediately and locate all paper fragments before continuing. Use a flashlight to inspect thoroughly, and remove all pieces carefully. Torn paper left inside can cause more severe jams and mechanical problems.
Q: Is it safe to use tools to remove jammed paper? A: Only use appropriate tools like needle-nose pliers for small fragments in accessible areas. Avoid metal objects near electrical components or delicate mechanisms. When in doubt, consult your printer’s manual or contact professional service.
Conclusion
Mastering the art of solving printer paper jams transforms a frustrating experience into a manageable maintenance task. By following proper safety procedures, understanding your printer’s paper path, and using systematic removal techniques, you can quickly resolve most jam situations without damage or professional intervention.
Remember that prevention is always better than cure. Regular maintenance, quality paper, proper loading techniques, and attention to your printer’s condition will significantly reduce jam frequency. When jams do occur, patience and methodical approaches yield the best results.
With these skills and knowledge, you’ll never again feel helpless when facing a paper jam. Instead, you’ll confidently tackle the problem and get back to productive printing in minutes rather than hours.
Why Won’t My Printer Print? Common Causes & Easy Fixes Read More.


Recent Comments