
Introduction
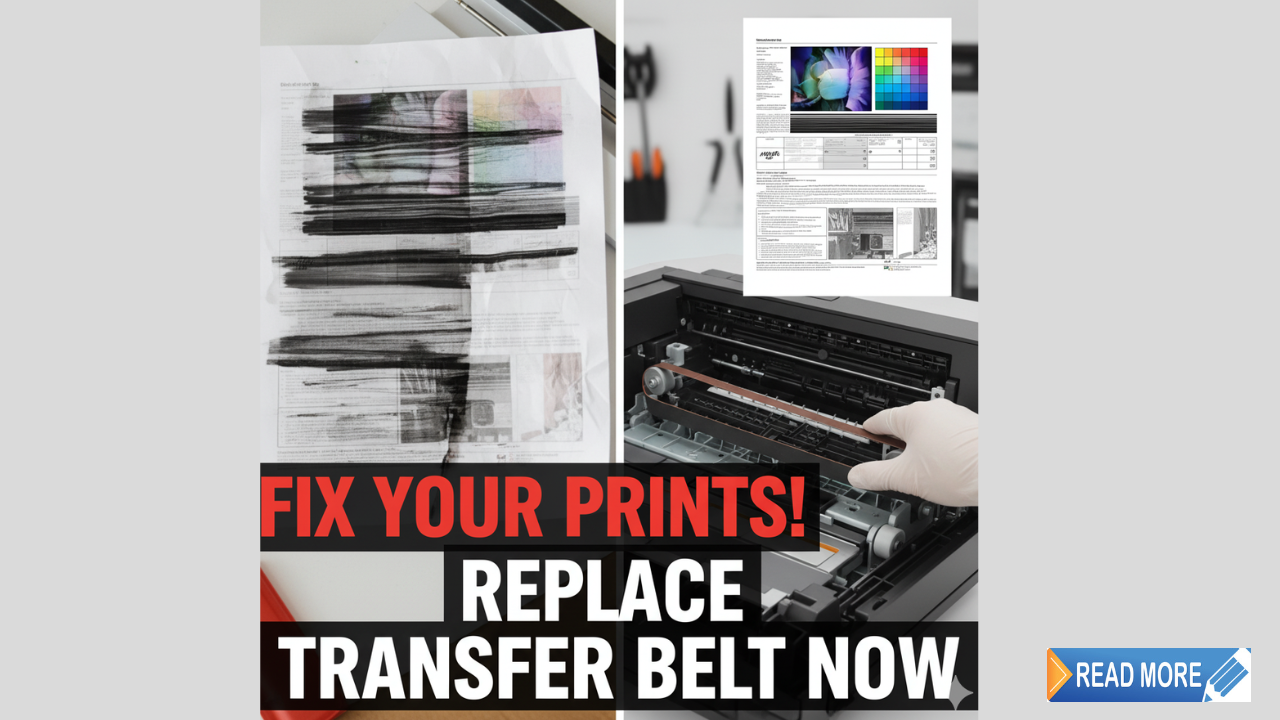
Knowing when to replace transfer belt components saves you from costly print quality disasters and wasted supplies. This critical printer part transfers toner from imaging drums to paper, creating the sharp prints you expect. Many people ignore early warning signs until print quality becomes unacceptable. Understanding transfer belt function and recognizing failure symptoms helps you act before problems escalate. This guide reveals exactly when replacement becomes necessary and how worn belts destroy print quality. You will learn practical tips for extending belt life and avoiding common mistakes that damage this expensive component.
What Is a Transfer Belt and Why Does It Matter?
Understanding Transfer Belt Function
The transfer belt is a loop of flexible material that carries paper through your laser printer’s imaging process. In color printers, it collects toner from four separate drums (cyan, magenta, yellow, and black) before transferring the complete image onto paper in one pass.
Without a properly functioning transfer belt, toner cannot move from drums to paper effectively. This causes incomplete prints, color misalignment, and wasted toner.
Types of Transfer Systems
Intermediate Transfer Belt (ITB): Used in most color laser printers. The belt picks up toner from all drums, then transfers everything to paper at once. This system produces accurate color registration.
Direct Transfer System: Found in some monochrome printers. Paper moves directly past the drum without an intermediate belt. These printers use a simpler transfer roller instead.
Most quality issues related to transfer belts occur in ITB systems because they handle more complex operations.
How Transfer Belts Affect Print Quality
The transfer belt must maintain precise electrical properties to attract toner correctly. It carries a specific charge that pulls toner particles away from drums and holds them until paper arrives. When the belt wears out, its electrical properties change, causing patchy toner transfer and poor print quality.
Surface damage, contamination, or wear creates visible defects in every print. Even minor belt problems multiply across thousands of prints, wasting toner and paper.
7 Clear Signs You Need to Replace Transfer Belt Components
1. Repeating Marks at Regular Intervals
What You See: Spots, lines, or smudges appearing at exactly the same distance apart on multiple pages. The spacing matches your transfer belt circumference.
Why It Happens: Physical damage, embedded debris, or coating wear creates consistent defects. Each belt rotation transfers the problem to your paper.
What to Do: Measure the distance between defects. If it matches your belt size (check your printer manual), the belt needs replacement. Clean the belt first, but persistent marks indicate permanent damage.
2. Color Registration Problems
What You See: Colors appear misaligned, creating blurry edges or rainbow-like halos around text and images. Colors do not line up properly.
Why It Happens: Belt stretching, tracking issues, or worn drive mechanisms prevent accurate positioning. Each color drum must place toner in exactly the right spot on the belt.
What to Do: Run your printer’s alignment test. If alignment fails repeatedly or colors shift constantly, replace the transfer belt. This problem rarely improves without replacement.
3. Light or Faded Prints Across All Colors
What You See: Entire pages appear washed out or faded, even with full toner cartridges. The problem affects all colors equally.
Why It Happens: Worn belts lose their ability to attract and hold toner. The electrical charge weakens, allowing toner to fall off before reaching paper.
What to Do: Replace toner cartridges first to eliminate that possibility. If fading continues with new toner, the transfer belt has reached end of life. Check your page counter against manufacturer specifications.
4. Background Scatter or Ghosting
What You See: Light toner dust covering areas that should be white. Previous images leave faint “ghosts” on subsequent pages.
Why It Happens: Contaminated or worn belts cannot cleanly release toner to paper. Residual toner clings to the belt, contaminating later prints.
What to Do: Clean the belt thoroughly with approved materials. If ghosting persists, the belt surface has degraded beyond cleaning. Replacement becomes necessary.
5. Blank Spots or Missing Image Areas
What You See: Random white areas where toner should appear. The problem occurs inconsistently across different page areas.
Why It Happens: Belt surface damage prevents toner adhesion in specific spots. Contamination or coating breakdown creates dead zones that reject toner.
What to Do: Inspect the belt for visible damage, scratches, or contamination. Any physical damage requires immediate replacement to prevent further print quality degradation.
6. Increased Paper Jams
What You See: Paper jams becoming more frequent, especially around the transfer area. Paper might wrinkle or crease during printing.
Why It Happens: Worn belts lose tension or tracking accuracy. The belt may slip, wobble, or catch paper edges incorrectly.
What to Do: Check belt tension and tracking guides. If mechanical adjustments do not help, worn belt material causes the problem. Replace before jam damage affects other components.
7. Error Messages or Warning Lights
What You See: Your printer displays “Replace Transfer Belt,” “Transfer Unit Low,” or similar messages. Some printers show warning lights or codes.
Why It Happens: Modern printers track belt usage by page count. They estimate remaining life based on manufacturer specifications and actual usage patterns.
What to Do: Take these warnings seriously. Manufacturers program them conservatively, but ignoring them risks print quality and possible damage to other components. Plan replacement soon.
Step-by-Step Guide to Replace Transfer Belt Components
Before You Begin
Power off your printer completely and unplug it. Wait 30 minutes for internal components to cool down. The fuser area stays extremely hot and can cause serious burns.
Gather your new transfer belt, clean gloves, and your printer manual. Work in a clean, well-lit area with enough space to set aside removed components safely.
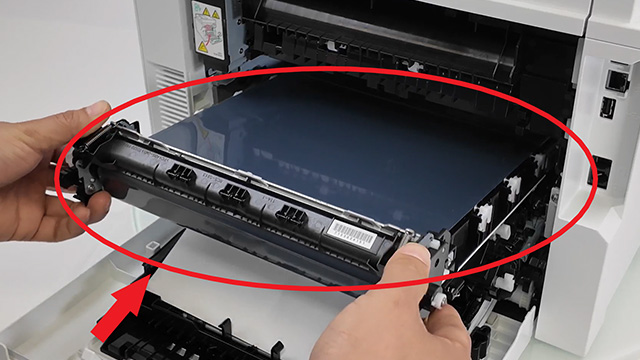
Step 1: Locate the Transfer Belt Assembly
Open your printer according to the manual instructions. In most color laser printers, you will remove the toner cartridges and drum units first. The transfer belt sits beneath these components.
Some printers have side access panels. Others require front access. Never force panels open. Consult your specific model’s documentation.
Step 2: Remove the Old Belt
Release the belt locking mechanism. Most use simple clips or levers that snap open. Lift the belt assembly straight up and out of the printer.
Handle the old belt carefully to avoid spreading toner dust. Place it immediately into a plastic bag for disposal.
Step 3: Clean the Transfer Area
Use a lint-free cloth to gently clean any toner residue from the transfer area. Do not use solvents or wet cleaners unless your manual specifically recommends them.
Check for any debris, paper scraps, or accumulated dust. Remove everything before installing the new belt.
Step 4: Install the New Belt
Remove the new belt from its protective packaging. Avoid touching the belt surface with bare hands. Skin oils damage the coating and cause print defects.
Align the belt according to the arrows or marks on the assembly. Lower it into position until you hear locking clips engage.
Step 5: Reinstall Drums and Cartridges
Replace drum units and toner cartridges in their correct positions. Ensure each component clicks firmly into place. Loose components cause immediate print quality problems.
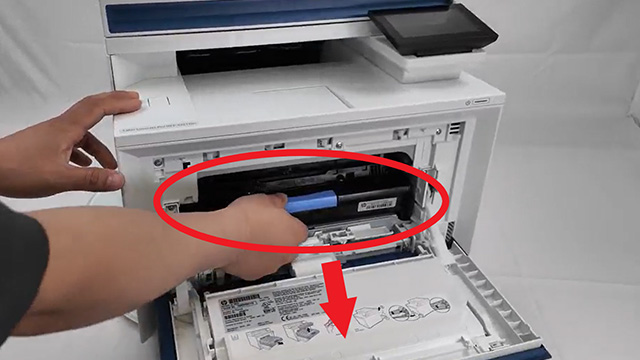
Step 6: Reset the Page Counter
This step is critical. Access your printer’s service menu and reset the transfer belt page counter. The process varies by manufacturer. Without resetting, you will continue seeing replacement warnings.
Step 7: Run Test Prints
Print several test pages to verify proper installation. Check alignment, color accuracy, and overall quality. Run your printer’s built-in diagnostic tests.
If problems appear immediately, recheck installation. Ensure all components seated correctly and nothing obstructs the belt path.
Useful Tools and Resources for Maintenance

Printer Maintenance Software
Most printer manufacturers offer free diagnostic software. HP Print and Scan Doctor, Epson Printer Utility, and Brother iPrint&Scan help troubleshoot issues before you spend money on parts. These tools identify problems accurately and suggest solutions.
Page Counter Tracking Apps
Track your printer page count using simple apps or spreadsheets. Note when you install new components and set reminders for expected replacement times. Proactive replacement prevents quality disasters.
Online Video Tutorials
Search for your specific printer model on YouTube. Many users and service technicians post detailed replacement videos. Watching someone perform the process on your exact model boosts confidence and reveals model-specific tricks.
Manufacturer Support Resources
Visit your printer manufacturer’s website for official replacement guides, part numbers, and specifications. Sites like HP Support provide comprehensive documentation and community forums where you can ask questions.
Common Mistakes That Damage Transfer Belts

Ignoring Page Count Recommendations
Manufacturers specify transfer belt lifespan in pages, typically 50,000 to 200,000 depending on the model. Ignoring these numbers and waiting for complete failure risks damage to drums, fusers, and other expensive components.
Check your page count regularly. Plan replacement when you reach 80% of rated capacity rather than waiting until the belt fails completely.
Using Wrong Paper Types
Heavy cardstock, labels, and textured papers wear transfer belts faster than standard copy paper. Excessive use of specialty media shortens belt life significantly.
If you frequently print on heavy or textured media, expect to replace transfer belt components more often than the manufacturer’s standard estimates suggest.
Touching Belt Surface During Installation
Fingerprints and skin oils contaminate the belt surface, creating permanent print defects. Always wear clean gloves when handling new transfer belts.
If you accidentally touch the surface, gently clean it with isopropyl alcohol on a lint-free cloth. Let it dry completely before installation.
Mixing New and Old Components
Installing a new transfer belt while keeping old, worn drums creates immediate problems. Worn drums damage new belts and prevent proper toner transfer.
Replace transfer belts and imaging drums together when possible. This ensures compatible wear levels and optimal print quality.
Skipping the Reset Procedure
Failing to reset the page counter after installation keeps your printer in “replace soon” mode. Constant warnings become annoying, and tracking remaining belt life becomes impossible.
Always complete the reset procedure. It takes only minutes and ensures accurate monitoring of your new belt’s condition.
Using Cheap Compatible Parts
Off-brand transfer belts cost less but rarely match OEM quality. Poor materials wear faster, transfer toner inconsistently, and may damage other printer components.
OEM parts cost more upfront but deliver better print quality and longer life. Calculate total cost including wasted prints and potential repair needs before choosing compatible parts.
Frequently Asked Questions
Q: How often should I replace transfer belt components?
Most transfer belts last 50,000 to 150,000 pages depending on your printer model and usage patterns. Check your printer manual for exact specifications. Heavy use of color printing or specialty papers shortens belt life. Monitor your page counter and plan replacement at 80% of rated capacity.
Q: Can I clean my transfer belt instead of replacing it?
Gentle cleaning helps remove surface contamination and may temporarily improve print quality. Use a soft, lint-free cloth and isopropyl alcohol if your manual allows it. However, cleaning cannot fix worn coatings, stretching, or physical damage. Clean first, but prepare to replace if problems continue.
Q: Will a worn transfer belt damage my printer?
A failing transfer belt wastes toner, damages drums through excessive friction, and may cause paper jams that stress mechanical components. While it will not immediately destroy your printer, continuing to use a worn belt accelerates wear on other expensive parts. Replace promptly when you notice quality degradation.
Q: How much does transfer belt replacement cost?
OEM transfer belts cost $100 to $400 depending on your printer model. Compatible third-party belts run $50 to $200. Professional installation adds $50 to $150 to these costs, though most users can perform replacement themselves. Factor replacement into your printer’s total cost of ownership.
Conclusion
Knowing when to replace transfer belt components protects your print quality and prevents expensive secondary damage. Watch for repeating defects, color registration problems, and fading that indicate belt wear. Most belts need replacement every 50,000 to 150,000 pages depending on usage and printer model. Regular monitoring, proper maintenance, and timely replacement keep your printer producing excellent results. Do not wait for complete failure before taking action. Early replacement at the first signs of degradation saves money on wasted supplies and protects other printer components. Follow manufacturer guidelines, avoid common mistakes, and invest in quality parts. Your printer will reward you with years of reliable, high-quality output that meets your expectations every time.
Inkjet vs Laser Printer Cost: The Hidden Truth Revealed Read More


