
Introduction
Dealing with a printer that just won’t cooperate? You’re not alone. One of the most frustrating printer problems is knowing whether you need to replace printhead components or if simple maintenance will fix the issue. Here’s the thing – printheads are expensive, and replacing one unnecessarily can cost you hundreds of dollars.
But ignoring a genuinely failing printhead? That leads to wasted ink, ruined prints, and endless frustration. The good news is there are clear diagnostic signs that tell you exactly when it’s time to replace printhead parts. In this comprehensive guide, I’ll walk you through every symptom, test, and troubleshooting step so you can make an informed decision. Whether you’re dealing with an HP, Canon, Epson, or any other brand, these diagnostic methods will help you determine if replacement is truly necessary or if cleaning and maintenance can solve your problem.
What Is a Printhead and Why Does It Fail?
A printhead is the component in your printer that actually transfers ink onto paper. It contains microscopic nozzles – sometimes hundreds or thousands of them – that spray tiny droplets of ink in precise patterns to create your prints.
Think of it like a tiny sprinkler system. Each nozzle needs to fire at exactly the right moment with exactly the right amount of ink. When printheads work properly, you get crisp text and vibrant images. When they fail, you get streaks, missing colors, or nothing at all.
Printheads fail for several reasons. Dried ink is the most common culprit. If you don’t print regularly, ink sits in those microscopic nozzles and hardens. Over time, this blockage becomes impossible to clean. Other failures come from physical damage, electrical issues, or simply age and wear.
Built-In vs. Replaceable Printheads
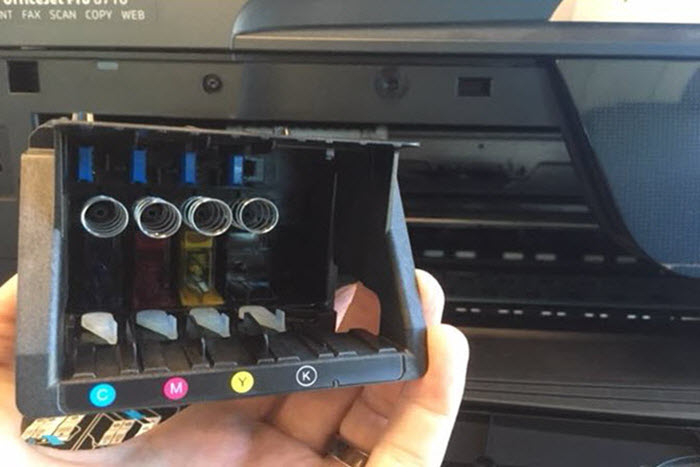
Some printers have printheads built into the ink cartridges. Every time you replace the cartridge, you get a fresh printhead. This design is common in entry-level HP and Canon models. Other printers have separate, permanent printheads designed to last the printer’s lifetime.
The permanent printhead design is typically found in higher-end and commercial printers. These printheads are more durable but also more expensive to replace when they do fail. Knowing which type you have matters because it affects both your diagnosis and replacement options.
7 Clear Signs You Need to Replace Printhead Components
Let me break down the definitive symptoms that indicate you need to replace printhead parts. These signs appear after you’ve already tried standard cleaning procedures.
1. Persistent Lines or Streaks After Multiple Cleanings
You run the cleaning cycle three, four, even five times. The test print still shows consistent lines or streaks in the same locations. This is your first major warning sign.
Normal clogging responds to cleaning cycles. Stubborn lines that won’t disappear suggest permanent nozzle damage or blockage that cleaning can’t fix. If you’re seeing the same pattern repeatedly after deep cleaning, the printhead likely needs replacement.
2. Completely Missing Colors That Won’t Return
One color simply refuses to print. You’ve replaced the ink cartridge, run cleaning cycles, and tried everything. Still nothing. This often indicates dead nozzles in that color section.
A single missing color after exhaustive troubleshooting strongly suggests you need to replace printhead components for that color group. Some printers let you replace individual color sections, while others require full printhead replacement.
3. Excessive Ink Consumption Without Quality Improvement
Your printer is burning through ink cartridges at an alarming rate, but print quality keeps getting worse. This happens when a failing printhead requires multiple passes to achieve acceptable results.
The printer tries compensating for clogged or misfiring nozzles by using more ink and printing slower. If you’re replacing cartridges weekly when they used to last months, and quality still suffers, the printhead is likely failing.
4. Horizontal Banding Across All Prints
Consistent horizontal bands or stripes appear across every print, regardless of what you’re printing. These bands maintain the same spacing and appearance even after cleaning.
This pattern suggests printhead alignment issues or mechanical failure within the printhead assembly. While you can try alignment calibration, persistent banding after calibration usually means you need to replace printhead parts.
5. Ink Spraying or Pooling on Paper
Your prints show random ink splatters, pooling, or bleeding that shouldn’t be there. The printhead might be spraying ink incorrectly or leaking from damaged nozzles.
Physical damage to the printhead causes erratic ink delivery. This can’t be cleaned away – damaged nozzles stay damaged. If cleaning makes the problem worse or doesn’t change it at all, replacement becomes necessary.
6. Error Messages Specifically Mentioning Printhead
Your printer displays error codes or messages directly referencing the printhead. Common messages include “Printhead Error,” “Printhead Missing,” or “Printhead Failure.”
Modern printers have sensors that detect printhead problems. When you see these specific errors after reseating the printhead and cleaning contacts, the printer is telling you directly that you need to replace printhead components.
7. Age and Print Volume Have Exceeded Specifications
Every printhead has a rated lifespan measured in pages printed. High-volume printers might rate printheads for 50,000-100,000 pages. If you’ve exceeded this and quality is declining, age is the culprit.
Check your printer’s page count (usually in settings or maintenance menus) and compare it to manufacturer specifications. Beyond rated life, even well-maintained printheads degrade and eventually need replacement.
How to Properly Diagnose Before You Replace Printhead Parts
Before spending money on a new printhead, run through this systematic diagnosis. You might solve the issue without replacement.
Step 1: Run a Nozzle Check Pattern
Every printer has a nozzle check function in its maintenance settings. Print this pattern to see exactly which nozzles are firing and which aren’t.
A good nozzle check shows complete, solid lines for each color. Missing segments, gaps, or faded areas indicate problems. Save this print – you’ll want to compare it after each cleaning attempt.
Step 2: Perform Multiple Deep Cleaning Cycles
Standard cleaning cycles use less ink and are less aggressive. Deep cleaning cycles use more ink but clean more thoroughly. Run two to three deep cleaning cycles, waiting 5-10 minutes between each.
Print a nozzle check after each cycle. If you see improvement – even slight improvement – continue. No improvement at all after three deep cleans suggests you might need to replace printhead components.
Step 3: Manual Printhead Cleaning
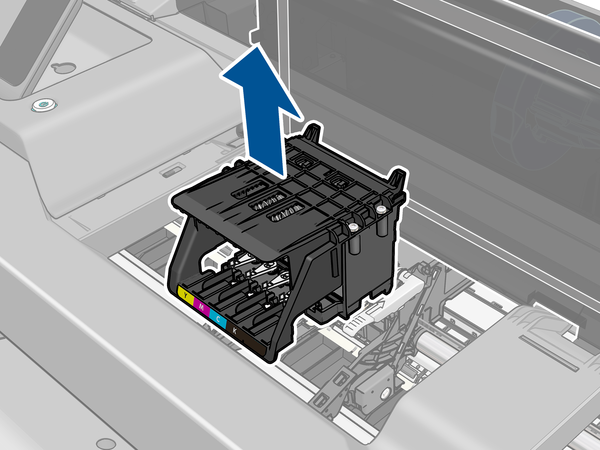
If automated cleaning fails, try manual cleaning. This involves removing the printhead and gently cleaning it with distilled water or specialized cleaning solution.
Warning: Only do this if your printer allows printhead removal. Consult your manual. Use distilled water, lint-free cloths, and extreme gentleness. Let it dry completely before reinstalling – at least 8 hours.
Step 4: Check and Clean Electrical Contacts
Sometimes connection issues masquerade as printhead failures. Remove the printhead and examine the electrical contacts – both on the printhead and in the printer.
Clean contacts with isopropyl alcohol on a cotton swab. Look for corrosion, damage, or bent pins. Damaged contacts might mean you need to replace printhead units or have the printer serviced.
Step 5: Test With New Genuine Ink Cartridges
Occasionally, bad ink cartridges cause symptoms that look like printhead failure. If you’re using third-party or refilled cartridges, test with genuine manufacturer cartridges.
This is especially important if problems started after changing cartridges. Incompatible ink can damage printheads, but ruling out the cartridge as the cause is important before deciding to replace printhead parts.
Additional Tools and Resources for Printhead Diagnosis

Several tools can help you make better diagnostic decisions before you replace printhead components unnecessarily.
Manufacturer diagnostic software often provides more detailed information than the printer’s built-in menus. HP Print and Scan Doctor, Epson Print Head Alignment, Canon IJ Printer Assistant Tool – these free utilities offer advanced diagnostics.
Third-party printhead cleaning solutions work better than distilled water for stubborn clogs. Products designed specifically for printer maintenance can sometimes revive printheads you thought were dead. Try these before replacement.
Ultrasonic cleaners represent a last-resort option before replacement. These devices use high-frequency sound waves to break up dried ink. Success rates vary, but they’ve saved printheads that standard cleaning couldn’t fix. You can find affordable ultrasonic cleaners online specifically designed for printheads.
Community forums and manufacturer support provide model-specific guidance. Search your printer model plus “printhead problems” to find others with identical issues. Sometimes you’ll discover known issues, recalls, or proven fixes that could save you from having to replace printhead parts.
For detailed troubleshooting specific to your printer brand, check the official HP support website which offers comprehensive guides for printhead maintenance and diagnosis.
Common Mistakes That Make You Think You Need to Replace Printhead
Many people decide to replace printhead components prematurely. Avoid these common diagnostic mistakes that lead to unnecessary replacements.
Mistake 1: Not waiting long enough between cleanings. Running five cleaning cycles back-to-back doesn’t work better than spacing them out. Ink needs time to soften and dissolve. Wait 5-10 minutes minimum between cycles. For severe clogs, wait several hours or overnight.
Mistake 2: Using tap water for manual cleaning. Minerals in tap water leave deposits that make clogs worse. Always use distilled water. It costs $1 per gallon and prevents additional damage.
Mistake 3: Assuming third-party printheads work the same. Cheap replacement printheads from unknown manufacturers often fail quickly or don’t work properly. If you must replace printhead parts, buying genuine manufacturer components costs more upfront but saves money long-term.
Mistake 4: Not checking the printhead warranty. Some manufacturer printheads have separate warranties from the printer itself. You might get free replacement if the printhead fails within the warranty period. Always check before buying.
Mistake 5: Cleaning too aggressively. Scrubbing, using harsh chemicals, or applying too much pressure damages delicate nozzles permanently. Gentle is the keyword. If gentle cleaning doesn’t work, aggressive cleaning won’t magically fix it.
The Real Cost: When Replacement Makes Financial Sense

Sometimes the decision to replace printhead parts isn’t about whether it’s broken, but whether it’s economically sensible.
Compare printhead cost to printer cost. If a replacement printhead costs $150 and your printer originally cost $200, buying a new printer makes more sense. Manufacturers know this and price accordingly.
Factor in your time and frustration. Hours spent troubleshooting, cleaning, and fighting with a failing printer have value. Sometimes paying for replacement or a new printer is worth the time savings alone.
Consider long-term reliability. An old printer with a failing printhead might soon develop other problems. If the printer is 5+ years old and heavily used, replacement might just delay the inevitable.
Professional service vs. DIY replacement. Some printheads require professional installation and calibration. Service costs sometimes exceed DIY replacement printhead expenses, but professionals get it right the first time.
Frequently Asked Questions
How much does it cost to replace printhead components?
Replacement printheads range from $30 for basic models to $300+ for professional printers. Canon and HP entry-level printheads cost $40-80. Epson photo printer printheads run $80-150. Commercial printer printheads can exceed $400. Always check pricing before deciding – sometimes a new printer costs less.
Can I replace printhead parts myself?
For most consumer printers, yes. Printhead replacement typically involves removing old cartridges, lifting out the old printhead, installing the new one, and running alignment. Check your printer manual for specific instructions. Some commercial printers require professional service. DIY replacement usually takes 15-30 minutes.
How long do printheads typically last?
Consumer printer printheads last 1-3 years with regular use. Commercial printheads rated for 50,000-100,000 pages might last 5+ years. The biggest factor is usage frequency. Printers used weekly last longer than printers used monthly because ink doesn’t dry out. Proper maintenance extends lifespan significantly.
Will using third-party ink damage my printhead?
It can. Third-party inks vary widely in quality. Good third-party inks work fine. Poor quality inks contain impurities, wrong viscosity, or ingredients that clog nozzles or corrode components. If using third-party ink, research thoroughly and stick to reputable brands. Damage from third-party ink usually voids manufacturer warranties.
What’s the difference between printhead cleaning and replacement?
Cleaning removes dried ink and debris from nozzles using cleaning solution and pressure. It works for clogs and maintenance. Replacement means installing a completely new printhead because cleaning can’t fix physical damage, dead nozzles, or electronic failures. Try cleaning first – it’s free. Replace printhead parts only when cleaning fails repeatedly.
Conclusion: Making the Right Decision About Printhead Replacement
Deciding whether to replace printhead components doesn’t need to be guesswork. The symptoms are clear, the diagnostic steps are straightforward, and the decision criteria are logical.
Start with proper diagnosis. Run nozzle checks, try cleaning cycles, and rule out simpler problems like bad cartridges or dirty contacts. Give cleaning a fair chance – multiple attempts over several hours or days. Document your results so you can see if there’s any improvement at all.
If cleaning fails repeatedly and symptoms match the clear warning signs, replacement becomes necessary. But before spending money, compare replacement cost to a new printer. Sometimes upgrading makes more financial sense than repairing an old printer.
The bottom line? Don’t replace printhead parts on a guess. Use systematic diagnosis. Try all reasonable fixes first. When evidence clearly points to printhead failure and economics support replacement, then pull the trigger confidently. Your wallet and your printing needs will thank you for making an informed decision rather than an emotional one.
Still experiencing print quality issues? Save this guide and work through each diagnostic step methodically. Most printhead problems have solutions that don’t require replacement if you approach them systematically.
Which Print Quality Setting Saves the Most Ink? Shocking Data-Driven Results Read More


