
Introduction
Printer duplexing lets you print on both sides of the paper automatically. This feature saves money, reduces waste, and makes your documents look professional.
But many people struggle with duplex settings. Pages come out backward, the printer jams, or the option doesn’t appear at all. You end up wasting time and paper trying to figure it out.
This guide shows you everything about printer duplexing. You’ll learn how it works, how to set it up, and how to fix common problems. Whether you have a home printer or office equipment, these tips will help you master double-sided printing.
By the end, you’ll print double-sided documents without any hassle. You’ll save paper, cut costs, and create better-looking prints every time.
What Is Printer Duplexing?
Printer duplexing means printing on both sides of a sheet of paper. Instead of using two pages for two sides of content, you use just one page.
There are two main types of duplexing:
Automatic duplexing happens when your printer flips the paper by itself. You click print, and the printer handles everything. The paper goes through once, flips inside the machine, and prints the other side. No manual work needed.
Manual duplexing requires you to flip the pages yourself. The printer prints one side first, then pauses. You take the printed pages, flip them over, put them back in the tray, and print the second side. This takes more effort but works on any printer.
Most modern printers support some form of duplexing. High-end models have automatic duplex units built in. Budget printers usually require manual duplexing. Check your printer’s manual or specifications to see what yours supports.
Duplexing works best for documents like reports, manuals, booklets, and presentations. It cuts paper use in half, which saves money and helps the environment. Professional documents often look better when printed double-sided too.
8 Steps to Enable and Use Printer Duplexing
1. Check If Your Printer Supports Duplexing
Not all printers can print double-sided. Find out what your printer can do before changing settings.
Look at your printer’s control panel. Many printers show duplex options right on the display screen. If you see “2-Sided,” “Duplex,” or similar words, your printer supports it.
Check the printer manual that came in the box. Look for specifications or features sections. They’ll tell you if automatic or manual duplexing is available.
Visit your printer manufacturer’s website. Search for your exact printer model. The specifications page lists all features, including duplex printing capabilities. Sites like HP Support, Canon, Epson, and Brother have detailed product information.
If your printer doesn’t support automatic duplexing, don’t worry. You can still use manual duplexing with any printer. The steps just take a bit more time.
2. Install the Correct Printer Drivers
Your computer needs the right drivers to access printer duplexing features. Outdated or generic drivers might hide duplex options.
Go to your printer manufacturer’s website. Download the latest driver for your specific model and operating system. Generic Windows drivers often lack advanced features.
Run the driver installer. Follow all prompts carefully. Choose “Custom Installation” if available. This installs all features including duplex support.
Restart your computer after installation. This ensures all driver components load properly. New duplex settings should appear in your print dialog box now.
If you already have drivers, update them. Old drivers cause compatibility issues. New versions fix bugs and add missing features like printer duplexing controls.
3. Access Duplex Settings in Windows
Windows puts duplex settings in the print dialog box. Here’s how to find them for any program.
Open your document in any application. Click File, then Print. Or press Ctrl + P.
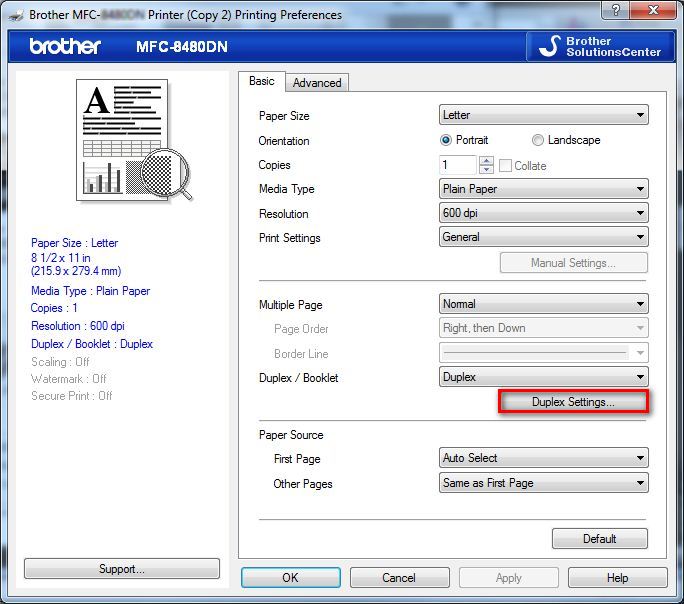
Look for “Printer Properties” or “Preferences” button. Click it to open advanced settings. This is where printer duplexing options live.
Find the section labeled “Layout,” “Finishing,” or “2-Sided Printing.” Different printer brands use different names. Look for anything mentioning sides or duplex.
You’ll see options like:
- Print on one side
- Print on both sides (flip on long edge)
- Print on both sides (flip on short edge)
Long edge flip works for portrait documents. Pages flip like a book. Short edge flip suits landscape documents. Pages flip like a notepad.
Select your preferred option. Click OK to save settings. Now print your document.
4. Configure Duplex Printing on Mac
Mac computers handle printer duplexing slightly differently than Windows.
Open your document and click File, then Print. Or press Command + P.
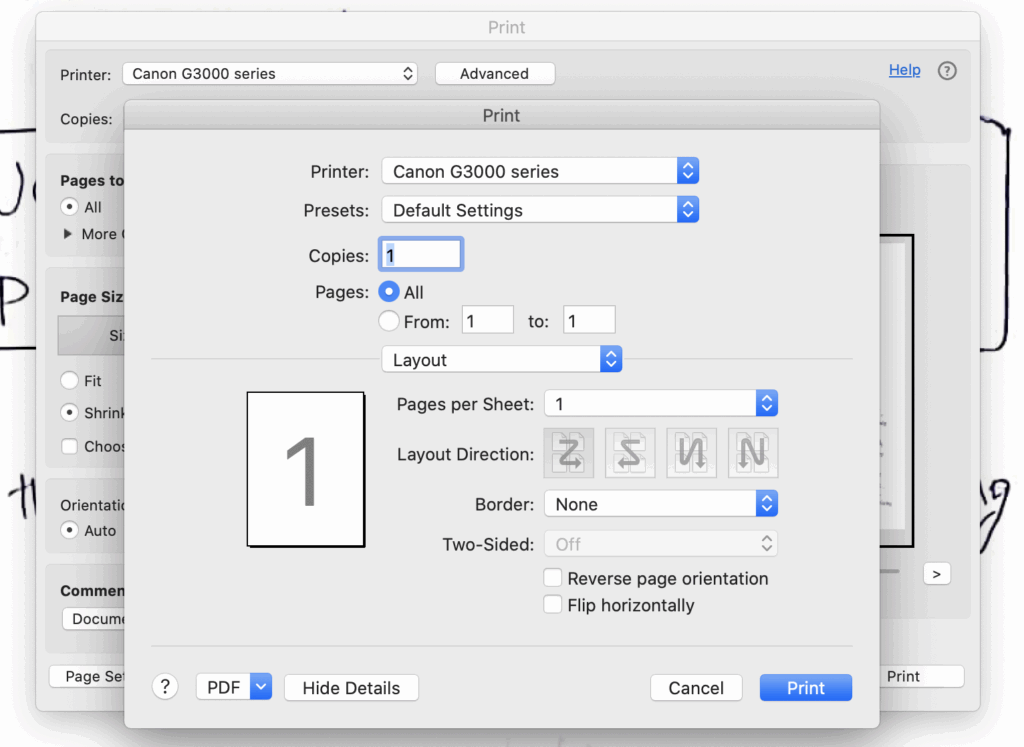
Look for a dropdown menu that says “Copies & Pages” or similar. Click it to see more options.
Select “Layout” from the dropdown menu. This reveals duplex settings.
Find “Two-Sided” or “Duplex” checkbox. Check this box to enable double-sided printing.
Choose binding direction:
- Long-Edge binding for portrait pages
- Short-Edge binding for landscape pages
Click Print to start your duplex print job. Mac remembers your settings for future prints in most cases.
Some Mac applications hide these options. Click “Show Details” at the bottom of the print dialog to expand all settings.
5. Set Duplexing as Your Default
Changing settings every time you print wastes time. Make printer duplexing your default to save effort.
For Windows:
- Open Settings
- Go to Devices, then Printers & Scanners
- Click your printer name
- Click “Manage”
- Click “Printing Preferences”
- Enable two-sided printing
- Click Apply and OK
For Mac:
- Open System Preferences
- Click Printers & Scanners
- Select your printer
- Click “Options & Supplies”
- Go to the “Options” or “Driver” tab
- Set Duplex Unit to “Installed” or “Enabled”
- Close the window
Now every document prints double-sided automatically unless you change it. You can still switch back to single-sided for specific documents.
6. Use Manual Duplexing for Non-Automatic Printers
If your printer lacks automatic duplexing, you can still print on both sides manually.
First, print odd pages:
- Open print dialog
- Look for “Print” or “Pages” section
- Select “Odd pages only”
- Click Print
- Let all odd pages finish printing
Then flip and print even pages:
- Take the printed stack from the output tray
- Keep pages in order
- Flip the entire stack over
- Put them back in the paper tray
- Return to print dialog
- Select “Even pages only”
- Click Print
The tricky part is figuring out which way to flip pages. This depends on your printer model. Most printers need pages face-down with the top edge going in first.
Print a test with just 2 pages first. This helps you learn the correct flipping method for your printer. Write down the steps for next time.
7. Adjust Duplex Settings for Different Paper Types
Different paper needs different duplex settings. Thick paper requires special attention when using printer duplexing.
For regular paper (20-24 lb): Standard settings work fine. No adjustments needed.
For cardstock or thick paper (65+ lb):
- Slow down print speed in settings
- Allow longer drying time between sides
- Use manual duplexing instead of automatic
- Check if your printer supports thick paper duplex
For thin paper (less than 20 lb):
- Be careful with ink saturation
- Reduce print quality slightly
- Manual duplexing works better than automatic
Access paper type settings in Printer Properties. Look under “Paper/Quality” or “Media” tabs. Select your paper type from the list. This optimizes printer duplexing for that material.
8. Test Your Duplex Settings
Always test printer duplexing before printing important documents.
Create a simple two-page test document. Number each page clearly. Page 1 should say “Front – Page 1” and Page 2 should say “Back – Page 2.”
Print this test document using your duplex settings. Check the results:
- Does page 2 appear on the back of page 1?
- Is page 2 right-side up?
- Are margins aligned correctly?
- Did the printer jam?
If something’s wrong, try the other flip option (long edge vs short edge). Test again until it works perfectly.
Save these settings as a preset if your printer software allows it. Name it something clear like “Duplex Reports” or “2-Sided Docs.”
Advanced Duplexing Features and Tools
Modern printer software includes helpful tools for complex duplex jobs.
Booklet printing creates folded booklets from regular pages. Your printer rearranges pages automatically. When you fold the stack, pages appear in the correct order. Look for “Booklet” in the Layout settings.
N-up printing puts multiple pages on each side. You can print 2, 4, or more pages per sheet. Combined with duplexing, you can fit 4+ pages on one sheet of paper. Find this under “Pages per sheet” or “Multiple pages” options.
Binding offset adds extra margin space for hole punching or binding. Enable this when creating bound documents. The printer shifts content slightly away from the binding edge. Look for “Gutter” or “Binding offset” in page setup.
Print preview shows exactly how pages will look before printing. Always use preview for duplex jobs. It catches layout problems before you waste paper. Most programs show this preview automatically when you click Print.
Third-party software like FinePrint or PrinterShare adds extra duplex controls. These programs sit between your document and printer. They offer more layout options than standard drivers provide.
Common Duplexing Mistakes to Avoid
Many people make the same errors when learning printer duplexing. Here’s how to avoid them.
Choosing the wrong binding edge causes upside-down pages. Long edge works for portrait pages that flip like a book. Short edge works for landscape pages that flip like a calendar. Use print preview to check before printing many pages.
Forgetting to adjust margins creates cut-off text. Single-sided documents use all margins equally. Double-sided documents need extra space on binding edges. Add 0.25 to 0.5 inches to the inside margin before printing.
Using the wrong paper tray confuses the printer. Some printers require specific trays for duplex printing. Check your printer manual. Load paper in the correct tray for printer duplexing to work properly.
Overloading the paper tray causes jams. Duplex printing pulls paper through twice. This stresses the paper feeding mechanism. Load only 50-75% of tray capacity for duplex jobs.
Ignoring paper quality leads to show-through. Thin or low-quality paper shows ink from the other side. Use at least 20 lb paper for duplex printing. Heavier paper prevents this problem.
Not testing first wastes paper and ink. Every printer handles duplexing differently. Always print a 2-page test before printing 50-page documents. This saves you from reprinting everything.
Troubleshooting Printer Duplexing Problems
Even with correct settings, problems can happen. Here’s how to fix common issues.
Duplex option is grayed out or missing: Update your printer drivers first. Download the latest version from the manufacturer’s website. If still missing, your printer might not support automatic duplexing. Use manual duplexing instead.
Pages print on one side only: Check that duplex mode is actually enabled in print settings. Don’t just rely on default settings. Verify before each big print job. Also make sure the duplex unit inside your printer is installed and functioning.
Paper jams during duplex printing: Paper might be too thick or too thin for automatic duplexing. Try different paper. Clean your printer rollers with a lint-free cloth. Remove any stuck paper pieces from inside the printer. Reduce the number of pages you print at once.
Pages come out backward or upside down: You selected the wrong binding edge. Switch between long-edge and short-edge binding. Print a test page to find which works for your printer. Different printer brands feed paper differently.
Blank backs or missing content: Check your document formatting. Some PDFs don’t support duplex printing correctly. Try printing from a different program. Make sure your document actually has even-numbered pages to print.
Alignment issues between front and back: Your printer’s duplex unit might need calibration. Check printer settings for a “Duplex Alignment” or “Two-Sided Calibration” tool. Run this utility to fix alignment problems. Some printers require manual adjustment.
Smudging on back side: Ink isn’t drying before the second side prints. Increase the drying time in printer settings. Use draft mode for faster drying. Switch to laser printing if you frequently have this problem with inkjet.
Saving Money with Printer Duplexing

Double-sided printing cuts costs significantly over time.
A typical office worker prints about 10,000 pages per year. Single-sided printing uses 10,000 sheets. With printer duplexing, you use only 5,000 sheets. That’s 5,000 sheets saved annually.
Paper costs around $5 per 500 sheets. Saving 5,000 sheets saves $50 per year per person. For a 20-person office, that’s $1,000 saved just on paper.
Duplex printing also reduces storage needs. Documents take half the space. File folders last longer. Filing cabinets hold more.
Environmental benefits matter too. Less paper means fewer trees cut down. Reduced shipping weight lowers carbon emissions. Smaller trash bins need less frequent emptying.
Set duplex as your company default. Studies show 60-80% of documents work fine double-sided. Only override for special cases like presentations or photos.
Track your paper usage before and after enabling printer duplexing. Most printers have built-in page counters. Check monthly to see your savings add up.
Frequently Asked Questions
Does duplex printing use more ink? No, printer duplexing uses the same amount of ink as single-sided printing. You’re just putting that ink on both sides of the paper instead of two separate sheets. Total ink consumption stays the same for the same content.
Can all printers print double-sided? Not all printers have automatic duplexing. Budget models usually require manual duplex printing where you flip pages yourself. Check your printer specifications or manual to see if yours supports automatic duplex printing.
Which edge should I choose for binding? Use long-edge binding for portrait documents that flip like books. Use short-edge binding for landscape documents that flip like calendars. When unsure, long-edge works for most standard documents.
Why is my duplex printing so slow? Automatic printer duplexing takes longer because paper must pass through the printer twice. The printer also pauses briefly between sides to let ink dry. This prevents smudging but adds time to each print job.
Can I duplex print photos? Most photo paper is too thick for automatic duplexing. Printer mechanisms can’t grip and flip heavy photo paper reliably. Stick to single-sided printing for photos. Use standard paper weight for double-sided documents.
Conclusion
Printer duplexing transforms how you print documents. You save money, reduce waste, and create professional-looking materials.
Start by checking if your printer supports automatic or manual duplexing. Install the latest drivers to access all features. Configure your settings once, then set duplex as your default option.
Remember the key tips: choose the right binding edge, use appropriate paper weight, and always test before big print jobs. Fix problems by updating drivers, checking paper quality, and adjusting alignment settings.
Whether you print at home or in an office, duplex printing cuts your paper use in half. Those savings add up quickly over weeks and months.
Try printer duplexing on your next document. Once you master it, you’ll never want to go back to single-sided printing. Your wallet and the environment will thank you.
Fix Port Is in Use Error: Simple Guide to Print Again Read More


