
Introduction
Ever printed a photo that looked amazing on your screen but came out blurry and pixelated on paper? The culprit is usually print resolution DPI. It’s one of those technical things that sounds complicated but actually makes a huge difference in your final results.
Print resolution DPI determines how sharp and detailed your printed images look. Get it wrong, and you’ll waste money on poor-quality prints. Get it right, and your photos will look professional and crisp.
In this guide, I’m breaking down everything you need to know about print resolution DPI. You’ll learn what it actually means, why it matters, and exactly how to change it for better quality prints. No confusing tech jargon – just practical steps anyone can follow.
Let’s turn those disappointing prints into something you’ll be proud to frame.
What Is Print Resolution DPI?
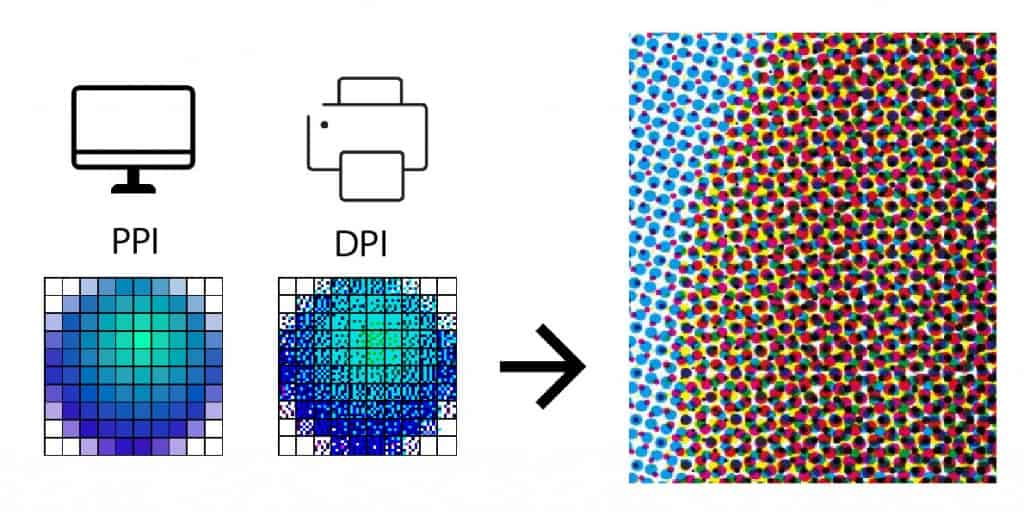
DPI stands for “Dots Per Inch.” It measures how many tiny dots of ink your printer places in one inch of paper. More dots mean more detail and sharper images.
Think of it like this: imagine creating a picture using colored dots on graph paper. If you use big squares, the image looks blocky. If you use tiny squares, you can create much finer detail. That’s basically how print resolution DPI works.
Here’s what different DPI settings mean:
72 DPI – This is screen resolution. Perfect for websites and digital displays. Terrible for printing. Your prints will look fuzzy and low-quality.
150 DPI – Acceptable for casual prints. You’ll notice some quality loss, but it works for drafts or informal documents.
300 DPI – The gold standard for print resolution. This is what professionals use. Your images will look sharp and detailed at normal viewing distances.
600 DPI+ – Used for specialized printing like fine art reproductions or commercial work. Overkill for most home printing needs.
The key thing to understand about print resolution DPI is that it’s different from pixel dimensions. An image can have lots of pixels but still print poorly if the DPI is too low. The DPI tells your printer how to distribute those pixels across physical paper.
When you change print resolution DPI, you’re essentially telling your printer: “pack more (or fewer) dots into each inch of paper.” Higher DPI means more dots, which means better detail and quality.
7 Simple Steps to Change Print Resolution DPI for Better Quality
Changing print resolution DPI isn’t complicated once you know where to look. Here are the most common methods that actually work.
Step 1: Check Your Current Image Resolution
Before you change anything, you need to know what you’re working with.
On Windows:
- Right-click the image file
- Select “Properties”
- Click the “Details” tab
- Look for “Horizontal resolution” and “Vertical resolution”
On Mac:
- Open the image in Preview
- Go to Tools > Adjust Size
- Check the resolution shown
This tells you your starting point. If it shows 72 DPI and you need to print it, you’ve found your problem.
Step 2: Use Photoshop to Change DPI (Professional Method)
Adobe Photoshop gives you the most control over print resolution DPI.
Here’s how:
- Open your image in Photoshop
- Go to Image > Image Size
- Uncheck “Resample” (important!)
- Change the resolution to 300 DPI
- Watch the width and height dimensions change
- If the dimensions are too small, check “Resample” and use “Preserve Details” option
- Click OK
Why uncheck Resample first? This shows you the actual printable size at 300 DPI without changing pixel data. If it’s too small, then you need to resample (which adds pixels but can reduce sharpness slightly).
Step 3: Change DPI Using Free Software (GIMP)
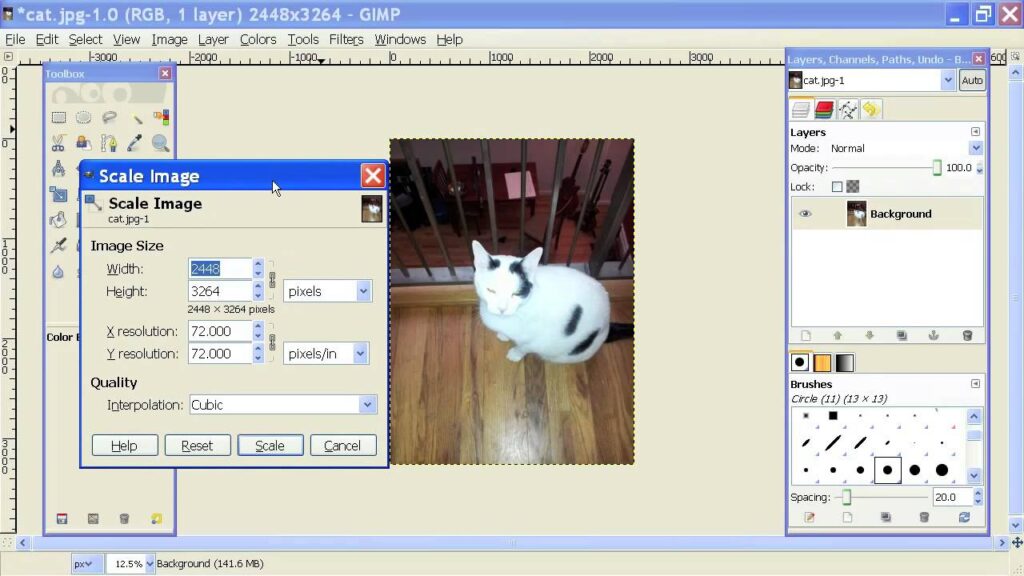
Don’t have Photoshop? GIMP is free and works great for changing print resolution DPI.
Follow these steps:
- Download and install GIMP from gimp.org
- Open your image
- Go to Image > Scale Image
- Change the resolution to 300 pixels/inch
- Choose “NoHalo” or “LoHalo” for quality
- Click Scale
GIMP handles DPI changes well and won’t cost you anything.
Step 4: Use Online DPI Converter Tools
Several websites let you change print resolution DPI without downloading software.
How to use online converters:
- Search for “change image DPI online”
- Upload your image
- Set target DPI to 300
- Download the converted file
Be careful: Some online tools compress your images or add watermarks. Read the fine print before uploading important photos.
Step 5: Adjust DPI in Microsoft Word or PowerPoint
If you’re printing documents with images, you can adjust print resolution DPI right in Office programs.
In Word:
- Insert your image
- Right-click the image
- Select “Format Picture”
- Go to Picture > Compress
- Choose “Print (220 dpi)” or “High fidelity (330 dpi)”
- Uncheck “Apply only to this picture” to change all images
- Click OK
This method works when you’re creating documents with multiple images and need consistent print quality.
Step 6: Set Printer DPI Settings
Your printer itself has DPI settings that affect output quality.
To adjust printer DPI:
- Open Print dialog
- Click “Preferences” or “Properties”
- Look for “Quality” settings
- Choose “Best” or “High Quality”
- Check “Advanced” settings for specific DPI options
- Some printers let you manually set DPI (try 600 or 1200)
Higher printer DPI settings use more ink and take longer, but produce noticeably better prints.
Step 7: Use Smartphone Apps to Change DPI
Need to change print resolution DPI on your phone? There are apps for that.
Popular options:
- Photo & Picture Resizer (Android) – Easy interface, accurate DPI control
- Image Size (iOS) – Simple and effective
- Adobe Lightroom Mobile (Both) – Professional-level control
These apps work well when you’re printing photos directly from your phone or sending them to print services.
Understanding the Relationship Between Pixels, DPI, and Print Size
Here’s where people get confused about print resolution DPI. Let me clear it up with a simple formula:
Print Width (inches) = Pixel Width ÷ DPI
Example:
- Image is 3000 pixels wide
- At 300 DPI: 3000 ÷ 300 = 10 inches wide
- At 150 DPI: 3000 ÷ 150 = 20 inches wide
- At 72 DPI: 3000 ÷ 72 = 41 inches wide
Same image, different print sizes depending on DPI. Lower DPI spreads the same pixels over more inches, which reduces quality.
The magic number is 300 DPI for most printing. This balances quality and file size perfectly.
Quick reference chart:
- 4×6 inch photo at 300 DPI needs 1200×1800 pixels
- 5×7 inch photo at 300 DPI needs 1500×2100 pixels
- 8×10 inch photo at 300 DPI needs 2400×3000 pixels
- 11×14 inch photo at 300 DPI needs 3300×4200 pixels
If your image doesn’t have enough pixels, you can’t magically create quality by changing DPI. The pixels need to be there first.
Tools and Software for Managing Print Resolution DPI
Let’s look at the best tools for handling print resolution DPI across different needs.
Professional Tools:
Adobe Photoshop – Industry standard. Gives you complete control over print resolution DPI with advanced resampling algorithms. Worth it if you print regularly.
Adobe Lightroom – Perfect for photographers. Handles DPI adjustments as part of the export process. Great for batch processing multiple images.
Free Alternatives:
GIMP – Open-source image editor. Does everything Photoshop does for DPI management, just with a different interface.
Paint.NET – Windows only. Simpler than GIMP but handles print resolution DPI changes effectively.
Online Tools:
Convertio – Supports multiple formats. Changes DPI without requiring software installation.
ILoveIMG – User-friendly interface. Good for quick DPI adjustments.
Specialized Tools:
IrfanView – Lightweight Windows program. Excellent for batch processing DPI changes on multiple files.
XnConvert – Cross-platform batch converter. Perfect when you need to change print resolution DPI on hundreds of images.
Choose based on your needs. Casual users can stick with free tools. Regular printing justifies professional software.
Common Mistakes When Changing Print Resolution DPI (And How to Fix Them)
People make the same mistakes over and over with print resolution DPI. Here’s how to avoid them.
Mistake 1: Upsampling Low-Resolution Images
You can’t add detail that isn’t there. Changing a 72 DPI image to 300 DPI doesn’t magically improve quality if you don’t have enough pixels.
Fix: Start with high-resolution images. If you’re stuck with low resolution, print smaller or use AI upscaling tools like Topaz Gigapixel.
Mistake 2: Saving in Wrong File Format
Saving your high-DPI image as a highly compressed JPEG throws away all that quality you worked to achieve.
Fix: Use PNG for graphics with text or sharp edges. Use high-quality JPEG (quality 90+) for photos. Use TIFF for professional printing.
Mistake 3: Ignoring Resampling Methods
Not all resampling is equal. Using “Nearest Neighbor” will make your images look terrible.
Fix: Use “Bicubic Smoother” when enlarging in Photoshop. Use “Preserve Details 2.0” for best quality. In GIMP, use “LoHalo” or “NoHalo.”
Mistake 4: Setting Printer to Draft Quality
You can have perfect 300 DPI images, but if your printer is set to draft mode, they’ll still print poorly.
Fix: Always check printer settings before hitting print. Choose “Best” or “High Quality” mode for final prints.
Mistake 5: Not Checking Print Preview
What looks good on screen might reveal problems in print preview.
Fix: Always use print preview. Check if images look sharp. Adjust print resolution DPI settings before wasting paper and ink.
Mistake 6: Using Screen Resolution for Print
Designing for web at 72 DPI then trying to print is a recipe for disappointment.
Fix: Create separate versions. Keep 72 DPI for web, 300 DPI for print. Never assume screen resolution will print well.
Mistake 7: Forgetting About Viewing Distance
A billboard doesn’t need 300 DPI because you view it from far away. A business card needs high DPI because you hold it close.
Fix: Match print resolution DPI to viewing distance. Close viewing = 300+ DPI. Poster on wall = 150-200 DPI acceptable.
Frequently Asked Questions About Print Resolution DPI
Q1: What DPI should I use for printing photos?
Use 300 DPI for standard photo prints. This is the industry standard and produces sharp, professional-quality results for viewing at normal distances. For large posters or banners viewed from farther away, 150-200 DPI is acceptable.
Q2: Can I change DPI without losing quality?
You can change the DPI setting without losing quality IF you don’t resample. Simply changing how pixels are distributed across inches doesn’t affect image data. However, if you need to add pixels to increase DPI, some quality loss may occur depending on the upscaling method used.
Q3: Why do my images look blurry when printed but clear on screen?
Screens typically display at 72-96 DPI, which looks sharp on backlit displays. Printers need 300 DPI for equivalent sharpness on paper. Your image doesn’t have enough resolution (DPI) for the print size you’re attempting.
Q4: How do I know if my image has enough DPI for printing?
Divide your image’s pixel dimensions by your desired print size in inches. If the result is 300 or higher, you’re good. For example, a 3000-pixel-wide image can print 10 inches wide at 300 DPI (3000÷300=10).
Q5: Does higher DPI always mean better quality?
Not always. Beyond 300 DPI, most people can’t see quality improvements on standard prints. Higher DPI creates larger files, uses more ink, and takes longer to print with minimal visible benefit. Save 600+ DPI for specialized professional applications.
Q6: Can I print a 72 DPI image?
Technically yes, but it will look pixelated and blurry. You can print a 72 DPI image at a very small size, or accept lower quality. Better option: find or create a higher resolution version of the image.
Conclusion
Understanding print resolution DPI transforms how your images look when printed. It’s not complicated – just know that 300 DPI is your target for quality prints, and make sure your images have enough pixels to reach that resolution at your desired print size.
The steps we covered work across different software and situations. Whether you’re using professional tools like Photoshop or free alternatives like GIMP, the principles remain the same. Check your current DPI, adjust to 300 for printing, choose the right resampling method, and always preview before committing to expensive prints.
Start with high-resolution images when possible. Avoid common mistakes like upsampling low-quality images or saving in compressed formats. Match your printer settings to your image resolution.
Now you have the knowledge to create sharp, professional-looking prints every time. No more disappointment when beautiful screen images turn into blurry printouts. Take control of your print resolution DPI, and watch your image quality transform.
Printer Duplexing: Master Double-Sided Printing Fast Read More


