Introduction
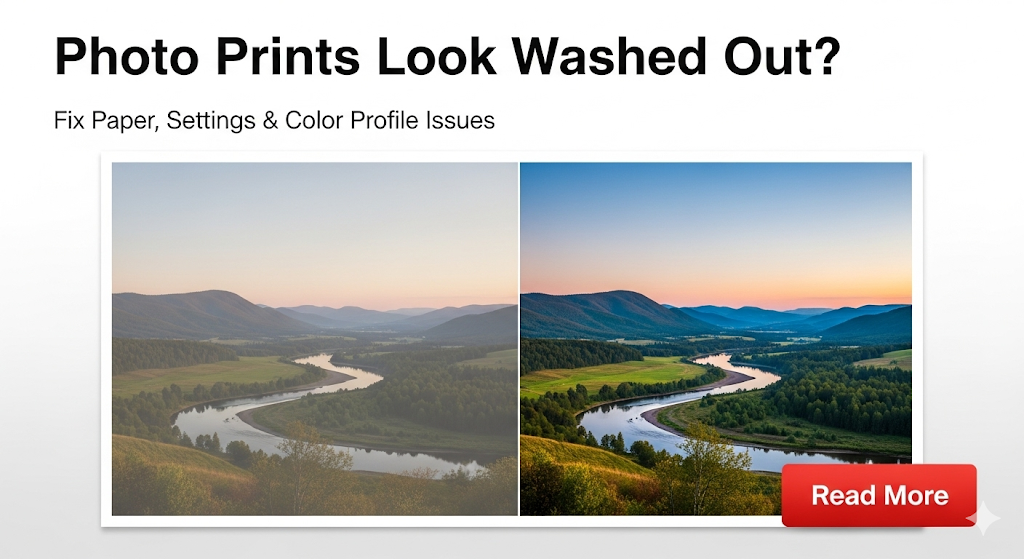
Wondering why your photo prints look washed out compared to what you see on your computer screen? This frustrating problem affects millions of photographers and home users who expect vibrant, accurate colors from their printed photos.
The issue rarely stems from a single cause but rather a combination of factors including wrong paper choices, incorrect printer settings, and mismatched color profiles. Understanding these elements transforms disappointing prints into stunning reproductions that match your digital vision.
This comprehensive guide identifies the root causes behind faded photo prints and provides actionable solutions that work with any printer and photo editing software. You’ll learn professional techniques used by commercial labs to achieve consistent, vibrant results.
By implementing these proven strategies, your photo prints will finally display the rich colors and sharp details that make your images truly shine.
What Are Washed Out Photo Prints?
Washed out photo prints appear faded, lacking the vibrant colors and contrast visible on computer screens. This common printing problem manifests as dull colors, weak blacks, and an overall flat appearance that fails to capture the original image’s impact.
Visual Characteristics Include:
- Colors appear pale and lifeless
- Black areas print as dark gray instead of true black
- Overall contrast seems reduced
- Skin tones look unnatural or ghostly
- Bright colors appear muted and subdued
Technical Causes: The problem occurs when your printer cannot accurately reproduce the color range (gamut) displayed on your monitor. Different devices use various color spaces, and without proper coordination, translation errors create visible quality loss.
Color Space Mismatches: Your monitor displays colors in RGB (Red, Green, Blue) format, while printers use CMYK (Cyan, Magenta, Yellow, Black) or extended color sets. This fundamental difference requires careful management to maintain color accuracy.
Paper and Ink Interactions: Different paper types absorb and reflect ink differently, dramatically affecting final color appearance. Generic papers often cannot hold sufficient ink density to reproduce rich, saturated colors.
Understanding these technical aspects helps you identify which factors contribute to your specific printing problems and guides effective solutions.
7 Essential Steps to Fix Washed Out Photo Prints

Step 1: Choose the Right Photo Paper
Paper Type Matters: Premium photo papers make the biggest difference in print quality. Glossy papers provide maximum color saturation and contrast, while matte papers offer subtle tones with reduced glare.
Weight and Coating: Use papers rated 240gsm or higher for professional results. Heavier papers resist curling and provide better ink absorption. Resin-coated papers prevent ink bleeding and maintain sharp details.
Brand Compatibility: Stick with papers from your printer manufacturer when possible. Canon printers work best with Canon papers, HP printers with HP papers, etc. These combinations are specifically calibrated together.
Step 2: Calibrate Your Monitor
Why Calibration Matters: If your monitor displays colors incorrectly, your prints will never match your expectations. Professional calibration ensures what you see matches what you print.
Calibration Tools: Hardware calibrators like X-Rite ColorMunki or Datacolor SpyderX provide accurate results. Software-only solutions work for basic correction but lack precision.
Regular Maintenance: Recalibrate monthly for critical work or quarterly for general use. Monitor performance changes over time, affecting color accuracy.
Step 3: Select Proper Printer Settings
Print Quality Options: Always choose “Photo” or “Best” quality settings for important prints. Draft or economy modes sacrifice color accuracy for speed and ink savings.
Paper Type Selection: Your printer’s paper type setting dramatically affects ink deposition. Select the exact paper type you’re using from the printer driver menu.
Color Management: Choose “Printer Manages Colors” or “Photoshop Manages Colors” – never both simultaneously. This prevents double color correction that causes washed out results.
Step 4: Install and Use Color Profiles
What Are Color Profiles: ICC profiles describe how specific paper and ink combinations reproduce colors. They act as translation guides between your screen and printer.
Where to Find Profiles: Paper manufacturers provide free ICC profiles on their websites. Download profiles matching your exact printer model and paper combination.
Profile Installation: Windows: Copy profiles to C:\Windows\System32\spool\drivers\color
macOS: Copy to /Library/ColorSync/Profiles/ or ~/Library/ColorSync/Profiles/
Step 5: Adjust Image Brightness and Contrast
Pre-Print Adjustments: Photos often need slight brightness and contrast adjustments for optimal printing. Increase contrast by 10-15% and reduce brightness by 5-10% as starting points.
Soft Proofing: Use Photoshop’s soft proofing feature to preview how your image will print before making adjustments. This prevents wasteful test prints.
Shadow and Highlight Recovery: Lift shadows slightly and protect highlights to ensure detail retention in printed output.
Step 6: Check Ink Levels and Quality
Fresh Ink Cartridges: Low or old ink produces weak, inconsistent colors. Replace cartridges showing low levels before important printing sessions.
Genuine vs. Generic Ink: While generic inks cost less, they often produce inferior color reproduction. Use genuine cartridges for critical color work.
Print Head Maintenance: Run printer cleaning cycles if colors appear streaky or uneven. Clean print heads ensure proper ink deposition.
Step 7: Control Your Printing Environment
Lighting Conditions: Evaluate prints under appropriate lighting. Fluorescent lights make colors appear different than incandescent or natural light.
Paper Storage: Store photo paper in cool, dry conditions. Humidity and heat affect paper coating and ink absorption properties.
Printer Warm-Up: Allow inkjet printers to complete initialization cycles before printing important photos. Cold printers often produce inconsistent results.

Professional Tools and Advanced Techniques
Color Management Software: Professional applications like X-Rite i1Profiler or ColorMunki Photo provide comprehensive color management solutions beyond basic printer drivers.
Custom ICC Profile Creation: Advanced users can create custom profiles for specific paper and ink combinations using colorimeters and spectrophotometers for ultimate accuracy.
Print Permanence Testing: Wilhelm Imaging Research provides longevity data for different ink and paper combinations, helping you choose archival-quality materials for important prints.
Lab Comparison Services: Some photographers send test prints to professional labs to compare home printing results against commercial standards.
Multiple Paper Testing: Serious photographers maintain libraries of different photo papers to match specific images with optimal printing surfaces.
Batch Processing Workflows: Develop consistent image processing workflows that include appropriate sharpening, color space conversion, and print-specific adjustments.
Professional printing requires systematic approaches that consider every variable from image capture through final output.
Common Photo Printing Mistakes and Solutions
Mistake 1: Using sRGB Color Space for Printing Many users work in sRGB color space, which cannot reproduce the full color range modern printers can achieve. Switch to Adobe RGB or ProPhoto RGB for wider color reproduction possibilities.
Mistake 2: Ignoring Printer Driver Settings Default printer settings rarely optimize for photo quality. Always access advanced settings and select appropriate paper types and quality levels for best results.
Mistake 3: Printing Immediately After Editing Newly edited images benefit from “resting” time to evaluate adjustments. Print important photos the next day after reviewing edits with fresh eyes.
Mistake 4: Mixing Color Management Systems Using both Photoshop and printer driver color management simultaneously creates double correction errors. Choose one system and disable the other completely.
Mistake 5: Expecting Perfect Monitor Matching No print perfectly matches monitor display due to different color reproduction methods. Accept slight variations while working toward close approximations.
Mistake 6: Neglecting Environmental Factors Temperature and humidity affect ink flow and paper behavior. Maintain consistent printing environments for predictable results.
Mistake 7: Using Expired or Low-Quality Materials Old ink cartridges and cheap papers significantly impact color reproduction. Invest in quality materials for quality results.
Frequently Asked Questions
Q: Why do my photo prints look washed out even with premium paper? A: The most common cause is incorrect color management settings. Ensure you’re using proper ICC profiles and avoid double color correction by choosing either printer or application color management, not both.
Q: Should I adjust my photos before printing to compensate for washed out colors? A: Yes, slight pre-print adjustments often improve results. Increase contrast by 10-15% and reduce brightness by 5-10% as starting points, then fine-tune based on test prints.
Q: Do generic ink cartridges cause washed out photo prints? A: Generic inks can produce inferior color reproduction compared to genuine cartridges. While they save money, the color accuracy and longevity trade-offs may not justify the savings for important photos.
Q: How often should I calibrate my monitor for accurate photo printing? A: Calibrate monthly for critical color work or quarterly for general photography. Monitor performance degrades over time, affecting the accuracy of your color judgments.
Q: What’s the difference between glossy and matte photo paper for color reproduction? A: Glossy papers typically provide more vibrant colors and higher contrast, while matte papers offer more subdued tones with less glare. Choose based on your artistic preferences and viewing conditions.
Conclusion
Solving the mystery of why photo prints look washed out requires addressing multiple factors from paper selection through color management. The good news is that each improvement builds upon others, creating dramatically better results through systematic optimization.
Start with quality photo paper and proper printer settings, then add monitor calibration and color profiles for professional-level accuracy. These fundamental changes solve most color reproduction problems that frustrate home photographers.
Remember that perfect screen-to-print matching remains impossible due to different color reproduction technologies. Focus on achieving pleasing, accurate colors rather than exact matches, and your satisfaction with printed photos will increase significantly.
Consistent application of these techniques transforms disappointing prints into vibrant reproductions that capture the full impact of your digital images and showcase your photographic vision beautifully.
Share USB Printer Over Network: Easy Home & Office Setup Guide 2025 Read More.