
Introduction
Is your printer producing blurry text, misaligned colors, or streaky images? Printer calibration is the solution you need. Whether you’re printing important documents or vibrant photos, proper calibration ensures every page looks sharp and professional.
Many people struggle with poor print quality without realizing a simple calibration can fix most issues. This guide walks you through everything about printer calibration, from basic alignment to advanced color management. You’ll discover practical steps to transform your printing results and save money on wasted paper and ink.
Let’s dive into the essentials of achieving perfect print quality alignment.
What Is Printer Calibration?
Printer calibration is the process of adjusting your printer’s settings to ensure accurate color reproduction, proper alignment, and consistent output quality. Think of it as tuning a musical instrument—without calibration, your printer can’t perform at its best.
The calibration process involves several key adjustments. Print head alignment ensures ink droplets land precisely where they should. Color calibration matches your screen colors to printed output. Density adjustments control how much ink is applied to paper.
Most modern printers include built-in calibration tools. These automated utilities guide you through the process with printed test patterns. You examine these patterns and select the best-aligned options, or the printer’s sensors do it automatically.
Regular printer calibration prevents common problems like banding, color shifts, and blurry text. Professional photographers and designers rely on calibration for color-accurate prints. Home users benefit from sharper documents and better photo prints.
Understanding calibration basics helps you maintain print quality over time.
7 Essential Steps to Calibrate Your Printer for Perfect Print Quality Alignment
Step 1: Clean Your Print Heads
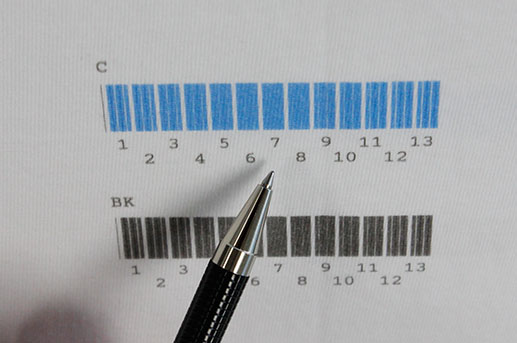
Before starting printer calibration, clean your print heads thoroughly. Clogged nozzles cause alignment issues and color inconsistencies that calibration alone won’t fix.
Access your printer’s maintenance menu through the control panel or software. Run the cleaning cycle once or twice. Print a nozzle check pattern to verify all colors print evenly without gaps.
For stubborn clogs, perform a deep cleaning. This uses more ink but removes dried ink buildup effectively. Wait 10 minutes between cleanings to let the print heads rest.
Regular cleaning extends print head life and ensures calibration accuracy.
Step 2: Use Quality Paper and Correct Settings
Paper quality directly affects calibration results. Load fresh, high-quality paper that matches your printer’s specifications. Cheap paper absorbs ink unevenly, making accurate calibration impossible.
Select the correct paper type in your printer settings. Options include plain paper, glossy photo paper, or matte paper. Wrong settings cause the printer to apply incorrect ink amounts.
Check that paper is loaded straight without wrinkles or tears. Misaligned paper skews calibration test prints.
Match paper size settings to your loaded paper. Using letter-size settings with A4 paper causes alignment errors.
Step 3: Run Automatic Print Head Alignment
Most printers offer automatic alignment through their software or control panel. This is the easiest printer calibration method for beginners.
Open your printer’s utility software on your computer. Windows users find it in Settings > Devices > Printers. Mac users check System Preferences > Printers & Scanners.
Look for “Align Print Heads,” “Print Head Alignment,” or similar options. Follow the on-screen prompts to print alignment sheets.
The printer prints patterns with numbered columns or rows. Either select the straightest, most aligned pattern number, or the printer’s sensors automatically detect the best alignment.
Confirm your selection and let the printer apply the adjustments. This process takes 5-10 minutes but dramatically improves print quality alignment.
Step 4: Perform Manual Alignment Adjustments
Some situations require manual printer calibration adjustments. This gives you finer control over alignment than automatic methods.
Print a test page showing alignment grids. Examine each color pattern carefully under good lighting. Look for gaps, overlaps, or misaligned lines.
Access your printer’s advanced settings menu. Find options for horizontal and vertical alignment adjustments. These typically use numeric scales.
Adjust values in small increments—usually 0.1 to 0.5 units at a time. Print test pages after each adjustment to check progress.
Continue adjusting until all colors align perfectly with no visible gaps or overlaps. Manual calibration requires patience but delivers precise results.
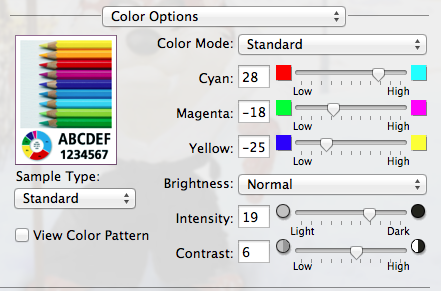
Step 5: Calibrate Color Output
Color calibration ensures your prints match what you see on screen. This is crucial for photographers, designers, and anyone printing important visual content.
Start by calibrating your monitor using built-in tools or third-party software like DisplayCAL. Your screen must display accurate colors first.
Access your printer’s color management settings. Print a color calibration sheet showing various color patches and grayscale gradients.
Compare printed colors to reference charts or your calibrated screen. Adjust individual color channels (cyan, magenta, yellow, black) if your printer allows.
Many printers offer preset color profiles for different paper types. Test these profiles and choose the one that produces the most accurate colors.
For professional work, consider using a colorimeter device. These tools measure printed colors precisely and create custom ICC profiles for perfect color accuracy.
Step 6: Adjust Print Density and Quality Settings
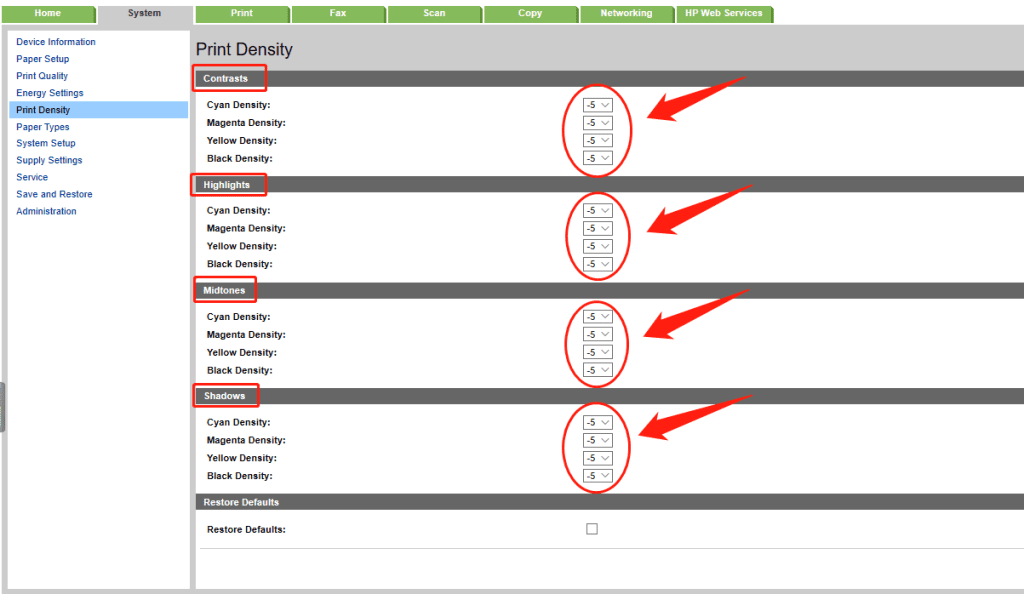
Print density controls how much ink your printer applies. Incorrect density causes prints to look too light or too dark with bleeding colors.
Print a density test pattern from your printer’s maintenance menu. This shows gradients from light to dark.
Examine the pattern for consistent tones without banding or blotches. Adjust density settings up or down in small increments.
Balance is key—too little ink creates faded prints, while too much causes smudging and longer drying times. Aim for rich colors without oversaturation.
Set quality preferences based on your needs. Draft mode saves ink for everyday documents. High-quality mode is perfect for photos and presentations.
Remember that higher quality settings use more ink and print slower. Choose appropriately for each print job.
Step 7: Test and Document Your Settings
After completing printer calibration, run comprehensive test prints. Print text documents, color photos, and graphics to verify all improvements.
Create a document with sharp text in various sizes, color gradients, and detailed images. This reveals any remaining calibration issues.
Compare your calibrated prints to previous ones. You should notice sharper text, better color accuracy, and improved detail.
Document your successful calibration settings. Write down specific adjustment values and paper settings that work best. This saves time when recalibrating later.
Save digital copies of your test prints with notes about settings used. These serve as reference points for future calibration sessions.
Print a reference page monthly to monitor calibration drift. Recalibrate when you notice quality declining.
Additional Tools and Resources for Printer Calibration
Beyond built-in printer utilities, specialized tools enhance calibration accuracy and results.
Color management software like Adobe Color or BasICColor offers advanced profiling options. These programs create custom ICC profiles tailored to your specific printer and paper combinations.
Hardware colorimeters such as X-Rite i1 or Datacolor SpyderPrint measure actual print output. They generate precise color profiles by reading printed color patches.
Online calibration guides specific to your printer model provide targeted advice. Manufacturer websites often have detailed PDF manuals with model-specific calibration instructions.
Print test images from professional photography sites. These standardized images help you evaluate color accuracy, sharpness, and tonal range consistently.
Join online printing forums and communities. Experienced users share calibration tips, troubleshooting advice, and recommended settings for various printer models.
Keep your printer firmware updated. Manufacturers release updates that improve calibration algorithms and fix known issues.
Common Printer Calibration Mistakes and How to Fix Them

Using Old or Dried Ink Cartridges
Expired ink prevents accurate printer calibration. Ink chemistry changes over time, causing color shifts and clogging. Always use fresh cartridges before calibrating. Check expiration dates printed on cartridge packaging.
Skipping the Cleaning Step
Many people rush into calibration without cleaning print heads first. Clogged nozzles make calibration adjustments ineffective. Always run cleaning cycles and print nozzle checks before calibrating.
Calibrating on Low-Quality Paper
Cheap paper absorbs ink unevenly and causes inaccurate results. Calibration settings optimized for cheap paper won’t work well with better paper. Always calibrate using the paper type you’ll print on most often.
Making Large Adjustment Changes
Adjusting calibration values dramatically causes overcorrection. Small incremental changes let you fine-tune accurately. Change values by 0.1 to 0.5 units, then test before adjusting further.
Ignoring Environmental Factors
Temperature and humidity affect ink flow and paper behavior. Calibrate in normal room conditions (65-75°F, 40-60% humidity). Extreme conditions cause inconsistent calibration results.
Not Testing After Calibration
Some users calibrate and assume everything’s perfect without testing. Always print test documents and photos to verify improvements. Re-adjust if needed based on actual print results.
Forgetting to Update Profiles
After calibration, update color profiles in your design software. Programs like Photoshop and Illustrator need to know about calibration changes. Outdated profiles cause color mismatches between screen and print.
Frequently Asked Questions About Printer Calibration
How often should I perform printer calibration?
Calibrate your printer every 1-3 months for regular use. Calibrate immediately after replacing ink cartridges, changing paper types, or noticing print quality problems. Professional users working with color-critical projects should calibrate weekly.
Can printer calibration fix all print quality issues?
Printer calibration fixes alignment, color accuracy, and consistency issues. However, it can’t repair hardware problems like worn print heads, faulty sensors, or mechanical failures. If calibration doesn’t improve quality, your printer may need professional service.
Does printer calibration use a lot of ink?
Calibration uses minimal ink—typically one or two test pages. The cleaning cycles before calibration consume more ink than calibration itself. The improved print quality and reduced waste from better calibration quickly offset this small ink usage.
Will calibration settings work for all paper types?
No, calibration is paper-specific. Settings optimized for glossy photo paper won’t work well for plain paper. Many printers let you save multiple calibration profiles for different paper types. Create separate profiles for each paper you regularly use.
Conclusion
Printer calibration transforms mediocre prints into professional-quality results. By following these seven essential steps—cleaning print heads, using quality paper, running automatic alignment, making manual adjustments, calibrating colors, adjusting density, and testing thoroughly—you’ll achieve perfect print quality alignment every time.
Regular calibration saves money by reducing wasted prints and extending your printer’s lifespan. Whether you’re printing family photos or business documents, proper calibration ensures every page meets your expectations. Start with automatic calibration tools, then explore manual adjustments as you gain confidence.
Don’t let poor print quality frustrate you any longer. Take 20 minutes today to calibrate your printer. You’ll immediately notice sharper text, accurate colors, and professional results. Your printer has the potential to produce amazing output—calibration simply unlocks it.
Printer Duplexing: Master Double-Sided Printing Fast Read More


