
Introduction
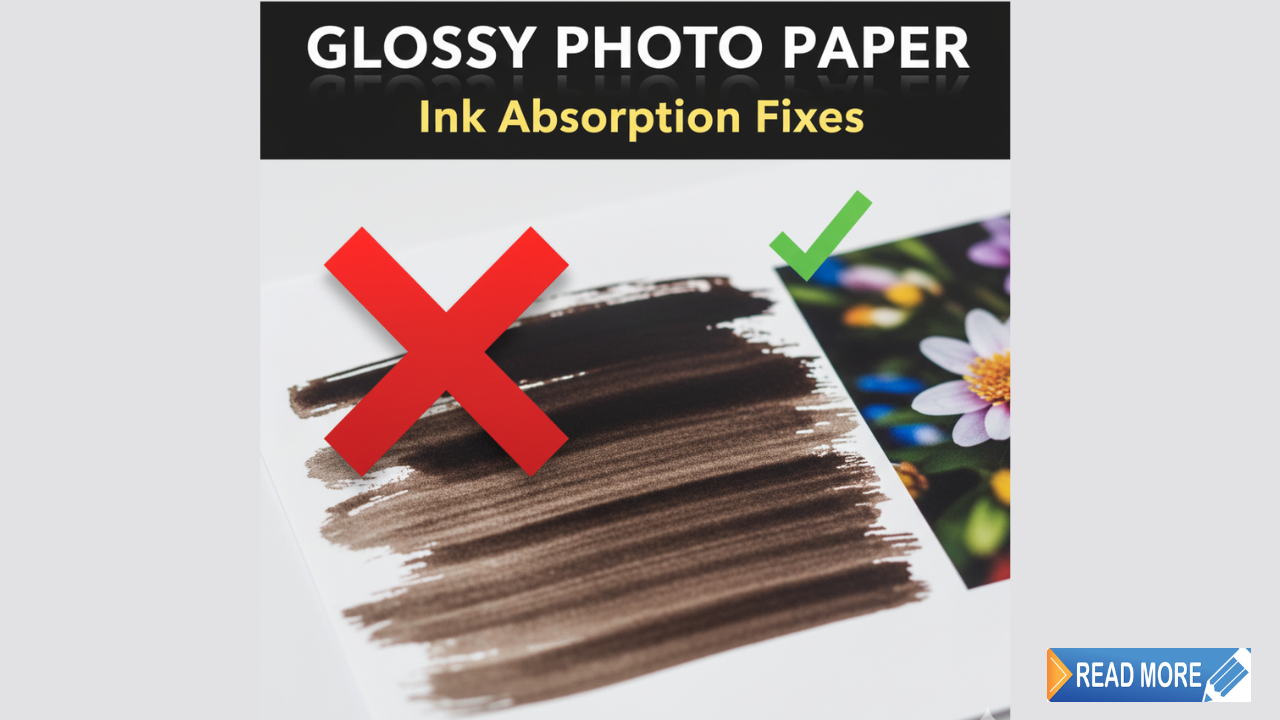
Ink absorption issues on glossy photo paper ruin what should be beautiful prints. You invest in premium photo paper, carefully edit your images, hit print, and watch ink pool on the surface or smudge when touched minutes later.
This frustrating problem wastes expensive paper, ink, and time. Worse, it makes you question whether your printer can produce professional-quality photos at all.
Here’s the truth: ink absorption problems rarely mean your printer is broken. Usually, they stem from incorrect settings, incompatible paper-ink combinations, or environmental factors you can easily control.
This guide walks you through exactly how to diagnose and fix ink absorption issues on glossy photo paper. You’ll learn why glossy paper behaves differently than plain paper, the specific settings that prevent problems, and troubleshooting steps when prints still won’t dry properly.
Let’s get your photo prints looking professionally printed instead of homemade disasters.
What Are Ink Absorption Issues on Glossy Photo Paper?
Ink absorption issues on glossy photo paper occur when ink doesn’t properly bond with the paper’s coating, resulting in smudging, pooling, bleeding, or extremely long drying times.
How glossy paper differs from regular paper:
Glossy photo paper has a special resin coating designed to:
- Produce vibrant, saturated colors
- Create a smooth, reflective surface
- Hold ink on the surface rather than absorbing it into fibers
Unlike plain paper that absorbs ink like a sponge, glossy paper keeps ink on the surface. This creates stunning photo quality but also makes the paper more sensitive to incorrect settings and handling.
Common symptoms of absorption problems:
Smudging: Ink transfers to fingers when touched, even hours after printing. This indicates too much ink or wrong paper settings.
Pooling: Visible droplets or puddles of ink sit on the paper surface. Shows excessive ink density for the paper type.
Bleeding: Colors blur together or run beyond intended boundaries. Happens when ink remains liquid too long.
Cockling: Paper warps or buckles due to moisture from excess ink. Ruins photo flatness and appearance.
Extremely long drying times: Photos remain tacky or wet for hours. Proper prints should be touch-dry within 10-15 minutes.
Why these issues occur:
- Wrong paper type setting in printer driver
- Incompatible ink and paper brands
- Excessive ink density settings
- High humidity in printing environment
- Low-quality or expired photo paper
- Clogged print heads depositing uneven ink
Understanding the cause helps you choose the right solution for your specific situation.
7 Proven Solutions for Ink Absorption Issues on Glossy Photo Paper

Try these fixes in order for best results.
1. Select the Correct Paper Type in Printer Settings
This is the most common cause of ink absorption issues on glossy photo paper.
Why this matters:
When you select “Glossy Photo Paper” in settings, your printer:
- Reduces ink output (glossy paper needs less ink)
- Adjusts ink laydown pattern
- Modifies dot spacing for optimal absorption
- Slows print speed for better drying
How to fix (Windows):
- Open your document or photo
- Click File > Print
- Click “Printer Properties” or “Preferences”
- Find “Paper Type” or “Media Type” dropdown
- Select “Glossy Photo Paper,” “Premium Glossy,” or “Photo Paper – Glossy”
- Apply settings before printing
How to fix (Mac):
- Click File > Print
- Click “Show Details” if print dialog is collapsed
- Find “Media Type” in dropdown menus
- Select the glossy paper option
Specific paper type options:
Different printers use different terminology:
- “Premium Glossy Photo Paper” (Canon)
- “Photo Paper Glossy” (HP)
- “Ultra Glossy Photo Paper” (Epson)
- “Glossy Photo Paper” (Brother)
Choose the option that best matches your actual paper. When in doubt, check your paper package for recommended settings.
2. Reduce Ink Density or Coverage
Too much ink overwhelms glossy paper’s ability to handle moisture.
How to adjust ink density:
In printer preferences, look for:
- “Ink Density” slider
- “Ink Volume” settings
- “Color Intensity” control
- “Saturation” adjustment
Optimal settings for glossy paper:
Start at 90% density and adjust if needed:
- If prints are too light: Increase to 95-100%
- If ink still pools: Decrease to 85-90%
Where to find these settings:
Usually under “Advanced,” “Color Adjustment,” or “Custom Settings” in your printer driver.
Alternative approach:
If density controls aren’t available, try:
- Selecting “Standard” quality instead of “Best” (uses less ink)
- Enabling “Paper Conservation” or “Ink Save” mode
- Adjusting brightness in your image editing software (lighter images need less ink)
According to Epson’s printing guides, reducing ink density by 5-10% resolves most ink absorption issues on glossy photo paper without noticeably affecting print quality.
3. Use Matching Paper and Ink Brands
Brand compatibility significantly affects ink absorption.
Why matching matters:
Printer manufacturers formulate inks specifically for their paper coatings. Canon inks work optimally with Canon paper, HP inks with HP paper, and so on.
What happens with mismatched brands:
Third-party papers may have coatings that:
- Absorb ink too quickly (causing dull colors)
- Don’t absorb ink properly (causing pooling and smudging)
- React chemically with your printer’s ink
Testing compatibility:
If using third-party paper:
- Check manufacturer’s compatibility list
- Start with one sheet to test before buying bulk
- Read reviews from users with your specific printer model
Best approach:
For critical prints, use your printer brand’s paper. For everyday photos where some quality compromise is acceptable, quality third-party brands like Red River Paper, Moab, or Hawk Mountain often work well.
4. Adjust Environmental Conditions
Humidity and temperature dramatically affect ink absorption issues on glossy photo paper.
Ideal printing environment:
- Temperature: 68-77°F (20-25°C)
- Humidity: 40-60%
Problems with high humidity:
Moisture in air slows ink drying. In humid conditions (70%+ humidity):
- Ink stays wet longer
- Paper absorbs atmospheric moisture (reduces coating effectiveness)
- Smudging risk increases significantly
Solutions for humid environments:
- Run dehumidifier in print area
- Print during less humid times of day (usually afternoon)
- Store paper in sealed plastic bags with silica gel packets
- Allow extra drying time (30+ minutes before handling)
Problems with low humidity:
Below 30% humidity:
- Static electricity attracts dust
- Paper may curl
- Ink may dry too quickly (causing banding)
Solutions for dry environments:
- Use humidifier to bring levels to 40-50%
- Store paper properly sealed
- Ground yourself before handling paper to reduce static
5. Clean Print Heads and Check Nozzles

Clogged nozzles deposit irregular ink amounts, causing absorption problems.
How to check nozzle condition:
Most printers have built-in test patterns:
- Access printer utility software
- Select “Print Nozzle Check” or “Print Test Pattern”
- Examine pattern for gaps or missing lines
What you’re looking for:
The test pattern should show:
- Continuous lines with no gaps
- Even color density across all colors
- No streaking or missing segments
How to clean print heads:
Automatic cleaning:
- Open printer utility
- Select “Clean Print Heads” or “Head Cleaning”
- Run cleaning cycle (uses some ink)
- Print nozzle check again to verify improvement
- Repeat if necessary (up to 3 times)
Manual cleaning (advanced):
If automatic cleaning fails:
- Remove print heads (if removable on your model)
- Gently wipe contacts with lint-free cloth
- Use print head cleaning solution if available
- Reinstall and run automatic clean
Prevention:
Run nozzle check weekly. Print something at least once weekly to prevent ink drying in nozzles.
6. Use High-Quality, Fresh Photo Paper
Paper quality and age affect coating performance.
Signs of low-quality paper:
- Very cheap price (under $10 for 50 sheets)
- Unknown brand names
- Packaging doesn’t specify coating type
- Poor online reviews mentioning smudging
How paper degrades over time:
Glossy paper coating deteriorates with:
- Age (even in package)
- Exposure to humidity
- Temperature fluctuations
- Light exposure
Shelf life of photo paper:
- Sealed package: 2-3 years typically
- Opened package: 6-12 months if stored properly
- Signs of aging: yellowing, curling, loss of glossiness
Proper paper storage:
- Keep in original sealed package until needed
- Store in cool, dry place
- Reseal opened packages in plastic bags
- Use oldest paper first
Recommended brands:
For reliable absorption and quality:
- Epson Premium Glossy
- Canon Photo Paper Plus Glossy II
- HP Advanced Photo Paper
- Red River Polar Gloss
- Ilford Galerie
7. Adjust Drying Time and Handling
Even with perfect settings, glossy prints need proper drying.
Minimum drying times:
- Touch-dry: 10-15 minutes (minimal ink transfer)
- Handling-safe: 30-60 minutes (can touch freely)
- Fully cured: 24 hours (maximum durability)
Accelerating drying:
- Use fan to circulate air (don’t point directly at wet prints)
- Ensure good ventilation in print area
- Print one photo at a time instead of batches
- Use lower humidity printing environment
Handling wet prints safely:
- Hold by edges only
- Use gloves if you must handle immediately
- Place prints face-up on clean, dry surface
- Don’t stack prints until fully dry
- Keep away from other objects that might touch surface
Additional Insights and Tools for Perfect Glossy Prints

Beyond basic troubleshooting, these tips optimize results.
Color management for accurate prints:
Use printer color profiles:
- Install manufacturer’s ICC profiles for your specific paper
- Enable color management in printing dialog
- Calibrate monitor for accurate color preview
Print quality settings:
Always use highest quality mode for photos:
- Select “Photo” or “Best” quality
- Disable “Fast” or “Draft” modes
- Enable high-resolution printing (1440+ DPI)
Image preparation:
Before printing:
- Ensure images are at least 300 DPI at print size
- Sharpen slightly for printing (prints need more sharpening than screen display)
- Adjust contrast slightly higher than screen appearance
- Save in appropriate color space (sRGB for most photo printers)
Protective finishing:
For maximum durability after solving ink absorption issues on glossy photo paper:
- Allow 24-hour cure time
- Apply spray fixative or UV protective coating
- Store in photo albums or sleeves
- Frame under UV-protective glass for display
Testing methodology:
Create a test photo document:
- Include solid colors (cyan, magenta, yellow, black)
- Include grayscale gradient
- Include detailed photo with faces
- Print on single sheet to verify settings before printing multiple copies
Alternative paper types:
If glossy continues causing problems:
- Try satin or semi-gloss (less coating, fewer absorption issues)
- Consider matte photo paper (absorbs differently)
- Test luster finish (balance between glossy and matte)
Common Mistakes That Worsen Ink Absorption Issues

Avoid these errors that make problems worse.
Mistake 1: Using plain paper settings for glossy paper
This dumps excessive ink designed for absorptive plain paper onto glossy coating that can’t handle the volume.
Solution: Always verify paper type setting before printing. Create and save a custom preset for glossy photo printing.
Mistake 2: Handling prints too soon
Touching wet ink spreads it and creates permanent fingerprints or smudges.
Solution: Wait minimum 15 minutes, preferably 30+ minutes. Set a timer if necessary. Use this time to prepare next print instead of immediately handling finished prints.
Mistake 3: Stacking wet prints
Placing wet prints together transfers ink between sheets and creates permanent damage.
Solution: Lay prints individually on flat surface. Use drying rack or clothesline with clips if printing multiple photos.
Mistake 4: Using expired or improperly stored paper
Old paper loses coating effectiveness, making ink absorption issues on glossy photo paper almost inevitable.
Solution: Check manufacture date on package. Store opened packages in sealed bags. Buy paper from retailers with good turnover (fresh stock).
Mistake 5: Ignoring humidity warnings
Printing in very humid or very dry conditions causes consistent problems regardless of settings.
Solution: Monitor humidity with hygrometer. Postpone printing if humidity exceeds 70% or falls below 30%, unless you can control environment.
Mistake 6: Using maximum ink density by default
More ink doesn’t always mean better quality, especially on glossy paper with limited absorption capacity.
Solution: Start at 90-95% density. Only increase if colors appear too light after proper drying time.
Mistake 7: Assuming all glossy paper is identical
Different brands and grades of glossy paper have significantly different absorption characteristics.
Solution: Test new paper brands with single sheet before committing to bulk purchase or important prints.
Troubleshooting Persistent Glossy Paper Problems
When standard solutions don’t resolve ink absorption issues on glossy photo paper.
Problem: Smudging only in specific areas
Ink pools or smudges in certain parts of print but not others.
Solution: This often indicates uneven ink deposition from clogged nozzles. Run print head cleaning and nozzle check. If problem persists in same location, specific nozzles may be permanently clogged requiring professional service.
Problem: Works with some papers but not others
Certain brands print perfectly, others pool and smudge.
Solution: Paper coating formulations vary significantly. Stick with papers that work well with your printer. Check paper manufacturer’s recommended printer settings—some papers require specific adjustments.
Problem: Sudden onset after previously working
Prints were fine, now suddenly experiencing absorption issues.
Solution: Check for changes: new ink cartridges (possibly third-party?), new paper batch, environmental changes (season change affecting humidity), or software update that reset printer defaults.
Problem: Only occurs with specific colors
Cyan or magenta pools but other colors fine.
Solution: Individual color nozzles may be clogged or that color cartridge may be low. Check ink levels. Run cleaning focused on problematic color if printer allows. Replace relevant cartridge.
Problem: Paper curls severely after printing
Excessive moisture causes dramatic curling.
Solution: Definitely using too much ink. Reduce ink density to 85%. Consider switching to lighter weight photo paper or different coating type. Press prints under heavy book after fully dry to flatten.
Frequently Asked Questions
Q: How long should glossy photo prints take to dry?
Properly printed glossy photos should be touch-dry (minimal ink transfer) within 10-15 minutes in normal conditions. Full curing takes 24 hours for maximum durability. If prints remain wet after 30+ minutes, you have ink absorption issues on glossy photo paper requiring troubleshooting.
Q: Can I use a hair dryer to speed drying of glossy prints?
Not recommended. Heat can damage the glossy coating and cause uneven drying or color shifts. Instead, use room-temperature fan for air circulation, or simply wait. Patience produces better results than forced heating.
Q: Why do some colors smudge but not others?
Different color inks have different drying rates. Cyan often dries slowest. If one color consistently smudges, check that specific ink cartridge’s nozzles, verify it’s genuine (not third-party), and ensure cartridge isn’t expired or low.
Q: Is it normal for glossy prints to be slightly tacky?
Fresh prints (under 5 minutes) may feel slightly tacky, but should not transfer ink. If prints remain tacky after 15+ minutes or transfer ink to fingers, you have absorption problems. Verify paper type settings and reduce ink density.
Q: Will switching to matte paper solve absorption problems?
Possibly. Matte paper absorbs ink into the paper rather than holding it on surface coating. This eliminates glossy-specific pooling issues. However, you’ll sacrifice the vibrant colors and depth that glossy provides. Try semi-gloss as middle ground.
Conclusion
Ink absorption issues on glossy photo paper frustrate many users, but they’re almost always fixable without replacing your printer or giving up on photo printing.
The solution usually involves one or more simple changes: selecting correct paper type in printer settings, reducing ink density, using compatible paper and ink brands, and controlling environmental conditions.
Start by verifying your paper type setting—this single change fixes the majority of problems. Then check humidity levels, clean print heads, and ensure you’re using fresh, quality paper.
Remember that glossy paper behaves differently than plain paper by design. The coating that creates stunning photo quality also makes the paper more sensitive to incorrect settings. Once you understand this, achieving perfect results becomes straightforward.
Take action today: print your next photo with correct glossy paper settings, reduce ink density to 90%, and allow proper drying time. Test with a single sheet before printing important photos.
With these troubleshooting techniques, you can eliminate ink absorption issues on glossy photo paper and consistently produce professional-quality prints that rival commercial photo labs. Your photos deserve proper printing—now you have the knowledge to achieve it.
Print High-Quality Labels and Stickers: Optimal Settings Guide 2025 Read More


