
Introduction
Connecting your Canon printer to WiFi without the installation CD might seem challenging, but it’s actually quite straightforward once you know the right steps. Whether you’ve misplaced the original CD, purchased a computer without a CD drive, or simply prefer a more modern setup method, this guide has you covered. Today, we’ll walk through seven reliable methods to connect your Canon printer to WiFi without relying on that installation disc. By following these step-by-step instructions, you’ll have your printer wirelessly connected and ready to print from any device in your home or office in no time.
What Is Wireless Printer Setup?
Wireless printer setup refers to the process of connecting your printer to your WiFi network without using physical cables. Once properly configured, a wireless Canon printer can receive print jobs from computers, smartphones, and tablets connected to the same network. This eliminates the need for direct USB connections and allows for greater flexibility in printer placement and usage.
Traditional setup methods often relied on installation CDs containing printer drivers and setup wizards. However, modern Canon printers support various CD-free setup options, including WPS (WiFi Protected Setup), Canon mobile apps, web-based installation, and direct wireless connection. These methods leverage built-in printer software and network capabilities to establish stable wireless connections without requiring physical media.
Understanding these wireless connection principles will help you troubleshoot potential issues and select the most appropriate setup method for your specific Canon printer model and home network configuration.

7 Ways to Connect Canon Printer to WiFi Without CD
Method 1: Using the Printer’s Control Panel
Most modern Canon printers feature built-in control panels that allow for direct WiFi setup:
- Power on your Canon printer.
- Navigate to the “Setup” or “Settings” menu on your printer’s display panel.
- Select “Network Settings” or “Wireless LAN Setup.”
- Choose “Standard Setup” or “Search for Access Point.”
- Select your WiFi network name (SSID) from the list of available networks.
- Enter your WiFi password using the printer’s keypad or navigation buttons.
- Confirm the connection and wait for the printer to connect to your network.
- Print a network configuration page to verify successful connection.
This method works particularly well for Canon PIXMA, MAXIFY, and imageCLASS models with LCD screens. For printers with basic LED displays, you may need to reference your printer’s manual for specific button combinations.
Method 2: WPS Push Button Method
The WPS (WiFi Protected Setup) button method is one of the fastest ways to connect your Canon printer to WiFi:
- Ensure your WiFi router has a physical WPS button (most modern routers do).
- Turn on your Canon printer.
- Press the WiFi button on your printer until the WiFi lamp starts flashing.
- Within 2 minutes, press and hold the WPS button on your router for a few seconds.
- The printer’s WiFi lamp will stop flashing and remain lit when the connection is successful.
- Print a network configuration page to confirm the connection.
This method bypasses the need to enter WiFi passwords manually and works with most Canon inkjet and laser printers. However, if your router doesn’t support WPS or uses WPA3 security (which sometimes has WPS compatibility issues), you’ll need to try an alternative method.
Method 3: Canon PRINT Inkjet/SELPHY App
Canon’s mobile application offers a user-friendly way to set up your printer:
- Download the “Canon PRINT Inkjet/SELPHY” app from the App Store (iOS) or Google Play Store (Android).
- Turn on your Canon printer.
- Open the app on your smartphone or tablet.
- Tap “Register Printer” or the plus (+) icon.
- Select “Setup” and follow the on-screen instructions.
- Choose your home WiFi network when prompted.
- Enter your WiFi password.
- Wait for the app to complete the connection process.
This method is ideal for Canon PIXMA, MAXIFY, and SELPHY models and provides the added benefit of direct printing from your mobile device once setup is complete.
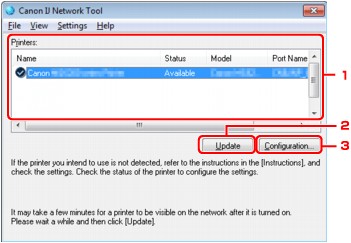
Method 4: Canon IJ Network Tool
For computer-based setup without the CD:
- Visit Canon’s official website (usa.canon.com/support or your country’s equivalent).
- Enter your printer model in the search bar.
- Navigate to “Drivers & Downloads.”
- Download the “Canon IJ Network Tool” for your operating system (Windows or macOS).
- Install and launch the application.
- Click “Next” and select your printer model from the detected devices.
- Choose “Wireless LAN Connection.”
- Select your WiFi network and enter your password.
- Complete the setup process by following the on-screen instructions.
This method is comprehensive and works well for all Canon printer models, especially when other methods fail. The tool also provides detailed network diagnostics if you encounter connection issues.
Method 5: Direct Internet Download of Drivers
For a complete driver installation approach:
- Go to Canon’s official support website.
- Enter your printer model number.
- Download the full driver package for your operating system.
- Run the installer and select “Wireless LAN Connection” when prompted.
- Follow the setup wizard instructions.
- Select your network and enter your WiFi password when requested.
- Allow the installation to complete, which will configure the printer’s wireless settings.
This method ensures you have all necessary software components for optimal printer functionality, including scanning capabilities and maintenance tools.
Method 6: Direct Wireless Connection (Access Point Mode)
Some Canon printers can create their own WiFi network:
- Power on your Canon printer.
- Access the printer’s settings menu.
- Select “Network Settings” then “Access Point Mode” or “Direct Connection.”
- The printer will display its network name (SSID) and password.
- On your computer or mobile device, connect to this printer network using the displayed credentials.
- Open a web browser and enter “192.168.1.1” or the IP address shown on your printer.
- Use the web interface to configure the printer to connect to your home WiFi network.
This method is particularly useful when your regular setup methods aren’t working or when you need to configure a printer in locations with restricted network access.
Method 7: USB Temporary Connection Method
For printers that support configuration via temporary USB connection:
- Connect your Canon printer to your computer using a USB cable.
- Turn on the printer.
- On Windows, wait for automatic detection or go to “Settings” > “Devices” > “Printers & scanners” > “Add a printer or scanner.”
- On Mac, go to “System Preferences” > “Printers & Scanners” > click “+” to add printer.
- Once detected, right-click the printer and select “Printer properties” or “Options & Supplies.”
- Look for a “Network” or “Web Configuration” tab/button.
- Enter your WiFi details to configure the printer for wireless connection.
- After successful setup, you can disconnect the USB cable.
This method effectively uses the USB connection as a temporary bridge to configure wireless settings and is especially helpful for older Canon printer models.

Essential Tools and Resources for Canon Printer Setup
To make your Canon printer wireless setup as smooth as possible, consider having these resources available:
- Your WiFi network name and password: Keep these details handy before starting any setup method.
- Canon Print App: Download this free application for iOS or Android to simplify setup and enable mobile printing.
- Canon’s support website: Bookmark support.usa.canon.com (or your country’s equivalent) for driver downloads and troubleshooting guides.
- Printer’s model number: Located on the front or back of your printer, needed for downloading correct drivers.
- Network configuration page: Learn how to print this from your specific model’s manual to verify connection details.
For advanced users, the Canon IJ Network Tool provides additional diagnostics capabilities that can help identify and resolve network-related issues beyond the initial setup process.
Troubleshooting Common Canon Printer WiFi Connection Problems
Even with clear instructions, you might encounter some challenges. Here are solutions to the most common issues:
Printer Not Detecting WiFi Network
- Move your printer closer to your WiFi router to improve signal strength.
- Ensure your network operates on 2.4GHz frequency, as many Canon printers don’t support 5GHz networks.
- Temporarily disable any VPNs on your setup device that might interfere with local network discovery.
- Restart both your router and printer to refresh their network capabilities.
Connection Process Fails Mid-Setup
- Check if your WiFi password contains special characters that might be difficult to enter on the printer’s keypad.
- Ensure your router’s firewall isn’t blocking printer connection requests.
- Try setting a static IP address for your printer through your router’s DHCP settings.
- Some Canon printers struggle with WiFi networks that have spaces in their names; consider renaming your network if possible.
Printer Shows Connected But Won’t Print
- Verify that your computer or mobile device is connected to the same network as the printer.
- Check if printer sharing is enabled (for network with multiple subnets).
- Install or reinstall the printer drivers on your computer.
- Run the printer’s network diagnostic tool through its control panel or the Canon IJ Network Tool.
WPS Connection Failures
- Ensure you press the WPS button on both devices within the 2-minute window.
- Check if your router has WPS disabled in its security settings.
- Try the standard setup method instead, manually entering network credentials.
- Update your router’s firmware if it’s significantly outdated.
Remember that persistent connection issues might indicate compatibility problems between your printer model and network configuration. In such cases, contacting Canon’s customer support with your specific model information and network details is recommended.
Frequently Asked Questions
How do I connect my Canon printer to WiFi if it doesn’t have a display screen?
For Canon printers without display screens, you can use the WPS button method if your router supports it. Alternatively, use the Canon PRINT app or temporarily connect via USB cable to configure wireless settings through your computer.
Will my Canon printer work with a 5GHz WiFi network?
Most older and entry-level Canon printers only support 2.4GHz networks. Mid-range and newer models often support both 2.4GHz and 5GHz bands. Check your specific printer’s specifications in the user manual or on Canon’s website to confirm compatibility.
Do I need to install drivers after connecting my Canon printer to WiFi?
Yes, you’ll still need printer drivers on each device you want to print from. Windows and macOS often have basic drivers pre-installed, but for full functionality (including scanning and maintenance features), download the complete driver package from Canon’s website.
How can I verify if my Canon printer is successfully connected to WiFi?
Most Canon printers can print a network configuration page that shows connection status and network details. This option is typically found in the printer’s maintenance or settings menu. A solid (non-blinking) WiFi light on the printer also indicates successful connection.
Can I connect multiple devices to my Canon printer once it’s on WiFi?
Yes, once your Canon printer is connected to your WiFi network, any device on the same network can print to it after installing the appropriate drivers or using compatible printing apps.
Conclusion
Connecting your Canon printer to WiFi without a CD is not only possible but often more convenient than traditional setup methods. By following any of the seven methods outlined in this guide, you can establish a reliable wireless connection that enables printing from all your devices. The key is choosing the right approach based on your specific printer model, network configuration, and available devices for setup.
Remember that wireless printing technology continues to evolve, with Canon regularly updating their printer software and connection methods. Keeping your printer’s firmware updated will ensure you benefit from the latest improvements in wireless connectivity and security. If you encounter persistent issues, Canon’s customer support remains a valuable resource for model-specific assistance.
Now that you know how to connect your Canon printer to WiFi without a CD, you can enjoy the convenience of wireless printing from anywhere in your home or office. Happy printing!
How to Connect a Printer to WiFi: Simple Steps for All Read More.


Recent Comments