
When your all-in-one printer scanner not working suddenly stops responding, it can disrupt your entire workflow. You need to scan important documents, but the scanner refuses to cooperate while the printer works perfectly fine. This frustrating situation is more common than you think, and the good news is that most scanner issues can be resolved without calling a technician.
In this guide, you’ll discover practical solutions to get your scanner working again. Whether you’re dealing with connection problems, driver issues, or software conflicts, we’ll walk you through every step to fix your all-in-one printer scanner not working problem quickly and effectively.
What Is an All-in-One Printer Scanner and Why Does It Stop Working?
An all-in-one printer combines multiple functions into a single device. It can print, scan, copy, and sometimes fax documents. The scanner component uses optical technology to capture images of physical documents and convert them into digital files on your computer.
Scanner malfunctions happen for several reasons. The most common causes include outdated drivers, poor cable connections, software conflicts, or incorrect settings. Sometimes, Windows updates can disrupt the communication between your computer and the scanner.
The scanner and printer operate as separate functions within the same machine. This means your printer can work perfectly while the scanner refuses to respond. Understanding this distinction helps you target the right solutions without wasting time on unnecessary fixes.
8 Proven Ways to Fix Your All-in-One Printer Scanner Not Working
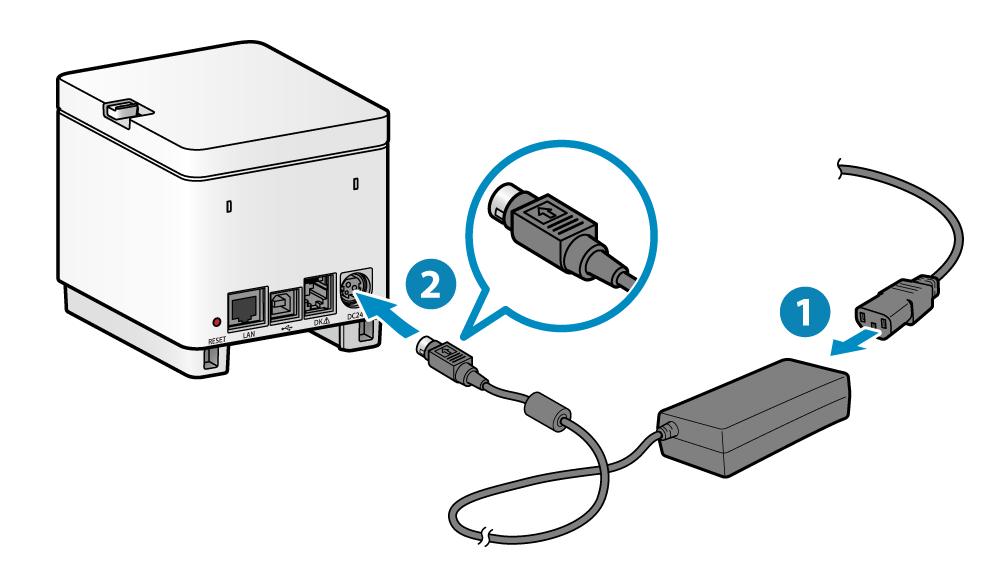
Step 1: Check All Physical Connections
Start with the basics before diving into complex solutions. Ensure your printer is properly connected to your computer and powered on.
For USB connections, unplug the cable from both the printer and computer. Wait 30 seconds, then reconnect firmly. Try a different USB port on your computer, preferably one directly on the motherboard rather than a front panel or hub.
If you’re using a wireless connection, verify that both devices are on the same network. Check your printer’s display panel to confirm it shows a Wi-Fi connection. Restart your router if the connection seems unstable.
Step 2: Restart Your Devices Properly
A simple restart can resolve many scanner issues. Turn off your printer completely and unplug it from the power source. Shut down your computer as well, not just restart it.
Wait for at least one minute before powering everything back on. This allows all temporary memory to clear and resets the connection protocols.
Turn on your printer first and wait until it’s fully initialized. Then start your computer. This sequence ensures your computer detects the scanner properly during startup.
Step 3: Update or Reinstall Scanner Drivers
Outdated or corrupted drivers are the leading cause of all-in-one printer scanner not working issues. Drivers act as translators between your hardware and operating system.
Visit your printer manufacturer’s official website. Navigate to the support or downloads section and enter your exact printer model number. Download the latest driver package specifically for your operating system version.
Before installing new drivers, uninstall the current ones. Go to Control Panel, select “Devices and Printers,” right-click your printer, and choose “Remove device.” Then go to “Programs and Features” and uninstall any printer software.
Restart your computer, then install the newly downloaded drivers. Follow the installation wizard carefully and choose the “Full Installation” option when available. This ensures all scanner components are properly installed.
Step 4: Run the Windows Troubleshooter
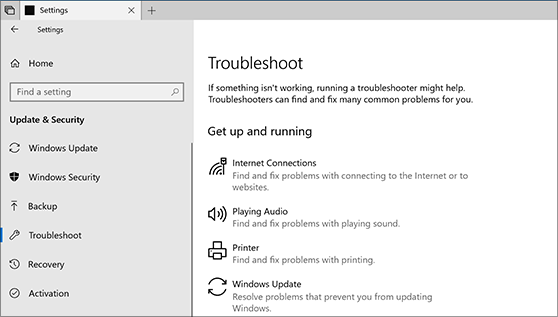
Windows includes built-in diagnostic tools that can identify and fix scanner problems automatically. Open Settings and go to “Update & Security,” then select “Troubleshoot.”
Click on “Additional troubleshooters” and find “Printer” in the list. Run this troubleshooter and follow the on-screen instructions. It will scan for common issues and attempt to repair them.
After completing the printer troubleshooter, also run the “Hardware and Devices” troubleshooter if available. This provides a more comprehensive scan of all connected hardware.
Step 5: Check Your Scanning Software Settings
Sometimes the problem isn’t with the hardware but with the software you’re using to scan. Open your scanning application and verify the correct scanner is selected as the input device.
Many computers have multiple imaging devices listed, including virtual scanners or camera devices. Make sure you’ve selected your actual all-in-one printer scanner from the dropdown menu.
Check the scan settings for resolution, color mode, and file format. Extremely high resolution settings can cause the scanner to freeze or fail. Try using default settings first to see if the scanner responds.
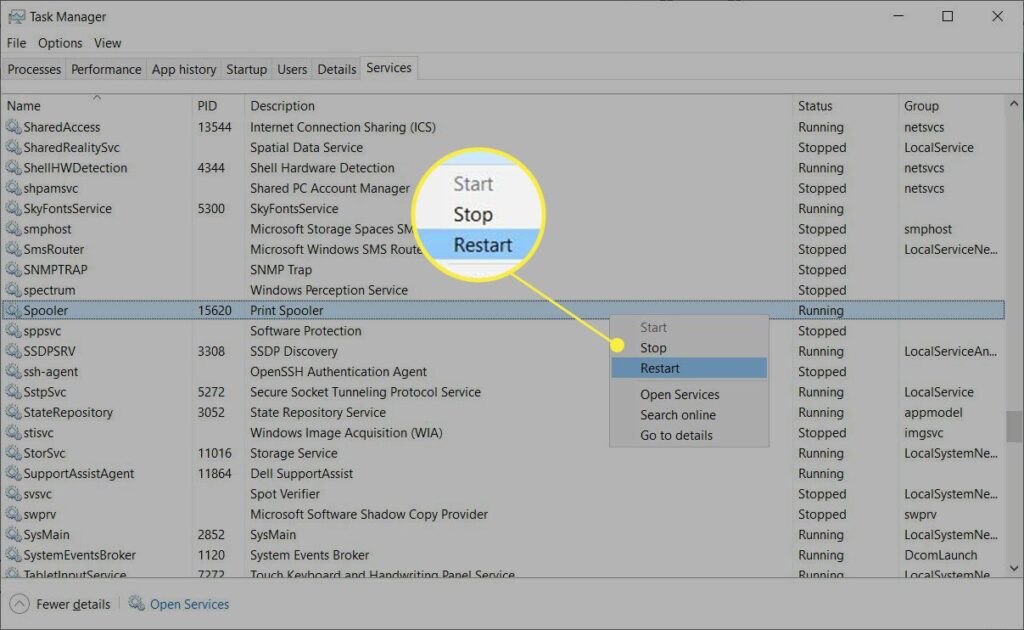
Step 6: Disable Windows Imaging Acquisition Service and Restart
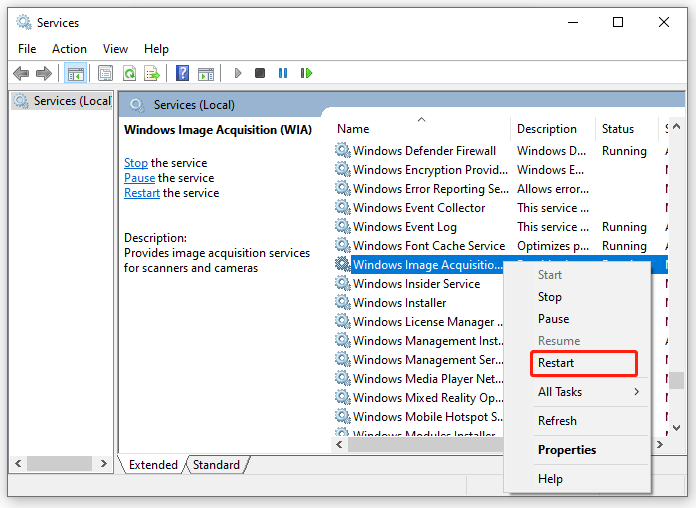
The Windows Imaging Acquisition (WIA) service manages scanner communication. If this service encounters errors, your scanner won’t function properly.
Press Windows key + R, type “services.msc” and hit Enter. Scroll down to find “Windows Image Acquisition (WIA).” Right-click it and select “Restart.” If it’s not running, click “Start” instead.
Right-click again and select “Properties.” Set the Startup type to “Automatic” to ensure it runs every time you start your computer. Click Apply and OK.
Step 7: Check for Software Conflicts
Third-party scanning applications can conflict with your printer’s native software, causing the all-in-one printer scanner not working problem.
If you’ve installed multiple scanning programs, try uninstalling ones you don’t regularly use. Common culprits include old versions of Adobe Acrobat, VueScan, or manufacturer software from previous printers.
Temporarily disable your antivirus software to test if it’s blocking scanner communication. Some security programs flag scanner drivers as suspicious. If this fixes the issue, add your printer software to the antivirus exception list.
Step 8: Reset Your Printer to Factory Settings
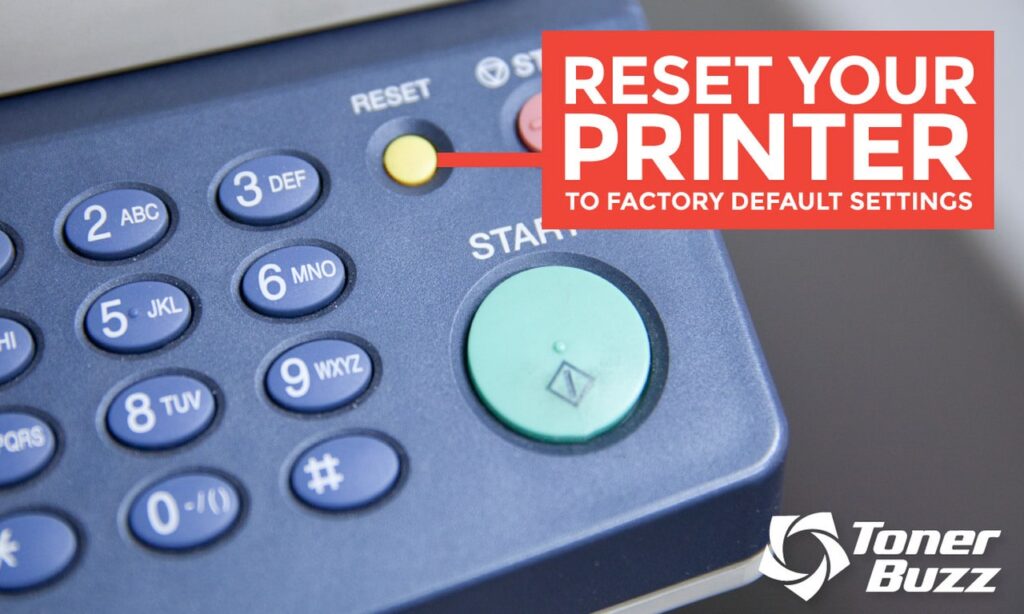
When all else fails, a factory reset can resolve persistent scanner issues. This erases custom settings and returns the printer to its original state.
Access your printer’s control panel and navigate to the Settings or Setup menu. Look for options labeled “Restore Factory Settings,” “Reset All,” or “Restore Defaults.” The exact location varies by manufacturer.
After resetting, you’ll need to reconfigure your wireless settings and reconnect to your computer. Follow your printer’s setup guide to complete this process. Then test the scanner functionality before making any custom adjustments.
Additional Tools and Resources for Scanner Troubleshooting
Several free tools can help diagnose and fix scanner problems more effectively. The manufacturer’s diagnostic software often includes advanced troubleshooting features not available in standard drivers.
HP offers HP Print and Scan Doctor, a free utility that automatically detects and fixes common printer and scanner issues. Canon provides similar tools through their IJ Scan Utility. Download these directly from the manufacturer’s website.
For persistent problems, consider using Device Manager to check for hardware conflicts. Press Windows key + X and select Device Manager. Expand “Imaging Devices” and look for yellow warning icons next to your scanner. Right-click and update or reinstall the device if warnings appear.
Generic scanning software like NAPS2 (Not Another PDF Scanner 2) can sometimes communicate with scanners when proprietary software fails. This free, open-source program supports most scanner models and offers a simple alternative for basic scanning needs.
Common Mistakes When Fixing All-in-One Printer Scanner Not Working Issues
Many users make these errors that actually worsen the problem or waste valuable time.
Installing the wrong driver version is extremely common. Always verify you’re downloading drivers for your exact model number and operating system. A driver for Windows 10 may not work properly on Windows 11, even for the same printer.
Skipping the full uninstall process before installing new drivers leaves corrupt files that cause conflicts. Use the manufacturer’s uninstall tool if available, or manually remove all printer-related programs before reinstalling.
Ignoring firmware updates can prevent your scanner from working with newer operating systems. Check your printer’s control panel or manufacturer website for firmware updates separate from driver updates.
Using generic Windows drivers instead of manufacturer-specific software limits functionality. While Windows might recognize your printer for basic printing, the built-in drivers rarely support full scanner features.
Not checking the scanner lock switch is a rookie mistake. Many flatbed scanners have a physical lock for shipping that must be unlocked before use. Check your scanner bed for any switches or locks that need to be released.
Frequently Asked Questions
Why does my printer work but the scanner doesn’t?
The printer and scanner are separate functions with different drivers and communication protocols. A printer can work perfectly while the scanner fails due to driver issues, software conflicts, or service problems specific to the imaging components.
How do I know if my scanner driver is outdated?
Check Device Manager for your scanner device. If it shows a yellow warning icon, the driver has issues. Visit the manufacturer’s website and compare the driver version you have installed with the latest available version.
Can a USB cable cause scanner problems?
Yes, definitely. Damaged or low-quality USB cables can prevent proper data transmission from the scanner to your computer. Always use cables rated for data transfer, not just charging cables. Try a different cable if you suspect connection issues.
Do I need special software to use my all-in-one printer scanner?
Most scanners work with Windows built-in scanning features, but manufacturer software provides better functionality and easier operation. Installing the full driver package from your printer maker ensures the best performance and access to all features.
How often should I update my scanner drivers?
Update your drivers whenever you upgrade your operating system or experience scanning problems. Otherwise, checking for updates every six months is sufficient. Enable automatic updates in your printer software if available.
Why does my wireless scanner work slowly or not at all?
Wireless scanners require strong, stable connections. Interference from other devices, distance from the router, or network congestion can slow or stop scanning. Try moving the printer closer to your router or using a wired USB connection for more reliable performance.
Conclusion
Dealing with an all-in-one printer scanner not working doesn’t have to be overwhelming. Most scanner issues stem from driver problems, connection errors, or software conflicts that you can fix yourself using the steps outlined in this guide.
Start with simple solutions like checking connections and restarting devices before moving to more complex fixes. Update your drivers regularly and keep your scanning software current to prevent future problems. Remember that patience and systematic troubleshooting are your best tools.
If you’ve tried all these solutions and your scanner still won’t work, the issue might be hardware-related. Contact your printer manufacturer’s support team or consider professional repair services. Most scanner problems, however, are software-related and completely fixable with the right approach.
External Resource: For official troubleshooting guidance, visit Microsoft’s Device and Printer Support Page for additional help with Windows-related scanner issues.
Printer in Error State? Fix It Fast With This Simple Troubleshooting Guide Read More.


