
Introduction
Want to setup ePrint email printing so you can send documents to your printer from anywhere? You’re in the right place.
Email printing (also called ePrint) lets you print by simply sending an email to your printer’s unique email address. No apps, no drivers, no being in the same room as your printer.
It sounds almost too easy, right? But it works amazingly well once you set it up properly.
In this guide, I’ll walk you through everything you need to know about ePrint email printing. You’ll learn how to set it up on HP, Canon, Epson, and Brother printers, plus how to fix the most common problems people run into.
Whether you’re printing from your phone while traveling or sending documents from a different office, email printing makes it simple.
Let’s get started.
What Is ePrint Email Printing?
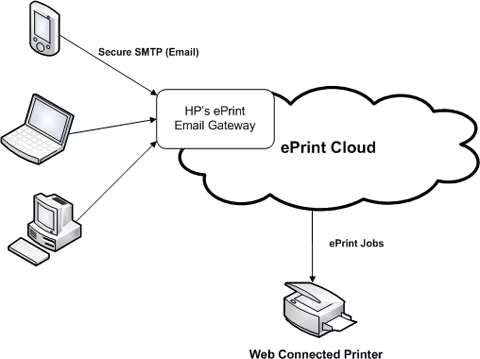
ePrint email printing is a feature that gives your printer its own email address. You send files to that address, and your printer automatically prints them.
Think of it like texting a document to your printer. Attach a PDF or Word file to an email, send it to your printer’s address, and within minutes, it prints out.
How Does Email Printing Work?
Here’s the basic process:
- Your printer gets assigned a unique email address (like yourprinter123@hpeprint.com)
- You send an email with attachments to that address
- The printer receives the email through the cloud
- The attachments automatically print
Why Use ePrint Email Printing?
There are several great benefits:
Print from Anywhere: You don’t need to be near your printer or even in the same country. As long as your printer is connected to WiFi, it’ll receive and print your documents.
No Software Needed: Skip installing printer drivers on every device. Just use email, which everyone already has.
Works on Any Device: Send from your phone, tablet, laptop, or even someone else’s computer.
Great for Remote Teams: Share your printer’s email with coworkers so they can print to your office printer remotely.
Perfect for Travel: Send boarding passes, hotel confirmations, or work documents to your home printer before you arrive.
This feature works best for:
- Remote workers who need home printing
- Small businesses with distributed teams
- Frequent travelers
- Printing from mobile devices
- Quick document sharing
6 Steps to Setup ePrint Email Printing
Setting up email printing varies slightly by brand, but the process is similar. I’ll cover the major printer brands.
Step 1: Check Your Printer’s Compatibility
Not every printer supports email printing. Here’s what you need:
HP Printers: Look for “HP ePrint” in the specs. Most HP printers from 2010 onwards support it.
Epson Printers: Check for “Epson Email Print” or “Epson Connect” support.
Canon Printers: Look for “Canon PIXMA Cloud Link” or Google Cloud Print compatibility.
Brother Printers: Check for “Brother Web Connect” support.
Visit your printer manufacturer’s website and search for your model number to confirm compatibility. You can also check your printer’s manual or control panel for email printing options.
Step 2: Connect Your Printer to WiFi
Email printing requires an internet connection.
To connect your printer to WiFi:
- Turn on your printer
- Go to the network or WiFi settings on the printer’s control panel
- Select your WiFi network from the list
- Enter your WiFi password using the printer’s keypad
- Wait for confirmation that you’re connected
Some printers have a WPS button that lets you connect without entering a password. Just press WPS on your router and printer within two minutes.
Make sure your printer shows a solid WiFi indicator light. If it’s blinking, the connection isn’t stable.
Step 3: Enable ePrint on Your Printer
Now let’s turn on the email printing feature.
For HP Printers:
- On your printer’s touchscreen, find the “HP ePrint” icon (looks like an envelope)
- Touch it to see your printer’s email address
- If ePrint isn’t enabled, select “Enable” or “Turn On”
- Your printer will connect to HP’s servers and generate an email address
- Write down or take a photo of this email address
For Epson Printers:
- Press the “Home” button on your printer
- Navigate to “Setup” or “Settings”
- Select “Epson Connect Services”
- Choose “Email Print”
- Select “Register” and follow the prompts
- Check your email for a confirmation message and click the link
- Your printer’s email address will be shown on screen
For Canon Printers:
- Visit the Canon PIXMA Cloud Link website
- Register your printer by entering its serial number
- Follow the setup wizard to enable email printing
- Your printer’s email address will be assigned during registration
For Brother Printers:
- Access your printer’s web interface by typing its IP address into a browser
- Go to “Network” settings
- Find “Brother Web Connect” or “Google Cloud Print”
- Follow the setup instructions
- Register for a Brother account to get your printer’s email address
Each printer gets a unique, permanent email address like “yourprinter.abc123@hpeprint.com.”
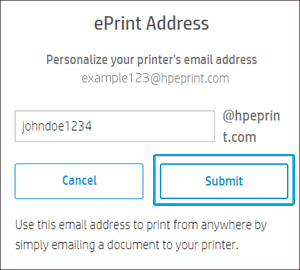
Step 4: Customize Your Printer’s Email Address
The default email addresses are usually long and random. Most services let you customize it.
To change your HP ePrint address:
- Visit HP Connected
- Sign in with your HP account (create one if needed)
- Find your printer in the dashboard
- Click “Printer Settings”
- Look for “ePrint Email Address”
- Enter a new name (like “johns-office-printer@hpeprint.com“)
- Save changes
Pick something memorable but not too obvious. You don’t want random people guessing your printer’s address.
Step 5: Configure Security Settings
This is important. You don’t want strangers printing to your printer.
Most ePrint services have security options:
Allowed Senders: Create a list of email addresses that can print to your printer. Only emails from these addresses will be accepted.
To set up allowed senders on HP:
- Go to HP Connected website
- Select your printer
- Click “ePrint Settings”
- Choose “Allowed Senders”
- Select “Only Allow Specified Email Addresses”
- Add email addresses you trust
Authentication: Some printers require a PIN code that must be included in the email subject line.
Print Job Limits: Set maximum page counts or file sizes to prevent abuse.
Always use the “allowed senders” feature. It’s your main protection against unwanted print jobs.
Step 6: Send a Test Email
Time to try it out!
- Open your email on any device
- Compose a new email
- Enter your printer’s email address in the “To” field
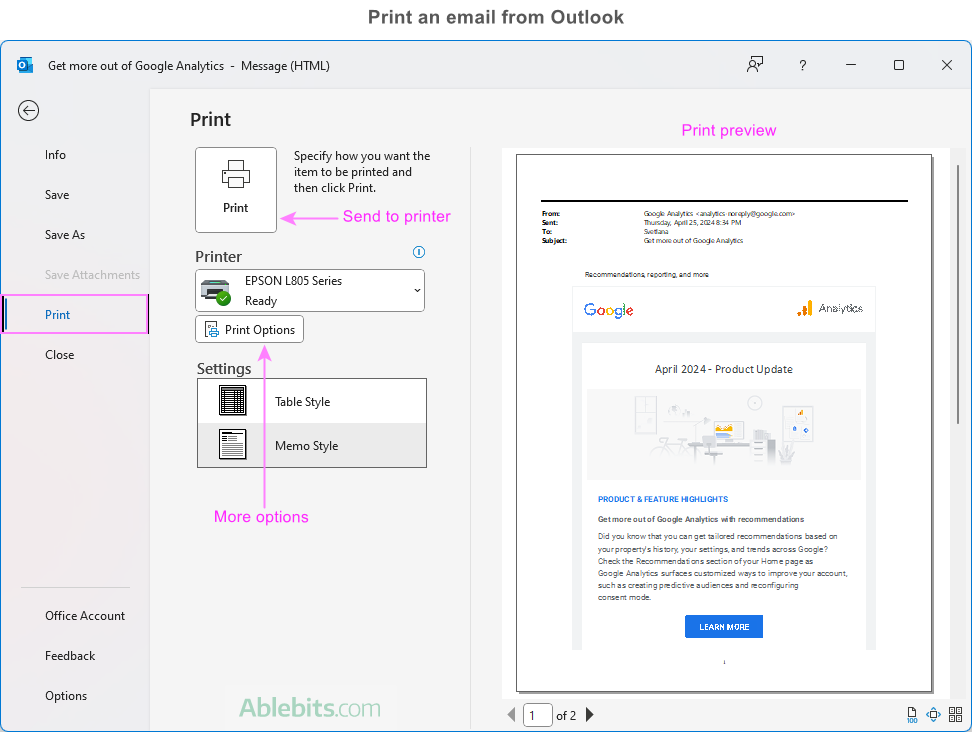
- Attach a PDF or Word document (most printers support PDF, DOCX, JPG, PNG)
- You can leave the subject and body blank, or add notes
- Send the email
Within 1-5 minutes, your printer should start printing. The first time might take a bit longer as the system processes everything.
If nothing happens after 10 minutes, check the troubleshooting section below.
Additional Tools and Features for Email Printing

Mobile Apps for Better Control
While email works great, mobile apps give you more options:
HP Smart App: Lets you monitor print jobs, adjust settings, and manage your ePrint address all from your phone.
Epson iPrint App: Provides similar functionality for Epson printers with better print quality controls.
Canon PRINT App: Gives you advanced options for Canon printers including paper type selection.
These apps are free and make managing your email printing setup much easier.
Supported File Types
Most ePrint services support these file formats:
- PDF (most reliable)
- Microsoft Word (.doc, .docx)
- Microsoft Excel (.xls, .xlsx)
- Microsoft PowerPoint (.ppt, .pptx)
- JPEG and PNG images
- Plain text files
File size limits: Usually 10-25MB per email, depending on your printer brand.
Page limits: Most services limit you to 10-20 pages per email to prevent abuse.
Advanced Settings
Dig into your ePrint settings for options like:
Default Print Quality: Set whether emails print in draft or high quality mode.
Color vs. Black & White: Choose if color documents print in color or convert to black and white.
Paper Size: Select your default paper size (Letter, A4, Legal, etc.).
Duplex Printing: Enable automatic two-sided printing for emails.
These settings save you from having to specify preferences in every email.
Troubleshooting Common ePrint Email Printing Problems
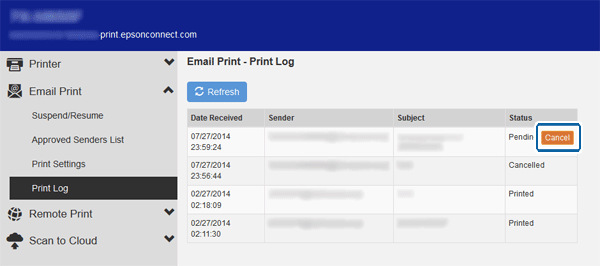
Problem 1: Email Sent But Nothing Prints
This is the most frustrating issue.
Possible causes and solutions:
Check if the sender is authorized: If you set up “allowed senders,” make sure you’re sending from an approved email address.
Verify your printer is online: Look at the printer’s WiFi status. If it’s offline, restart both your printer and router.
Check your email: Look for a bounce-back message saying delivery failed. This means the printer’s email address is wrong or the service is down.
File format issues: Make sure your attachment is in a supported format. Convert documents to PDF for best results.
File size too large: If your attachment is over 25MB, the email might be rejected. Compress your file or split it into multiple emails.
Wait longer: Sometimes emails take up to 15 minutes to process, especially during peak times.
Try sending a simple test email with just a one-page PDF attached. If that doesn’t work, the problem is with your setup, not your document.
Problem 2: Print Quality Is Poor
Email printing sometimes produces lower quality output.
Solutions:
Use PDF files: PDFs generally print better than Word documents or images.
Check your ePrint settings: Log into your printer’s web portal and set print quality to “Best” or “High.”
Increase image resolution: If you’re emailing photos, make sure they’re at least 300 DPI.
Use the correct paper: Make sure your printer has the paper type specified in your settings.
Update printer firmware: Outdated firmware can cause quality issues. Check your manufacturer’s website for updates.
For important documents, you might get better results using traditional printing methods instead of email.
Problem 3: Can’t Find Printer’s Email Address
You forgot to write it down, and now you can’t find it.
How to retrieve it:
HP Printers: Press the ePrint button on your printer’s touchscreen. The email address displays on screen.
Epson Printers: Print a network status sheet from the printer’s menu. The email address will be listed.
Canon Printers: Log into your Canon account at the Canon website. Your printers and their email addresses are listed in your account.
Brother Printers: Access the printer’s web interface by typing its IP address into your browser. The email address is in the network settings.
You can also check any previous emails you sent to the printer. The address is in your sent mail.
Problem 4: Security Warnings or Blocked Emails
Sometimes email providers flag printer emails as suspicious.
Solutions:
Add printer email to contacts: Save your printer’s email address in your contacts. This tells your email provider it’s trusted.
Check spam folder: Your printer’s confirmation emails might end up in spam.
Whitelist the domain: Add @hpeprint.com (or your printer’s domain) to your email provider’s safe sender list.
Disable overly aggressive spam filters: Some corporate email systems block automated emails. Talk to your IT department.
If you’re using Gmail, go to Settings → Filters and create a rule that always allows emails from your printer’s domain.
Problem 5: Printer Email Address Changed
Sometimes printer email addresses reset after firmware updates.
Solutions:
Check for firmware updates: Sometimes updates cause settings to reset. Reinstall the latest firmware properly.
Re-register your printer: You might need to go through the setup process again.
Contact support: If your email address changed without reason, contact your printer manufacturer’s support.
Update your allowed senders: If you get a new printer email address, update your security settings to allow your personal email.
Save your printer’s email address in multiple places (phone, computer, cloud notes) so you always have it handy.
FAQs About Setting Up ePrint Email Printing
Q: Is email printing secure?
Email printing is reasonably secure if you use the “allowed senders” feature. This restricts printing to specific email addresses you authorize. However, emails travel over the internet, so don’t use this method for highly sensitive documents. For confidential files, use a direct connection to your printer instead.
Q: Can I print from Gmail or Outlook using ePrint?
Yes! ePrint works with any email service including Gmail, Outlook, Yahoo, iCloud Mail, and even corporate email systems. Just send an email with your document attached to your printer’s email address from any email provider.
Q: How much does ePrint cost?
ePrint is free for most consumer printers. HP, Epson, Canon, and Brother don’t charge for the service itself. You only pay for your regular printer ink and paper. Some commercial or enterprise printing services might have fees, but home users don’t pay anything extra.
Q: Can multiple people use the same printer’s email address?
Absolutely. You can share your printer’s email address with family members, roommates, or coworkers. Just add their email addresses to your “allowed senders” list so they can print. This is perfect for home offices or small businesses where several people need printer access.
Conclusion: Master Email Printing Today
Now you know how to setup ePrint email printing and troubleshoot common issues.
Email printing is one of the most convenient features modern printers offer. Once configured, you can print from anywhere in the world with just an email. No apps, no drivers, no proximity required.
Start by enabling ePrint on your printer and writing down the email address. Then set up security with “allowed senders” to protect your printer. Finally, send a test email to make sure everything works.
Remember the key points: keep your printer connected to WiFi, use PDF files for best results, and configure security settings to prevent unauthorized printing.
If you run into problems, work through the troubleshooting steps methodically. Most issues are simple fixes like checking your allowed senders list or restarting your printer.
Email printing transforms how you work, especially if you travel frequently or work remotely. Set it up once, and you’ll wonder how you ever managed without it.
Give it a try today and experience the freedom of printing from anywhere.
Print from Google Drive Without Downloading | Fast Cloud Printing Solutions Read More


