
Introduction
Learning to print high-quality labels and stickers transforms homemade products from amateur to professional. But most people struggle with blurry images, colors that don’t match their screen, or ink that smears when touched.
The difference between disappointing results and professional-looking labels isn’t expensive equipment. It’s using the right printer settings, material choices, and preparation techniques.
Whether you’re printing product labels for your small business, custom stickers for craft projects, or organizing labels for your home, the principles for printing high-quality labels and stickers remain the same.
This comprehensive guide reveals the optimal settings for any printer type, the materials that produce best results, and troubleshooting steps when prints don’t meet expectations. You’ll learn the exact settings professional label makers use to achieve consistently excellent results.
Let’s turn your printer into a professional label-making machine.
What Does It Mean to Print High-Quality Labels and Stickers?
Printing high-quality labels and stickers means producing printed materials with sharp text, accurate colors, and professional durability that won’t fade, smear, or peel prematurely.
Key quality indicators:
Sharpness: Text and lines appear crisp with clean edges, not fuzzy or pixelated. Small text (6pt or smaller) remains readable.
Color accuracy: Printed colors match your design intent. Reds don’t look orange, blues don’t look purple, and skin tones appear natural.
Ink coverage: No white spots, streaks, or inconsistent density. Colors appear solid and vibrant throughout the entire label.
Durability: Ink doesn’t smear when touched immediately after printing. Labels resist water, oil, and UV exposure appropriate to their intended use.
Adhesion quality: Stickers stick properly to intended surfaces and don’t peel at edges or corners prematurely.
Why quality matters:
For businesses, poor label quality damages brand perception. Customers judge product quality partially by packaging appearance. Blurry or cheap-looking labels suggest low-quality contents.
For personal use, high-quality labels last longer and look better, making your organizational efforts more effective and aesthetically pleasing.
Factors affecting quality:
Multiple elements combine to determine whether you successfully print high-quality labels and stickers:
- Printer type and capabilities
- Printer settings and profiles
- Label material and coating
- Design file preparation
- Environmental conditions during printing
This guide addresses all these factors systematically.
8 Essential Settings to Print High-Quality Labels and Stickers
Configure these settings correctly for consistently excellent results.
1. Select the Highest Print Quality Mode
Print quality mode determines resolution and how much ink the printer uses.
How to access quality settings:
Windows:
- Open your document
- Click File > Print
- Select your printer
- Click “Printer Properties” or “Preferences”
- Look for “Quality,” “Print Quality,” or similar tab
Mac:
- Open your document
- Click File > Print
- Click “Show Details” (if collapsed)
- Find quality settings in dropdown menus
Which setting to choose:
Most printers offer these quality levels:
- Draft or Fast: Lowest quality, fastest speed
- Normal or Standard: Balanced quality and speed
- Best or High Quality: Highest resolution, slowest speed
- Photo or Maximum: Highest possible quality for your printer
For printing high-quality labels and stickers, always select “Best,” “High Quality,” or “Photo” mode. Yes, it’s slower. But quality matters more than speed for labels.
This setting increases DPI (dots per inch) from 300-600 to 1200-4800 depending on your printer, resulting in sharper text and smoother gradients.
2. Choose the Correct Paper Type Setting
This setting tells your printer how much ink to use and how to lay it down.
Why this matters:
Label materials absorb ink differently than regular paper. Using the wrong setting causes:
- Too much ink: Smearing, bleeding, longer drying time
- Too little ink: Faded colors, incomplete coverage
Common paper type options:
- Plain paper (default—don’t use for labels)
- Glossy paper/photo paper
- Matte paper
- Labels/Stickers (if available)
- Cardstock
- Transparency
Best settings for label materials:
- Glossy label sheets: Select “Glossy Paper” or “Photo Paper”
- Matte label sheets: Select “Matte Paper” or “Premium Matte”
- Clear sticker sheets: Select “Transparency” or “Film”
- Vinyl stickers: Select “Photo Paper” or “Premium Glossy”
If your printer has a specific “Labels” or “Stickers” setting, use it. Otherwise, match the setting to your label’s surface finish.
According to Avery’s printing guidelines, selecting appropriate media type improves print quality by 40% compared to using default settings.
3. Disable Fast Drying or Speed Settings

Speed optimization features compromise quality for faster output.
Settings to disable:
- “Fast” or “Speed” mode
- “Fast Drying” option
- “Economode” or “Economy” mode
- “Draft” quality
- Bidirectional printing (on some printers)
Where to find these:
Check under Advanced Settings, Printer Features, or Custom Settings in your printer preferences dialog.
Why disable these for labels:
These features reduce ink coverage, lower resolution, or speed up print head movement. All of these negatively impact quality when you print high-quality labels and stickers.
For regular documents, these settings make sense. For labels requiring professional appearance, always disable them.
4. Adjust Color Management Settings
Color management ensures what you see on screen closely matches printed output.
Color management options:
ICM/ColorSync (Windows/Mac):
- Allows application to manage colors (recommended for design software)
- Allows printer to manage colors (recommended for Office applications)
For most label printing: Select “Let printer manage colors” unless you’re using professional design software with embedded color profiles.
Brightness and saturation adjustments:
Some printer drivers offer sliders for:
- Brightness: Keep at default (0 or middle position)
- Contrast: Keep at default
- Saturation: Increase by 5-10% for labels (makes colors more vibrant)
Color correction:
If your printer offers “Vivid” or “Enhanced” color modes, try them when printing high-quality labels and stickers. These boost color intensity which looks better on labels than in photos.
5. Set Proper Margins and Bleed
Incorrect margins cause cut-off designs or misaligned labels.
Minimum margin settings:
Most printers can’t print to the absolute edge:
- Standard printers: 0.25-0.5 inch margins on all sides
- Borderless capable printers: 0 inch margins (for full-bleed stickers)
Check your printer specifications:
In printer properties, look for “Printable Area” or consult your printer manual. Never design beyond these boundaries.
Using bleed correctly:
Bleed extends your design 0.125-0.25 inches beyond the cut line. This prevents white edges if cutting isn’t perfectly precise.
Setting up bleed:
- Design your label 0.25 inches larger than final size
- Extend backgrounds and images to this border
- Keep important text/logos inside the safe area (0.25 inches from edge)
6. Choose the Right DPI for Your Design Files
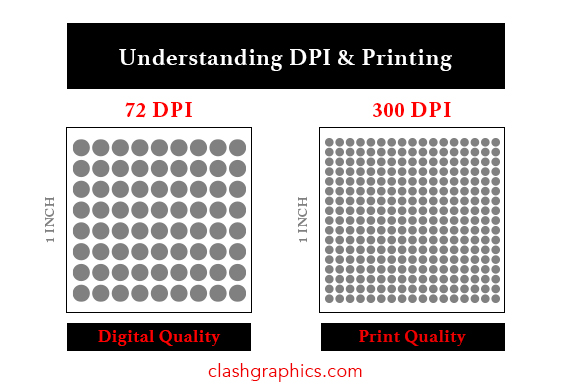
DPI (dots per inch) in your design file must match or exceed printer capabilities.
Recommended DPI for labels:
- Text and vector graphics: 300 DPI minimum (600 DPI ideal)
- Photos on labels: 300-600 DPI
- Barcodes and QR codes: 600 DPI minimum
Why higher DPI matters:
Low-resolution images (72-150 DPI) look fine on screens but appear pixelated when printed. To print high-quality labels and stickers, always use 300+ DPI source files.
How to check DPI:
- In Photoshop: Image > Image Size (check resolution)
- In PDF: File properties shows DPI
- In Word: Right-click image > Format Picture > Size (calculate from pixel dimensions)
Fixing low-resolution images:
You can’t truly increase DPI of a low-res image, but you can:
- Find higher resolution versions of the image
- Recreate graphics as vectors (infinitely scalable)
- Use image upscaling software (AI-powered tools like Topaz Gigapixel)
7. Adjust Ink Density Settings
Ink density controls how much ink the printer deposits.
When to adjust:
- Increase density: Faded colors, incomplete coverage
- Decrease density: Ink pooling, smearing, excessive drying time
Where to find density settings:
Look under:
- Advanced settings
- Color adjustment
- Ink/toner density control
- Print density slider
Optimal settings:
For most label materials when printing high-quality labels and stickers:
- Glossy labels: 90-100% density (standard to high)
- Matte labels: 100-110% density (standard to slightly higher)
- Vinyl stickers: 95-105% density
Start at 100% and adjust based on results. Test prints help determine optimal settings for your specific materials and printer combination.
8. Enable Advanced Print Features
Modern printers offer features that enhance label quality.
Useful features to enable:
Print Preview: Always preview before printing expensive label sheets. Catches alignment and sizing errors.
Reverse Print Order: For printers that output face-up, prevents smudging as sheets stack.
High-Quality Text Enhancement: Sharpens text edges for clearer small fonts.
Color Smoothing or Enhancement: Reduces banding in gradients.
Custom Color Profiles: If available for your specific label material, these optimize color accuracy.
Test before final prints:
Print one label or sticker before running an entire sheet. This confirms settings produce desired results before wasting material.
Additional Tools and Resources for Label Printing Excellence

Beyond printer settings, these tools help achieve professional results.
Label design software:
While Word and basic programs work, dedicated software offers better control:
- Avery Design & Print: Free, integrates with Avery label templates
- Adobe Illustrator: Professional vector design, perfect for labels
- Canva: User-friendly with label templates
- Inkscape: Free, open-source vector graphics editor
Color calibration tools:
For color-critical applications:
- Pantone Color Bridge: Matches screen colors to print output
- Colorimeter devices: Hardware calibrates monitors to match printer output
- Printer calibration utilities: Built into professional printer drivers
Label material considerations:
Different materials produce different results:
- Glossy labels: Vibrant colors, photo-like quality, not water-resistant without coating
- Matte labels: Softer look, writable surface, less glare
- Waterproof vinyl: Durable, outdoor use, requires specific ink types
- Clear labels: Show underlying surface, need increased ink density
Post-printing protection:
Extend label life and improve quality:
- Lamination: Protects from water, UV, and scratches
- Clear coat spray: Seals inkjet prints (let dry 24 hours first)
- Proper storage: Keep unused labels in sealed bags away from humidity
Testing methodology:
Create a test document with:
- Small text (6pt, 8pt, 10pt)
- Solid color blocks
- Gradients
- Your logo or key graphics
- Barcode (if applicable)
Print this on scrap label material or paper to verify settings before using expensive materials.
Common Mistakes When Trying to Print High-Quality Labels and Stickers

Avoid these errors that ruin label quality and waste materials.
Mistake 1: Using default printer settings
Default settings optimize for speed and ink conservation, not quality. They’re designed for everyday document printing, not labels.
Solution: Create and save a custom preset specifically for labels. Most printer drivers allow saving custom profiles you can quickly select.
Mistake 2: Printing on cheap label materials
Budget label sheets often have poor coatings that cause ink bleeding or adhesive that fails quickly.
Solution: Invest in quality label sheets from reputable brands (Avery, OnlineLabels, Sticker Mule). The quality difference justifies the cost when printing high-quality labels and stickers.
Mistake 3: Not letting ink dry completely
Handling labels too soon causes smearing and fingerprints.
Solution: Wait at least 5 minutes for laser prints, 15-30 minutes for inkjet prints before handling. In humid conditions, wait longer. Use a fan to speed drying if necessary.
Mistake 4: Ignoring printer maintenance
Clogged nozzles, low ink, and dirty print heads destroy quality.
Solution: Run printer cleaning cycles regularly. Replace ink/toner before it’s completely empty. Check nozzle patterns monthly. Clean printer rollers that contact label sheets.
Mistake 5: Designing at the wrong size
Creating labels at one size then scaling during printing reduces quality.
Solution: Design at exact final print size. Scaling, especially enlarging, reduces effective DPI and causes quality loss.
Mistake 6: Not accounting for color shift
Colors look different on screen than in print, especially reds and blues.
Solution: Print test sheets. Adjust colors in your design file based on actual printed results. Save these adjusted files as your print-ready versions.
Mistake 7: Using JPEG images unnecessarily
JPEG compression reduces quality, especially in text and sharp edges.
Solution: Use PNG or TIFF for graphics with text. Use vector formats (PDF, AI, EPS) when possible. Only use JPEG for photographic elements.
Troubleshooting Poor Label Print Quality
When results disappoint, try these solutions.
Problem: Blurry or pixelated prints
Text and images lack sharpness.
Solution: Increase source file DPI to 300+ minimum. Select highest quality print mode. Check that you haven’t accidentally scaled images up beyond 100% of their native resolution.
Problem: Colors don’t match screen
Printed colors look different from design file.
Solution: Calibrate your monitor. Use printer color management instead of application management. Print color samples and adjust design files accordingly. Remember that glossy vs. matte materials show colors differently.
Problem: Ink smears or pools
Wet ink spreads or doesn’t dry properly.
Solution: Reduce ink density 5-10%. Verify correct paper type setting. Ensure you’re using appropriate label material for your printer type (some materials are inkjet-only). Increase drying time before handling.
Problem: Faded or washed-out colors
Colors lack vibrancy and appear dull.
Solution: Increase ink density. Enable vivid or enhanced color mode. Check ink levels—partial clogs cause faded colors. Run print head cleaning cycle.
Problem: Misaligned prints on label sheets
Designs don’t line up with actual label boundaries.
Solution: Verify exact label template dimensions. Check printer paper settings match label size. Test with plain paper first. Some printers require margin adjustments for thicker label stock.
Problem: Banding or streaks
Horizontal lines appear across prints.
Solution: Clean print heads. Align print heads using printer utility software. Disable high-speed settings. Check that label sheets feed straight without skewing.
Frequently Asked Questions
Q: Can inkjet printers produce professional-quality labels?
Yes, absolutely. Modern inkjet printers can print high-quality labels and stickers that rival commercial printing when using proper settings and quality materials. The key is using appropriate label stock, highest quality settings, and protecting prints with lamination or coating if needed.
Q: What’s the difference between glossy and matte labels for printing?
Glossy labels produce more vibrant colors with photo-like quality but show fingerprints and glare. Matte labels offer subdued colors, are writable, and reduce glare. For product labels, glossy looks more professional. For organizing labels, matte is more practical.
Q: Why do my labels jam in my printer?
Label sheets are thicker than regular paper. Check that your printer supports the weight (measured in GSM or lb). Feed labels one sheet at a time. Ensure labels lie completely flat before loading. Use the bypass tray or manual feed if available.
Q: How can I make my printed labels waterproof?
Laser printers produce somewhat water-resistant prints naturally. Inkjet prints need protection: use waterproof label materials designed for inkjet, apply clear laminate film, or spray with clear acrylic sealer after prints dry completely.
Q: What resolution should I design labels at?
Design at actual print size (100% scale) at minimum 300 DPI, ideally 600 DPI. For barcodes and QR codes, use 600 DPI minimum. Use vector graphics instead of raster when possible—vectors scale infinitely without quality loss.
Conclusion

The ability to print high-quality labels and stickers consistently comes down to understanding and controlling key variables: printer settings, material selection, design file preparation, and proper handling.
Start by selecting the highest quality print mode available on your printer. Match paper type settings to your actual label material. Disable speed-optimizing features that compromise quality. Design files at proper resolution and size.
Quality label materials matter as much as printer settings. Invest in reputable brands specifically designed for your printer type. The cost difference pays for itself in professional results and reduced waste from failed prints.
Test settings on inexpensive materials before committing to full label sheets. Save successful setting combinations as custom presets for quick access. Keep notes on what works for different material types.
Take action today: open your printer settings and explore available options. Create a test document with various elements. Try different quality and paper type combinations. Document what produces best results for your specific printer and materials.
With these optimal settings and techniques, you can print high-quality labels and stickers that look professionally produced, enhance your products or projects, and last as long as you need them to.
Old Printers on Modern Operating Systems: Complete Windows 11 & Mac Guide Read More


