
Introduction
Port 9100 network printing is the backbone of how most modern network printers communicate with computers across your office network. If you’ve ever wondered why your IT department always references “port 9100” when setting up printers, or why printer troubleshooting often involves checking this specific port, you’re about to understand why.
This single TCP port handles the vast majority of network printing jobs worldwide. When you send a document to print across your network, there’s a good chance it’s traveling through port 9100 network printing protocols to reach your printer.
Understanding port 9100 network printing isn’t just technical trivia—it’s essential knowledge for IT professionals, network administrators, and anyone responsible for maintaining printing infrastructure. Whether you’re troubleshooting why printers suddenly stopped working, securing your network against vulnerabilities, or setting up new printing hardware, port 9100 knowledge directly impacts your success.
In this guide, I’ll explain what port 9100 network printing actually is, how it works behind the scenes, why it became the standard for network printing, how to properly configure it, and most importantly—how to troubleshoot the common problems that plague port 9100 printing setups.
What Is Port 9100 and How Does Network Printing Use It?
Port 9100 network printing uses a simple TCP/IP protocol called “raw printing” or “direct IP printing” that sends print data directly from computers to network printers without requiring special print servers or complex protocols.
Think of port 9100 as a dedicated communication channel between your computer and printer. When you send a document to print, your computer opens a TCP connection on port 9100, streams the raw print data directly to the printer, then closes the connection once transmission completes.
Technical definition:
Port 9100 is a TCP port number designated for “PDL data stream” (Page Description Language data stream). PDL refers to languages like PostScript, PCL (Printer Control Language), or PDF that describe how pages should look when printed.
How port 9100 network printing differs from other methods:
LPD/LPR (Port 515): Older Unix-based printing protocol with more overhead and complexity. Still used but gradually being replaced by port 9100 network printing.
IPP (Port 631): Internet Printing Protocol offers more features like authentication and encryption but requires more configuration than simple port 9100 network printing.
SMB/CIFS (Port 445): Windows file sharing protocol that can handle printing but adds unnecessary complexity for direct printer connections.
Port 9100 network printing wins because it’s simple, fast, and requires minimal configuration. No authentication, no encryption overhead, no complex handshaking—just raw data flowing directly to the printer.
Why manufacturers adopted port 9100:
According to HP’s network printing documentation, port 9100 became the de facto standard because it works consistently across different operating systems (Windows, Mac, Linux), requires no special server software, imposes minimal network overhead, and printers can implement it with simple firmware.
Every major printer manufacturer—HP, Canon, Epson, Brother, Xerox, Lexmark—includes port 9100 network printing support in their network-capable printers. It’s the universal language of network printing.
5 Steps to Configure Port 9100 Network Printing Correctly
Let me walk you through proper configuration of port 9100 network printing on Windows, which applies to most business environments. These steps ensure reliable, fast printing.
Step 1: Verify Your Printer Supports Port 9100 Network Printing
Most modern network printers support port 9100, but always verify before configuration.
Check your printer’s network settings page:
Print a network configuration page from your printer (usually through the control panel menu under “Information” or “Network”). Look for “Port 9100” or “Raw TCP” or “Direct IP” in the enabled services list.
Test port 9100 connectivity:
From a Windows command prompt, test if the printer is listening on port 9100:
cmd
telnet printer-ip-address 9100If the connection opens (screen goes blank), port 9100 network printing is available. If you get “connection refused” or “could not open connection,” the printer doesn’t have port 9100 enabled or has firewall restrictions.
Enable telnet client on Windows if needed:
powershell
dism /online /Enable-Feature /FeatureName:TelnetClientThis basic test confirms port 9100 network printing capability before you spend time configuring drivers and settings.
Step 2: Assign a Static IP Address to Your Printer
For reliable port 9100 network printing, your printer needs a consistent IP address that doesn’t change when DHCP leases expire.
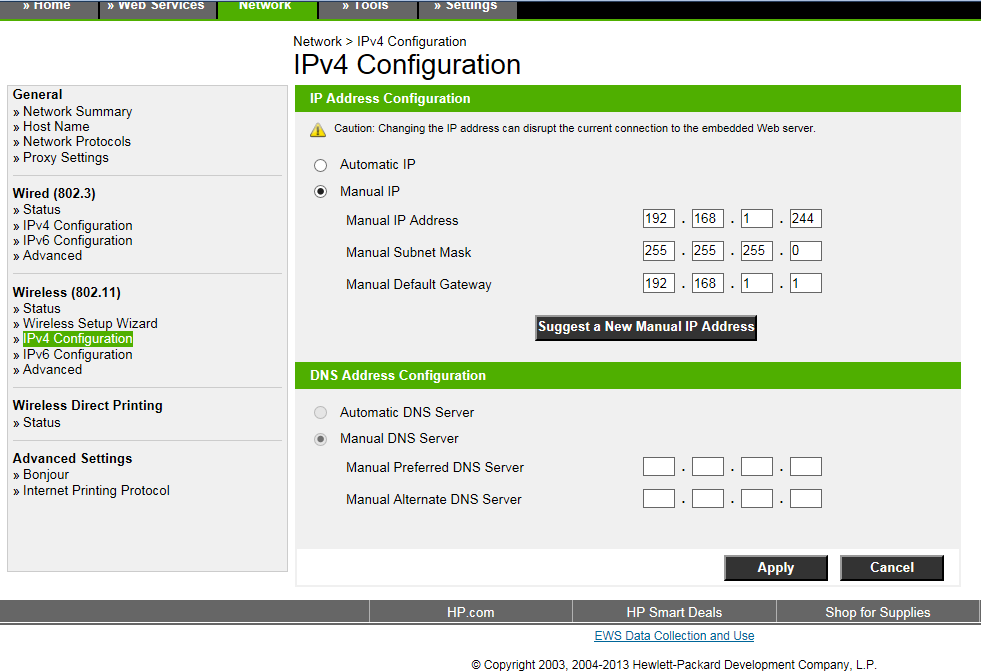
Access your printer’s web interface:
Most network printers have embedded web servers. In a browser, navigate to the printer’s current IP address (shown on the network config page). Log in with admin credentials (check your printer manual for defaults).
Configure static IP settings:
Find the Network or TCP/IP settings section. Change from DHCP to Static/Manual IP. Enter an IP address outside your DHCP range (ask your network admin). Set subnet mask, gateway, and DNS to match your network. Save and reboot the printer.
Document the static IP:
Write down the printer’s IP address, name, and location. This information is crucial for port 9100 network printing configuration on client computers and troubleshooting later.
Alternative: DHCP reservation:
If your router/DHCP server supports it, create a reservation binding the printer’s MAC address to a specific IP. This gives the benefits of static IP while keeping DHCP management centralized for easier port 9100 network printing administration.
Step 3: Create a Standard TCP/IP Port in Windows
Windows calls port 9100 network printing ports “Standard TCP/IP Ports.” Here’s how to create one properly.
Open Printer Management:
Press Windows + R, type printmanagement.msc, press Enter. Or go to Settings > Devices > Printers & scanners > Print server properties.
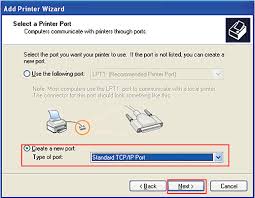
Add a new port:
Click “Ports” tab, then “Add Port.” Select “Standard TCP/IP Port” and click “New Port.” The Add Standard TCP/IP Printer Port Wizard opens.
Configure the port for port 9100 network printing:
Enter your printer’s IP address in the “Printer Name or IP Address” field. The wizard auto-fills the Port Name (usually “IP_” followed by the address). Click Next. Select “Custom” and click “Settings.” Ensure protocol is “Raw” and port number is “9100.” Disable “SNMP Status Enabled” if you have connectivity issues (some printers/firewalls block SNMP). Click OK, then Next, then Finish.
You’ve now created a port 9100 network printing port that Windows can use to send print jobs directly to your printer.
Step 4: Install Printer Drivers and Associate with the Port

With your port 9100 network printing port created, now add the actual printer and driver.
Add a new printer:
In Printers & scanners, click “Add a printer or scanner.” If auto-detection finds it, great—select it. If not, click “The printer that I want isn’t listed.”
Manual printer installation for port 9100 network printing:
Select “Add a local printer or network printer with manual settings.” Click Next. Under “Use an existing port,” select the Standard TCP/IP port you just created (should show IP address). Click Next.
Install the driver:
Choose your printer manufacturer and model from the list. If not listed, use Windows Update to search for drivers. Or click “Have Disk” to install drivers downloaded from the manufacturer’s website. Select the exact model for best port 9100 network printing performance. Click Next.
Name your printer:
Give it a descriptive name like “Accounting-HP-LaserJet-9100” so users know which printer they’re selecting. Choose whether to share this printer on the network. Click Finish.
Test printing:
Right-click the printer and select “Print Test Page.” If it prints successfully, your port 9100 network printing setup is complete.
Step 5: Optimize Port 9100 Network Printing Settings
Fine-tune settings for optimal port 9100 network printing performance and reliability.
Configure port timeout settings:
In Printer Properties > Ports tab > Configure Port. Set “Port Monitor Timeout” to 90-120 seconds for large complex print jobs. Default 60 seconds can cause timeouts on big files.
Enable bidirectional communication:
Check “Enable bidirectional support” in Ports tab. This allows your computer to receive status information (ink levels, paper jams, errors) from the printer through port 9100 network printing protocol.
Set printer defaults:
In Printer Properties > Advanced tab, set default paper size, print quality, duplex mode. In Printing Preferences, configure defaults for color vs black-and-white, orientation, and finishing options. These preferences apply to all users printing to this port 9100 network printing setup.
Configure print spooling:
In Advanced tab, ensure “Spool print documents” is enabled for better performance. Select “Start printing immediately” for fastest output. Enable “Print directly to the printer” only for troubleshooting slow printing issues.
Proper configuration ensures reliable, fast port 9100 network printing with minimal user complaints.
Essential Tools for Managing Port 9100 Network Printing

Beyond basic Windows settings, these tools help you monitor, troubleshoot, and optimize port 9100 network printing infrastructure.
Network scanning tools:
Nmap scans networks to identify printers and verify port 9100 is open:
cmd
nmap -p 9100 192.168.1.0/24This shows all devices on your network listening on port 9100 for network printing connections.
Advanced Port Scanner (free) provides GUI for scanning IP ranges and identifying port 9100 network printing devices quickly.
Print job monitoring:
PrinterLogic and PaperCut offer centralized dashboards showing all port 9100 network printing jobs, failures, bottlenecks, and usage statistics across your entire printer fleet.
Windows Print Management console (printmanagement.msc) shows active jobs and port status for local port 9100 network printing devices.
Packet capture tools:
Wireshark captures network traffic on port 9100 to diagnose protocol issues. Filter by tcp.port == 9100 to see only print traffic. Useful when port 9100 network printing works intermittently.
Printer management utilities:
Manufacturer-specific tools like HP Web Jetadmin, Canon Device Management Console, or Xerox CentreWare provide advanced configuration for port 9100 network printing features specific to your printer brand.
Command-line testing:
Test raw port 9100 network printing by sending data directly:
cmd
echo "Test Print" | netcat printer-ip 9100Or on Windows with PowerShell:
powershell
"Test Print" | Out-File -FilePath "\\printer-ip\9100" -Encoding ASCIIIf text appears on the printer, port 9100 network printing communication works at the protocol level.
Common Problems and Troubleshooting Port 9100 Network Printing
These issues plague port 9100 network printing deployments regularly. Here’s how to diagnose and fix them quickly.
Problem 1: Printer shows “offline” despite being powered on
The most common port 9100 network printing complaint—printer is on, network connected, but Windows shows offline.
Solutions:
Check if the printer’s IP address changed (DHCP lease renewed with different IP). Verify firewall isn’t blocking port 9100 network printing traffic—both Windows Firewall and network firewalls. Disable SNMP in the printer port configuration (some printers/networks have SNMP problems). Restart the Print Spooler service on Windows. Recreate the Standard TCP/IP port with current IP address.
Problem 2: Print jobs get stuck in queue but never print
Users send documents but they sit in the print queue forever without printing through port 9100 network printing.
Solutions:
Check port 9100 is actually open: telnet printer-ip 9100. Verify printer isn’t in an error state (paper jam, low toner). Clear and restart the print spooler. Check if another computer is monopolizing port 9100 network printing connection. Increase port timeout in Configure Port settings to 120 seconds. Test with a different driver version—driver bugs cause queue jams.
Problem 3: Intermittent printing failures
Port 9100 network printing works sometimes but randomly fails with no clear pattern.
Solutions:
Network congestion might be causing packet loss—test during low-traffic times. Printer might be going into sleep mode and not waking quickly enough. Check for IP address conflicts on your network. Some managed switches have port security that blocks port 9100 network printing intermittently. Monitor with Wireshark during failures to identify protocol issues.
Problem 4: Slow printing speeds
Documents take forever to print even though network is fast and printer is capable.
Solutions:
Enable “Print directly to the printer” temporarily to test if spooler is the bottleneck. Check if bidirectional communication is causing delays—disable temporarily to test. Reduce print quality or resolution for faster port 9100 network printing throughput. Verify network path isn’t routing through slow segments. Update printer firmware—older firmware has port 9100 network printing performance bugs. Check if antivirus is scanning print jobs before sending—exclude the print spooler process.
Problem 5: Security warnings about port 9100
Network security scans flag port 9100 as “insecure” or “risky” because port 9100 network printing lacks authentication and encryption.
Solutions:
Understand that port 9100 network printing is intentionally simple with no built-in security. Mitigate by placing printers on isolated VLAN segments. Use firewall rules limiting port 9100 access to authorized IP addresses only. Consider switching to IPP (port 631) with TLS encryption for sensitive documents. Implement print release authentication with third-party software. Port 9100 network printing itself can’t be “secured”—you secure the network infrastructure around it.
Frequently Asked Questions
Q: Why do network printers use port 9100 instead of other ports?
Port 9100 network printing became the industry standard because it’s simple, fast, and works across all operating systems without special software. Unlike older protocols like LPD (port 515) that require handshaking and acknowledgments, port 9100 network printing just streams raw data directly to the printer. This simplicity makes it more reliable and easier to implement in printer firmware. Manufacturers standardized on port 9100 in the 1990s and it remains dominant today for business network printing.
Q: Is port 9100 network printing secure for confidential documents?
No, port 9100 network printing has no built-in security—no authentication, no encryption. Anyone with network access can send print jobs to any printer listening on port 9100. For sensitive documents, use IPP with TLS encryption (port 631) instead, implement network segmentation with VLANs, restrict port 9100 access through firewall rules, or use print management software that adds authentication layers on top of port 9100 network printing. In secure environments, port 9100 should be restricted to trusted network segments only.
Q: Can I use port 9100 for both Windows and Mac computers?
Absolutely. Port 9100 network printing is operating system agnostic—that’s one of its biggest advantages. Windows uses “Standard TCP/IP Port,” Mac calls it “Socket/HP Jet Direct,” and Linux uses “AppSocket/HP JetDirect” but all three are connecting to port 9100 network printing on the printer. Configuration looks different in each OS but the underlying protocol is identical. This universal compatibility makes port 9100 network printing perfect for mixed-OS environments.
Q: What’s the difference between port 9100 and IPP (port 631)?
Port 9100 network printing is raw, simple data streaming with no encryption or authentication—just send and hope it prints. IPP (Internet Printing Protocol on port 631) is more sophisticated with built-in authentication, encryption (via TLS/SSL), job status tracking, and printer capability discovery. IPP is better for security and management but requires more configuration. Port 9100 network printing wins for simplicity and speed. Modern environments often support both—use port 9100 for general printing and IPP for sensitive documents.
Q: How do I secure port 9100 if my network security team says it’s vulnerable?
Port 9100 network printing is inherently insecure by design, so you can’t “fix” the protocol itself. Instead, secure the infrastructure around it: create separate VLANs for printers isolating them from general user networks, implement firewall ACLs allowing only specific IP addresses to access port 9100, deploy print management software adding authentication before jobs reach port 9100 network printing, consider switching high-security printers to IPP with TLS, and monitor port 9100 network printing traffic for unusual patterns. Defense-in-depth compensates for port 9100’s lack of native security.
Conclusion
Understanding port 9100 network printing is fundamental knowledge for anyone managing network infrastructure or supporting printing systems. This simple but powerful protocol handles millions of print jobs daily across businesses worldwide, and for good reason—it works reliably, performs quickly, and requires minimal configuration.
The key takeaways about port 9100 network printing: it’s a raw TCP/IP protocol sending unencrypted print data directly to printers, it’s the simplest and fastest network printing method available, virtually every network printer supports it as the default protocol, configuration requires only creating a Standard TCP/IP Port in Windows, and security concerns exist but can be mitigated through proper network design rather than protocol changes.
When you encounter printing problems, check port 9100 network printing configuration first—verify the port is open with telnet, confirm IP addresses haven’t changed, ensure firewalls aren’t blocking traffic, and test with simple raw data before blaming drivers or applications. Most network printing issues trace back to basic port 9100 connectivity problems.
Whether you’re setting up new printers, troubleshooting mysterious printing failures, or responding to security audit findings, understanding how port 9100 network printing actually works gives you the foundation to solve problems quickly and configure systems correctly from the start.
Keep this guide bookmarked—you’ll reference it constantly in real IT environments where port 9100 network printing remains the workhorse protocol keeping offices productive.
Set Default Printer Command Prompt Guide for IT Pros (2025) Read More


