
Introduction
Finding the right paper curl fix can save you hours of frustration and countless wasted sheets. Curled and warped paper is the number one cause of printer jams, costing businesses and home users time, money, and patience every single day.
Paper doesn’t curl randomly. Moisture changes, improper storage, and environmental factors cause sheets to warp and bend. These curled edges then catch on printer rollers, triggering jams that interrupt your work. The good news? Nearly all paper curling is preventable with simple adjustments.
This guide reveals exactly why paper curls and gives you practical solutions that work immediately. You’ll discover how to fix already-curled paper, prevent future warping, and create the perfect printing environment.
Let’s solve your paper curl problems once and for all.
What Is Paper Curl and Why Does It Happen?
Paper curl is when sheets bend, wave, or warp instead of lying flat. The edges lift up or the entire sheet takes on a bowl shape. This warping happens because paper fibers absorb or release moisture based on the surrounding environment.
Paper is made from wood pulp fibers that act like tiny sponges. When humidity increases, these fibers absorb water and expand. When air becomes dry, fibers release moisture and contract. This constant expansion and contraction causes uneven stress across the sheet, resulting in curl.
Different sides of paper react differently to moisture. The manufacturing process creates slight differences between the top and bottom surfaces. One side typically has more sizing (coating) that resists moisture. When moisture hits these surfaces unevenly, curl develops.
Temperature changes accelerate curling. Warm air holds more moisture than cold air. Moving paper between temperature zones causes rapid moisture exchange. This is why paper left near windows, heaters, or air conditioners curls more quickly.
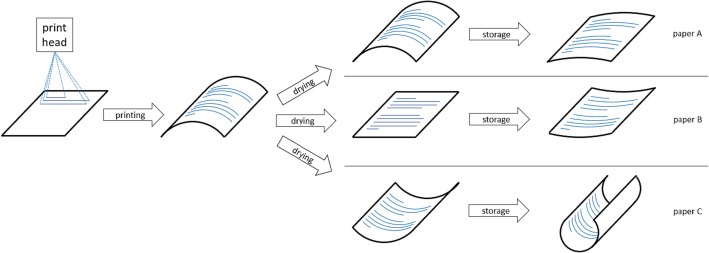
The direction and severity of curl depends on fiber orientation and moisture exposure. Paper stored in high humidity curls upward at the edges. Paper in very dry conditions curls downward in the center. Understanding these patterns helps you apply the right paper curl fix for your situation.
6 Proven Methods for Paper Curl Fix and Prevention
Method 1: Reverse the Curl Manually
The quickest paper curl fix for immediate printing needs is manual reversal. This technique works for small batches when you need to print right away.
Hold curled paper by opposite corners. Gently bend it in the direction opposite to the curl. Don’t crease or fold—just apply light pressure to counter the existing curl.
For edge curl, hold the paper lengthwise and flex it gently backward. You should feel slight resistance. Hold for 5-10 seconds, then release. The paper should relax closer to flat.
Stack corrected sheets between heavy books overnight for best results. The weight flattens paper while preventing new curl from forming. Use at least 10 pounds of weight distributed evenly.
This method provides temporary relief. Without addressing the root moisture problem, paper will curl again within hours. Use manual reversal as a quick fix while implementing longer-term solutions.
Fan through your paper stack before loading. This separates sheets and releases trapped moisture or static. Individual sheets feed through printers more reliably than stuck-together stacks.
Method 2: Control Your Paper Storage Environment
Proper storage prevents curl before it starts. Environmental control is the most effective long-term paper curl fix available.
Store paper in a climate-controlled room between 68-77°F (20-25°C). Temperature stability matters more than the exact number. Avoid areas with large temperature swings throughout the day.
Maintain relative humidity between 45-55%. This range keeps paper fibers in equilibrium without expanding or contracting. Use a hygrometer to monitor humidity levels accurately. These devices cost $10-20 and provide essential information.
Keep paper in its original wrapper until you’re ready to use it. The wrapper protects against moisture changes. Once opened, reseal packages with clips or place them in airtight containers.
Never store paper near windows, exterior walls, or HVAC vents. These locations experience the most dramatic temperature and humidity fluctuations. Interior closets or cabinets work best for paper storage.
Elevate paper off the floor, especially in basements or ground-level rooms. Floors collect moisture that rises into paper stacks. Use shelves or pallets to maintain air circulation underneath.
Store paper vertically when possible rather than in tall stacks. Horizontal stacking puts pressure on lower sheets, making them more susceptible to moisture-related curl. Vertical storage allows air circulation around all sheets equally.
Method 3: Condition Paper Before Printing
Paper conditioning is a professional paper curl fix technique used in commercial print shops. You can easily adapt it for home or office use.
Remove paper from storage 24 hours before printing. Let it acclimate to your print room’s temperature and humidity. This equilibration prevents shock when paper enters the printer.
For emergency conditioning, fan through the stack to introduce room air between sheets. Spread the stack across a table for 30-60 minutes. This speeds up moisture balance.
The “opposite environment” technique works for severely curled paper. If your paper curled from high humidity, place it in a slightly drier environment temporarily. For dry-curled paper, increase local humidity slightly.
Never put paper in ovens, microwaves, or direct sunlight to dry it. Extreme heat causes permanent damage to paper fibers and sizing. These methods create brittle paper that tears easily.
Use a dehumidifier in humid climates or humidifier in dry climates. Run these devices in your print room to maintain that ideal 45-55% humidity range. The investment pays for itself through reduced paper waste.
Check Paper and Paperboard Manufacturing Guide from TAPPI for technical specifications about paper moisture content and optimal storage conditions.
Method 4: Adjust Printer Settings for Curled Paper
Your printer settings directly impact how well it handles slightly curled paper. These adjustments provide an immediate paper curl fix without changing the paper itself.
Reduce printing speed in your printer driver settings. Slower paper feed gives curled sheets more time to align properly with rollers. This reduces jam frequency significantly.
Increase paper thickness settings even if using standard paper. Higher thickness settings adjust roller pressure and fuser temperature. These changes help the printer grip curled edges better.
Enable “thick paper” or “cardstock” mode for warped sheets. This setting modifies multiple parameters simultaneously. The printer treats paper more gently, reducing jam risk.
Adjust fuser temperature if your printer allows it. Lower temperature reduces additional curl that heat can cause. Be cautious—too low causes poor toner adhesion. Test with non-critical documents first.
Use manual feed or bypass tray for badly curled paper. Single-sheet feeding gives you control over paper entry angle. You can guide curled sheets manually to ensure proper alignment.
Clean paper rollers before printing on curled paper. Dirty rollers have reduced grip, making it harder to pull warped sheets through. A quick roller cleaning takes two minutes and prevents hours of frustration.
Method 5: Choose the Right Paper for Your Environment
Paper selection is a preventive paper curl fix that addresses the root cause. Different papers resist curl better based on their construction.
Premium papers with higher weight (24-32 lb) curl less than standard 20 lb paper. Heavier paper has more fiber density that resists moisture changes. The extra cost is worth it for important documents.
Look for “moisture-resistant” or “curl-resistant” labels on paper packaging. Manufacturers add special sizing to these papers that blocks moisture absorption. They cost slightly more but remain flat longer.
Avoid paper with high recycled content in humid environments. Recycled fibers tend to be shorter and absorb moisture more readily. Virgin fiber papers maintain flatness better in challenging conditions.
Cotton-blend papers excel in both humid and dry environments. The cotton fibers have different moisture properties than wood pulp. This creates more stable sheets with less curl tendency.
Buy paper in smaller quantities if you have storage challenges. A ream that you’ll use within a month suffers less storage-related curl than bulk paper sitting for months. Fresh paper always performs better.
Match paper grade to your printer type. Inkjet paper has different moisture properties than laser paper. Using the correct type reduces curl caused by printer heat and ink saturation.
Method 6: Implement Quick Pre-Print Fixes
Even with prevention, some paper arrives already curled. These fast techniques provide an effective paper curl fix minutes before printing.
The steam method works for moderately curled paper. Hold sheets 6-8 inches above boiling water for 3-5 seconds per side. The steam relaxes fibers without saturating them. Let paper air dry for 5 minutes before printing.
Iron paper on the lowest setting with no steam. Place a clean cloth between the iron and paper. Apply gentle pressure for 2-3 seconds per section. This flattens curl quickly but risks scorching if you’re not careful.
The freeze technique reverses humidity-caused curl. Place curled paper in a sealed plastic bag with a damp paper towel (not touching the paper). Refrigerate for 30 minutes. Remove and let reach room temperature before printing.
Roll severely curled paper around a tube in the opposite direction. Use a poster tube or paper towel roll. Secure with rubber bands and leave for 2-3 hours. The mechanical pressure counters the existing curl.
Press paper under glass or in a book press. Large picture frame glass works perfectly. Stack up to 50 sheets under the glass for 1-2 hours. This method flattens without moisture changes.
Essential Tools for Preventing Paper Curl

Having the right tools makes paper curl fix and prevention much easier. These items help you monitor and control the conditions that cause warping.
A digital hygrometer measures humidity accurately. Models with min/max memory show you humidity fluctuations over time. This data helps you identify problem periods. Quality hygrometers cost $15-30 and last for years.
Airtight storage containers keep opened paper fresh. Restaurant-sized clear containers work perfectly for reams. They seal out humidity changes while letting you see paper quantity at a glance.
Silica gel packets absorb excess moisture in storage containers. Place 2-3 packets in each container. Replace when they change color (usually every 3-6 months). Recharge packets in the oven to reuse them.
A small dehumidifier or humidifier maintains ideal conditions in your print area. Personal-sized units handle typical home offices perfectly. They’re especially valuable in basements or attics with extreme conditions.
Paper clips and binder clips seal opened reams. Simply fold the wrapper back over unused paper and clip securely. This simple step prevents hours of curl-related problems.
Anti-static brushes help separate sheets before printing. Static electricity makes curled paper stick together worse. A quick brush through eliminates static while checking for curl.
Common Mistakes That Make Paper Curl Worse
Storing Paper in Original Boxes on the Floor
Many people leave paper in cardboard boxes on basement or garage floors. Concrete floors wick moisture upward into boxes and paper. Cardboard absorbs humidity and transfers it to paper. Always remove paper from boxes and store on shelves at least 6 inches above the floor.
Opening Multiple Reams at Once
Opening several packages “to have enough paper” exposes unnecessary paper to moisture. Each opened ream begins absorbing or releasing humidity immediately. Only open what you’ll use within two weeks. Keep backup reams sealed.
Printing on Cold Paper
Taking paper directly from a cold garage or basement to a warm printer causes instant curl. The temperature shock creates rapid moisture exchange. Always let paper reach room temperature for at least an hour before printing.
Ignoring Humidity Warnings
Printer error messages about environmental conditions aren’t just suggestions. Operating outside recommended humidity ranges (usually 20-80%) guarantees curl problems. Address the environment rather than repeatedly clearing error messages.
Using Damaged or Wet Paper
Trying to salvage water-damaged paper never works well. Once paper gets truly wet, its structure changes permanently. Attempting to dry and use it wastes time and often damages your printer. Discard wet paper and claim insurance if applicable.
Mixing Old and New Paper
Adding fresh paper to the bottom of a tray with old curled paper spreads the problem. Old paper’s curl tendency affects new sheets through contact and moisture transfer. Start fresh with new paper when addressing curl issues.
Forcing Curled Paper Through Printers
Repeatedly feeding obviously curled paper damages rollers and sensors. Each jam attempt makes the paper worse and risks printer damage. Fix the curl first, then print. Patience saves equipment and produces better results.
Frequently Asked Questions About Paper Curl Fix
Can I fix paper that’s already curled or is it ruined?
Most curled paper can be fixed unless it’s been wet or creased. Use the manual reversal technique or condition paper in the opposite environment. Moderate curl responds well to 24-hour weight pressing. Very severe curl may need the steam or gentle iron method. Prevention is easier than cure, but curled paper rarely needs discarding.
Why does my paper curl immediately after printing?
Post-print curl happens when printer heat or ink moisture changes paper’s moisture balance. Laser printers’ high heat causes immediate curl in humid environments. Inkjet saturation curls paper in dry conditions. Let prints cool completely before stacking. Use appropriate paper types—laser paper for laser printers, inkjet for inkjets.
Does paper orientation in the printer tray matter for curl?
Yes, load paper with the curl facing up or down depending on your printer’s paper path. For printers that feed from the bottom, place the curl side facing up. This lets rollers naturally flatten curl as paper feeds through. Check your printer manual for the optimal loading direction.
How long does properly stored paper stay flat?
Paper stored in ideal conditions (sealed, 45-55% humidity, stable temperature) remains flat for years. Opened paper in good conditions stays usable for 6-12 months. Poor storage causes curl within days or weeks. The key is maintaining stable conditions rather than achieving perfect conditions temporarily.
Conclusion
Mastering paper curl fix techniques transforms your printing experience from frustrating to flawless. You now know that curl comes from moisture imbalance and that controlling storage environment prevents most problems before they start. The six methods—manual reversal, environmental control, conditioning, printer adjustments, paper selection, and pre-print fixes—give you solutions for every situation.
Start with proper storage today. Seal your paper, monitor humidity, and keep temperatures stable. These simple steps eliminate 90% of curl-related jams. For immediate needs, the manual reversal and conditioning techniques get you printing within minutes. Your printer, your deadlines, and your stress levels will thank you.
Don’t let warped paper waste another hour of your time. Implement these paper curl fix strategies now and enjoy jam-free printing for years to come.
Cleaning Printer Inside: Eliminate Dust & Debris for Peak Performance Read More


