
Introduction
Nothing’s more frustrating than sending a document to print, only to find ugly horizontal lines running across your pages. If you’re seeing streaky or uneven bands on your prints, you’re dealing with printer banding—and you’re definitely not alone.
The good news? You can fix printer banding lines without calling a technician or buying a new printer. Most banding issues come from clogged print heads, low ink, or misaligned cartridges. These are problems you can solve at home in just a few minutes.
This guide walks you through exactly what causes those annoying streaks and gives you proven solutions to get your printer back to producing crisp, clean prints. Whether you’re using an inkjet or laser printer, we’ve got the fixes you need.
What Is Printer Banding?
Printer banding refers to those horizontal or vertical lines that appear on your printed pages. These lines can be faint streaks, thick bands, or uneven color patches that ruin your print quality.
You’ll typically see banding as:
- Horizontal lines running across the page
- White streaks where ink should be
- Darker bands in certain areas
- Uneven color distribution
- Faded sections alternating with normal print
Banding happens when your printer can’t lay down ink or toner evenly. The print head might be clogged, the cartridge could be running low, or the printer needs alignment. Sometimes it’s a simple software setting causing the problem.
The issue affects both inkjet and laser printers, though the causes differ slightly. Inkjet printers usually have clogged nozzles. Laser printers often have dirty drum units or low toner.
Understanding what banding is helps you identify the right fix. Once you know what you’re looking at, solving it becomes much easier.
8 Proven Ways to Fix Printer Banding Lines

1. Run a Print Head Cleaning Cycle
This is your first line of defense against banding. All modern printers have a built-in cleaning function that flushes the print head nozzles.
For Windows users:
- Open Control Panel
- Click Devices and Printers
- Right-click your printer
- Select Printing Preferences
- Look for Maintenance or Tools tab
- Run Head Cleaning
For Mac users:
- Open System Preferences
- Click Printers & Scanners
- Select your printer
- Click Options & Supplies
- Choose Utility tab
- Run cleaning cycle
Run the cleaning cycle once. Print a test page. If banding remains, run it one more time. Don’t overdo it—excessive cleaning wastes ink.
Most printers also have a cleaning option in their software. Check the manufacturer’s app on your computer. Canon, Epson, HP, and Brother all include dedicated cleaning tools.

2. Check and Replace Low Ink or Toner Cartridges
Low ink is one of the most common causes of streaky prints. When cartridges run low, they can’t deliver consistent coverage.
Check your ink levels:
- Look at your printer’s display screen
- Check the printer software on your computer
- Print a status report from printer settings
If any cartridge shows below 20%, replace it. Don’t wait until it’s completely empty.
Sometimes a cartridge looks full but is actually dried out or faulty. If you’ve had the same cartridge for over six months without using it much, it might be the problem.
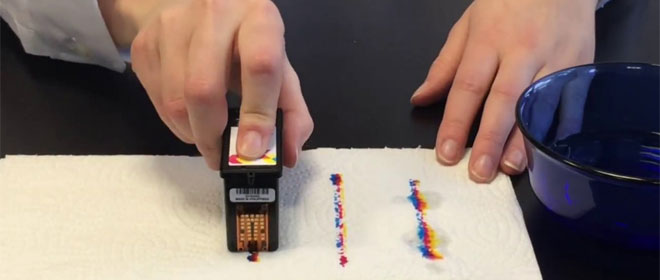
Pro tip: Gently remove the cartridge and shake it side to side. This redistributes the ink. Reinstall it and try printing again. This quick fix works surprisingly often.
For laser printers, remove the toner cartridge and gently rock it back and forth. This spreads the remaining toner powder evenly inside.
3. Align Your Print Heads
Misaligned print heads cause banding because the printer isn’t laying down ink where it should. This creates gaps that appear as white lines or streaks.
To align print heads:
- Go to printer settings
- Find Maintenance or Tools section
- Select Print Head Alignment
- Follow the on-screen instructions
- Print the alignment page
- Choose the best pattern when prompted
The process takes about 5 minutes. Your printer will print several patterns. You’ll select which one looks best aligned. The printer uses this information to calibrate itself.
Run alignment after replacing cartridges, moving your printer, or whenever you notice to fix printer banding lines. It’s a simple preventive step that keeps print quality high.
4. Clean the Print Head Manually
If automatic cleaning doesn’t work, manual cleaning might be necessary. This works especially well for older printers or stubborn clogs.
You’ll need:
- Distilled water
- Lint-free cloths
- Cotton swabs
- Rubber gloves
Steps for inkjet printers:
- Turn off and unplug the printer
- Open the cartridge access door
- Remove all ink cartridges
- Locate the print head (the part cartridges sit on)
- Dampen a lint-free cloth with distilled water
- Gently wipe the print head
- Use cotton swabs for tight spots
- Let it dry for 30 minutes
- Reinstall cartridges and test print
Never use tap water—it contains minerals that cause more clogs. Never touch the electrical contacts with wet materials.
For laser printers, you’ll clean the drum unit instead. Consult your manual for specific instructions, as laser printer components are more delicate.
5. Update or Reinstall Printer Drivers
Outdated drivers can cause all sorts of print quality issues, including banding. Software glitches sometimes make your printer perform incorrectly.
To update drivers:
- Visit your printer manufacturer’s website
- Find the support or downloads section
- Enter your printer model
- Download the latest driver for your operating system
- Run the installer
- Restart your computer
If updating doesn’t help, try completely uninstalling the printer software, restarting your computer, and doing a fresh install.
Sometimes Windows Update installs generic drivers that don’t work properly with your specific model. Manufacturer drivers always work better.
6. Adjust Print Quality Settings
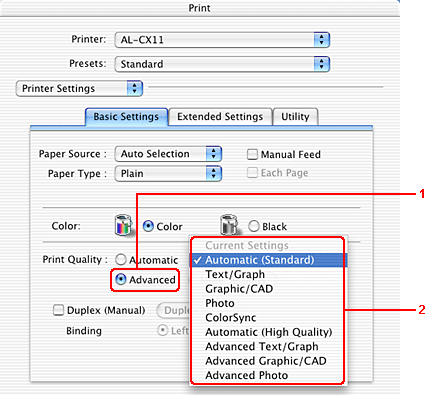
Your print settings might be causing banding without you realizing it. Draft mode or economy settings reduce ink usage, which can create streaks.
Change your settings:
- Open the document you want to print
- Click Print
- Select Properties or Preferences
- Find Quality settings
- Change from Draft to Normal or Best
- Disable Economy Mode
- Select the correct paper type
- Click OK and print
Using the wrong paper type setting causes problems too. If you’re printing on glossy paper but have “Plain Paper” selected, you’ll get poor results.
For photos and important documents, always use Best or High quality settings. The extra ink usage is worth the perfect print.
7. Check for Clogged Nozzles with a Nozzle Check
A nozzle check pattern shows you exactly which nozzles are clogged. This helps you diagnose the problem precisely.
To run a nozzle check:
- Go to printer maintenance settings
- Select Nozzle Check or Print Test Pattern
- Print the diagnostic page
- Examine the pattern
You’ll see a grid or series of lines in different colors. Missing lines or gaps indicate clogged nozzles in that color. If you see problems, run another cleaning cycle focused on those colors.
Most printers let you clean individual colors instead of all at once. This saves ink when only one color is problematic.
8. Clean the Printer Rollers and Paper Path
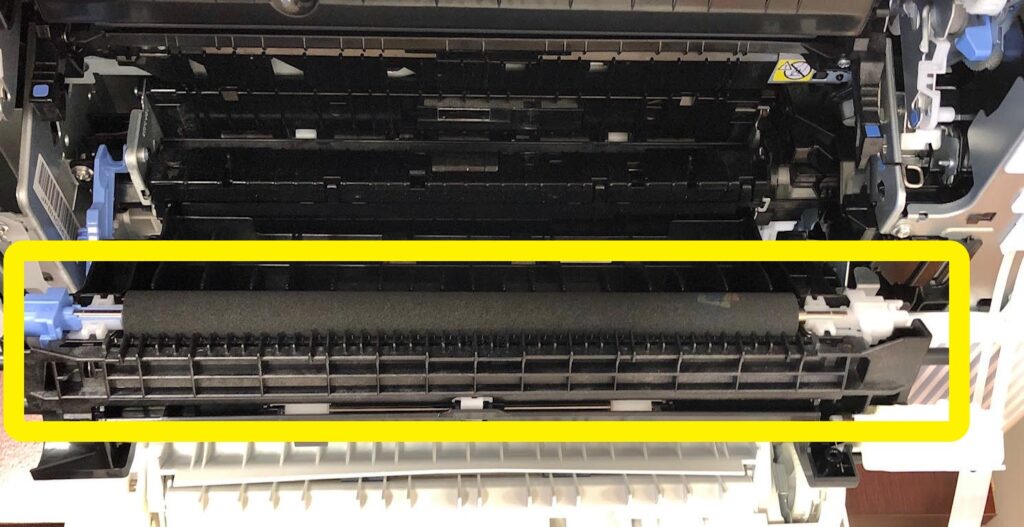
Dust and paper debris can cause inconsistent paper feeding, which creates banding patterns. Dirty rollers don’t grip paper properly, causing it to slip during printing.
Cleaning steps:
- Turn off and unplug the printer
- Open all access doors
- Look for rubber rollers
- Dampen a cloth with water
- Wipe rollers gently to remove dust
- Check for stuck paper bits
- Clean the paper path
- Let everything dry
- Close doors and test print
Do this maintenance every few months, especially if you print a lot. Keeping your printer clean prevents many issues before they start.
Additional Tools and Resources for Fixing Banding
Several tools can help you fix printer banding lines more effectively:
Cleaning Kits: Printer cleaning kits include specialized solutions and tools designed for deep cleaning. Brands like Epson and Canon sell official kits for their printers.
Print Quality Diagnostic Tools: Most printer manufacturers offer diagnostic software. HP has HP Print and Scan Doctor. Epson has Epson Print and Scan. These free tools automatically detect and fix common problems.
Printable Test Patterns: Download test patterns online to check your printer’s performance. These patterns help you see exactly where problems exist.
You can find helpful video tutorials on YouTube for your specific printer model. Watching someone perform maintenance on the exact same printer makes the process less intimidating.
The manufacturer’s support website usually has troubleshooting guides specific to your model. These guides cover model-specific quirks and solutions you won’t find in general advice.
Common Mistakes When Trying to Fix Banding

Over-cleaning the print head: Running too many cleaning cycles wastes ink and can actually damage the print head. Limit yourself to 2-3 cycles before trying something else.
Using the wrong cleaning solution: Never use alcohol, harsh chemicals, or tap water on print heads. Stick to distilled water or official cleaning solutions. Tap water minerals cause worse clogs.
Ignoring low ink warnings: Continuing to print with low ink makes banding worse and can damage your print head permanently. Replace cartridges promptly.
Refilling cartridges improperly: Third-party refilled cartridges sometimes cause problems. If you refill, use high-quality ink and follow instructions exactly. Bad ink clogs nozzles faster.
Skipping driver updates: Many people never update printer drivers. Old drivers cause mysterious problems that disappear with a simple update.
Using wrong paper settings: Always match your paper type setting to the actual paper you’re using. This single setting affects how much ink the printer uses and how it lays it down.
Touching the print head with bare hands: Oil from your fingers damages the print head. Always wear gloves or hold it by the edges only.
Not running the printer regularly: Printers that sit unused for weeks develop dried ink clogs. Print at least one page weekly to keep ink flowing.
The most important thing? Don’t panic and buy a new printer immediately. Most banding issues fix easily once you identify the cause.
Frequently Asked Questions
Q: Why does my printer have horizontal lines on every print?
Horizontal lines usually mean clogged print head nozzles or low ink. Run a cleaning cycle and check your ink levels. If that doesn’t work, align the print heads. These three steps fix most horizontal banding issues quickly.
Q: How often should I clean my printer to prevent banding?
Clean your printer every 2-3 months if you print regularly. If you print less than once a week, do a test print weekly to keep ink flowing. Run a cleaning cycle only when you notice quality problems, not on a schedule.
Q: Can I fix printer banding lines without buying new cartridges?
Yes, if the cartridges aren’t empty. Try cleaning cycles, print head alignment, and manual cleaning first. Often the cartridges are fine but the print head is clogged. Only replace cartridges if they’re actually low or defective.
Q: Is printer banding a sign my printer is dying?
Not necessarily. Banding happens to new and old printers alike. It’s usually a maintenance issue, not a hardware failure. If you’ve tried all fixes and banding persists, then you might have a hardware problem requiring professional repair.
Q: Do laser printers get banding like inkjet printers?
Yes, but the causes differ. Laser printer banding comes from dirty drum units, low toner, or corona wire issues. The fixes involve cleaning the drum, replacing toner, and checking the fuser assembly rather than cleaning nozzles.
Conclusion
Dealing with printer banding is annoying, but it’s almost always fixable at home. The key to success is working through solutions methodically—start with the simplest fixes first.
Begin by running a cleaning cycle and checking your ink levels. These two quick steps solve about 70% of banding problems. If those don’t work, move on to alignment, driver updates, and manual cleaning.
Remember that prevention matters too. Print regularly, use quality ink, keep your printer clean, and update drivers. These habits prevent most banding issues before they start.
Your printer doesn’t need to be perfect to be useful. But when you need quality prints, you now have the knowledge to fix printer banding lines and get professional results. Take it one step at a time, and you’ll have your printer working perfectly again.
For more detailed printer troubleshooting, visit HP’s official support page or your printer manufacturer’s website.
Printer Paper Guide: Master Choosing Perfect Paper for Stunning Print Results Read More.


