
Learning how to clean your printer safely is essential for maintaining optimal performance and extending your equipment’s lifespan, yet many users inadvertently damage their printers through improper cleaning techniques. Regular cleaning prevents paper jams, improves print quality, and reduces costly repairs, but using wrong methods or harsh chemicals can cause irreversible damage to delicate internal components.
Professional printer technicians report that improper cleaning causes nearly 30% of avoidable printer repairs, with costs often exceeding the price of basic maintenance supplies. The good news is that proper printer cleaning requires only basic tools and techniques that any user can master safely.
Whether you’re dealing with streaky prints, paper feed issues, or general maintenance, understanding the correct cleaning procedures will help you maintain professional print quality while avoiding expensive repairs or premature equipment replacement.
What Is Safe Printer Cleaning?
Safe printer cleaning involves using appropriate methods, tools, and materials to remove dust, debris, and dried ink from your printer without damaging sensitive electronic components, mechanical parts, or delicate surfaces. This process requires understanding which areas can be safely accessed and cleaned versus those that require professional service.
Proper printer cleaning encompasses both external maintenance (cleaning the exterior, paper paths, and accessible internal areas) and software-based cleaning cycles built into your printer’s maintenance menu. The key is knowing when to use physical cleaning methods versus automated cleaning functions.
Safe cleaning practices prioritize using lint-free materials, appropriate cleaning solutions, and gentle techniques that remove contaminants without introducing moisture to electronic components or scratching delicate surfaces. Understanding your specific printer model’s requirements is crucial, as different printer types have varying sensitivities and cleaning needs.
The goal is maintaining optimal performance through preventive maintenance that addresses common issues before they become serious problems requiring professional repair or equipment replacement.
8 Essential Steps to Clean Your Printer Safely

1. Power Down and Prepare Your Workspace
Before you begin to clean your printer safely, always turn off the power and unplug the device completely. This prevents electrical hazards and protects sensitive electronic components from power surges during cleaning.
Allow the printer to cool down for at least 30 minutes if it has been in use, as internal components can become extremely hot during operation. Laser printers particularly require cooling time due to their fuser units.
Prepare a clean, well-lit workspace with adequate room to access all sides of your printer. Gather appropriate cleaning supplies including lint-free cloths, cotton swabs, distilled water, and isopropyl alcohol if recommended by your manufacturer.
2. Clean the Exterior Surfaces
Start with the printer’s exterior using a slightly damp, lint-free cloth. Avoid using paper towels or tissues that can leave residue or scratch plastic surfaces. Clean the control panel with extra care to prevent moisture from entering button mechanisms.
Use cotton swabs lightly moistened with distilled water to clean around buttons, crevices, and hard-to-reach areas. Never spray cleaning solutions directly onto the printer – always apply cleaners to your cloth first.
For stubborn stains or sticky residue, use a small amount of mild soap solution, but ensure the cloth is only slightly damp and thoroughly wring out excess moisture before cleaning.
3. Address the Paper Path and Feed Mechanisms
Open all accessible covers and remove paper trays to access the paper path. Use a dry, lint-free cloth to gently wipe visible dust and debris from paper guides, rollers, and feed mechanisms.
For rubber feed rollers, use a cloth slightly dampened with distilled water to remove paper dust and improve traction. Rotate rollers manually while cleaning to ensure complete coverage, but avoid excessive pressure that could damage the mechanism.
Clean paper sensors (small plastic or glass components near the paper path) with dry cotton swabs, as these components are crucial for proper paper detection and feed timing.

4. Clean Accessible Internal Components
Remove ink or toner cartridges according to manufacturer instructions to access internal areas safely. Never force cartridge removal or ignore alignment guides during reinstallation.
Use dry, lint-free cloths to gently remove dust from accessible internal surfaces, avoiding any contact with electrical contacts, circuit boards, or ribbon cables. Focus on areas where dust typically accumulates, such as cartridge bays and paper path areas.
For inkjet printers, locate and gently clean the cartridge contacts (metal strips) with dry cotton swabs if they appear dirty or corroded, but avoid excessive pressure that could damage these delicate components.
5. Maintain Print Heads and Nozzles
For inkjet printers, use the built-in head cleaning function accessed through your printer’s maintenance menu or software. This automated process is safer than manual cleaning and uses precise amounts of ink to clear clogged nozzles.
If automated cleaning doesn’t resolve print quality issues, some manufacturers recommend gently dabbing (not wiping) the print head area with lint-free cloth slightly moistened with distilled water, but check your specific model’s guidelines first.
Never use alcohol or aggressive solvents on print heads unless specifically recommended by your printer manufacturer, as these can damage delicate nozzle mechanisms permanently.
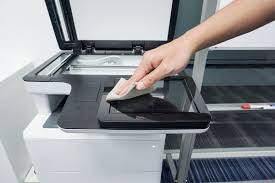
6. Clean Glass Surfaces and Scanners
For all-in-one printers with scanning capabilities, clean the scanner glass with a lint-free cloth and appropriate glass cleaner or distilled water. Spray cleaner onto the cloth, never directly onto the glass surface.
Clean both the main scanner glass and the automatic document feeder (ADF) glass strip if present. Streaks or spots on these surfaces will appear in all scanned documents and copies.
Use cotton swabs to clean around the edges of the scanner glass where dust commonly accumulates, taking care not to damage the gaskets or seals around the glass perimeter.
7. Address Ventilation Areas and Filters
Locate ventilation grilles and fan areas on your printer and use compressed air or a soft brush to remove accumulated dust. Blocked ventilation can cause overheating and reduce equipment lifespan significantly.
Some printers have removable air filters that require periodic cleaning or replacement. Check your user manual for filter locations and maintenance schedules specific to your model.
Use short bursts of compressed air rather than sustained pressure to avoid forcing debris deeper into the printer or damaging delicate internal components with excessive air pressure.
8. Reassemble and Test Functionality
Reinstall all cartridges, paper trays, and covers in reverse order of removal, ensuring proper alignment and secure connections. Misaligned components can cause mechanical problems or poor print quality.
Reconnect power and turn on the printer, allowing it to complete its initialization sequence. Run a test print to verify that cleaning has improved performance and hasn’t introduced new issues.
Print a nozzle check or alignment page if your printer offers these functions to ensure cleaning hasn’t affected print head alignment or nozzle function.
Additional Insights and Tools for Effective Cleaning
Beyond basic cleaning techniques, several specialized tools can make printer maintenance more effective and safer. Printer cleaning kits available from manufacturers often include appropriate cleaning solutions, lint-free cloths, and cotton swabs specifically designed for printer maintenance.
Compressed air cans with precision nozzles help remove dust from hard-to-reach areas without disassembly, but always use short bursts and maintain appropriate distance to avoid condensation from the compressed air affecting electronic components.
Anti-static brushes designed for electronics cleaning can safely remove dust from sensitive areas without generating static electricity that could damage circuit boards or memory components.
For high-use environments, consider investing in printer maintenance software that can schedule automatic cleaning cycles and track maintenance intervals, helping prevent problems before they affect print quality or require manual intervention.
Troubleshooting Common Cleaning Mistakes That Cause Damage
One of the most dangerous mistakes when attempting to clean your printer safely is using excessive moisture, which can short-circuit electronic components or cause corrosion. Always use the minimum amount of cleaning solution necessary and ensure cloths are only slightly damp, never wet.
Another costly error is using inappropriate cleaning materials like paper towels, tissue paper, or abrasive cloths that can scratch delicate surfaces or leave residue that attracts more dirt. Invest in proper lint-free cleaning cloths designed for electronics maintenance.
Many users damage their printers by forcing access to areas that aren’t designed for user maintenance. Never remove covers or components that require tools or excessive force, as these areas typically require professional service and may void your warranty if accessed improperly.
Using harsh chemicals like bleach, ammonia-based cleaners, or petroleum-based solvents can dissolve plastic components, damage rubber rollers, or leave residues that affect print quality. Stick to manufacturer-recommended cleaning solutions or distilled water for most cleaning tasks.
Ignoring proper shutdown procedures before cleaning can result in electrical shock or damage to the printer’s electronic components. Always power down completely and unplug the device before beginning any physical cleaning procedures.
Rushing through the cleaning process often leads to missed steps or improper reassembly. Take your time to ensure all components are properly cleaned, dried, and reinstalled according to manufacturer specifications.
Frequently Asked Questions
Q: How often should I clean my printer to maintain optimal performance? A: Clean your printer monthly for regular use, or every 2-3 weeks for high-volume printing environments. External cleaning can be done weekly, while internal cleaning should follow manufacturer recommendations.
Q: Can I use household cleaning products to clean my printer safely? A: Avoid most household cleaners, which may contain chemicals that damage printer components. Use distilled water, isopropyl alcohol (if manufacturer-approved), or printer-specific cleaning solutions for best results.
Q: What should I do if I accidentally get moisture in my printer’s electronics? A: Immediately power off and unplug the printer. Allow it to dry completely for 24-48 hours before attempting to power on. If problems persist, contact professional repair services rather than attempting further troubleshooting.
Q: Is it safe to clean my printer’s print heads manually? A: Manual print head cleaning should only be attempted if specifically recommended by your printer manufacturer and using their prescribed methods. Automated cleaning cycles are generally safer and more effective.
Conclusion
Mastering how to clean your printer safely is an essential skill that protects your investment while ensuring consistently high-quality output. Regular maintenance using proper techniques and materials can extend your printer’s lifespan significantly while preventing costly repairs and performance issues that affect productivity.
The key to successful printer cleaning lies in understanding your specific model’s requirements, using appropriate tools and techniques, and maintaining a consistent cleaning schedule that prevents problems before they become serious. Remember that prevention through regular light cleaning is far more effective than attempting to resolve major contamination issues.
By following these proven cleaning methods and avoiding common mistakes, you’ll maintain optimal printer performance while protecting your equipment from damage. Start with a conservative approach, using minimal moisture and gentle techniques, then gradually develop confidence as you become familiar with your printer’s specific maintenance needs. Your consistent care will be rewarded with reliable performance and professional-quality prints for years to come.
Save Money on Printing: 9 Budget-Friendly Tips That Cut Costs by 60% Read More.


Recent Comments