
Introduction
Fix printer out of paper error issues with our comprehensive troubleshooting guide. Few things are more frustrating than preparing to print an important document only to have your printer display an “out of paper” error when the tray is clearly loaded. This common printer problem affects users of all major brands including HP, Canon, Epson, and Brother printers. When your printer incorrectly detects an empty paper tray, it’s usually caused by sensor issues, paper feed problems, or software glitches rather than an actual paper shortage. In this detailed guide, we’ll walk you through the various causes of false paper detection errors and provide practical, step-by-step solutions to get your printer working properly again without requiring technical expertise or expensive repairs.
What Is a Printer Paper Detection System?
A printer’s paper detection system consists of several mechanical and electronic components that work together to sense whether paper is available for printing. Most modern printers use a combination of physical sensors, rollers, and software algorithms to detect the presence, positioning, and movement of paper through the device.
The primary component is the paper sensor—typically a small mechanical lever, optical sensor, or pressure-sensitive detector positioned in the paper tray or along the paper path. When paper is properly loaded, these sensors are triggered, sending a signal to the printer’s control board that paper is available. The printer also utilizes pick-up rollers (sometimes called feed rollers) that grip the paper and move it from the tray into the printing mechanism.
When you receive an “out of paper” error despite having paper loaded, it means this detection system is malfunctioning. The sensor might be obstructed, damaged, or misaligned; the rollers could be worn out or slipping; or the printer’s firmware might be incorrectly processing the sensor signals. Understanding this system is crucial because troubleshooting often involves addressing these specific components to restore proper paper detection functionality.
8 Steps to Fix Printer Out of Paper Error When Paper Is Loaded
Step 1: Power Cycle Your Printer
The simplest solution often works best:
- Turn off your printer completely
- Unplug the power cord from both the printer and the wall outlet
- Wait at least 30 seconds (this allows capacitors to discharge and the system to fully reset)
- Reconnect the power cord and turn the printer back on
- Try printing a test page
This basic restart helps clear temporary electronic glitches in the printer’s sensor system. Power cycling resets the printer’s internal memory and allows it to recalibrate its sensors upon restart. Many printer technicians recommend this as the first troubleshooting step because it resolves a surprising number of seemingly complex issues with minimal effort.
Step 2: Properly Reload the Paper Tray
Incorrect paper loading is a common cause of false “out of paper” errors:
- Remove all paper from the tray completely
- Fan the paper stack to separate any stuck sheets
- Check for bent corners or damaged sheets and remove them
- Align the stack perfectly with the tray guides
- Don’t overload—respect the maximum capacity line
- Insert the tray firmly until it clicks into place
Proper paper loading ensures the detection sensors make proper contact. Paper quality matters—very thin or very thick paper may not trigger sensors correctly. Always check your printer’s manual for specific recommendations on paper weight and type compatibility for your model.
Step 3: Clean the Paper Sensors
Dust and paper debris often interfere with sensor operation:
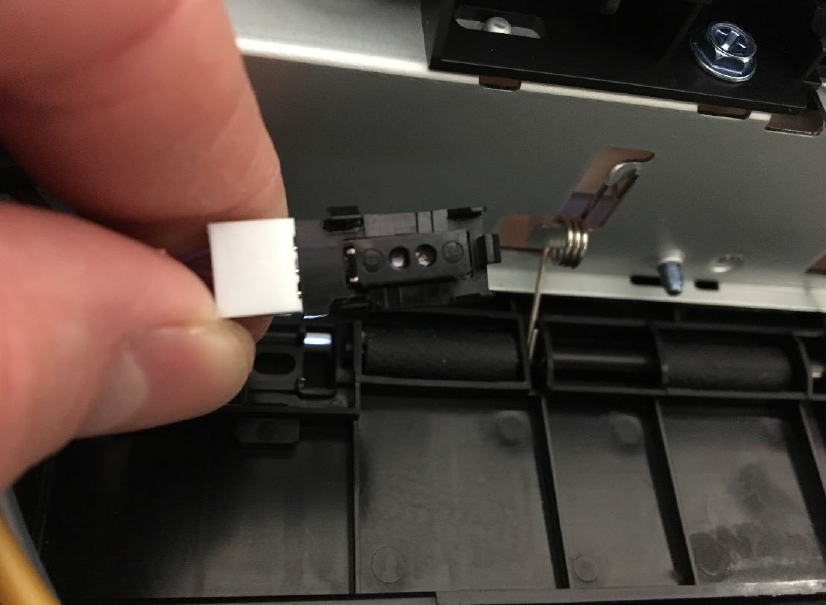
- Locate the paper sensors (typically small plastic or metal tabs in the paper tray area)
- Use compressed air to gently blow away dust (keeping the can upright)
- Use a clean, lint-free cloth slightly dampened with isopropyl alcohol for stubborn debris
- Allow the sensors to dry completely before reloading paper
- Avoid touching the sensors directly with your fingers
Regular cleaning of paper sensors is preventive maintenance many users overlook. Paper dust accumulates over time and can cause intermittent sensor problems. For optical sensors (which use light), even a small amount of dust can block the light beam and trigger false errors.
Step 4: Inspect and Clean the Paper Feed Rollers
Worn or dirty rollers often fail to grip paper properly:
- Locate the feed rollers (usually rubber wheels near the paper tray)
- Examine them for signs of wear, glazing, or paper dust
- Clean them using a lint-free cloth dampened with water or isopropyl alcohol
- Rotate the rollers manually to clean the entire surface
- For severely worn rollers, consider replacement parts
Feed rollers degrade over time, developing a smooth, glossy surface that reduces friction. This “roller glazing” prevents proper paper gripping. Some printer models allow user replacement of rollers, while others require professional service. If your printer is older than 3-5 years, worn rollers are a likely culprit for paper feed problems.
Step 5: Update Printer Firmware and Drivers

Outdated software can cause sensor communication issues:
- Visit your printer manufacturer’s website
- Download the latest firmware for your specific printer model
- Install the most recent printer drivers for your operating system
- Restart both your computer and printer after updates
- Run the printer’s built-in diagnostics if available
Manufacturers regularly release firmware updates that address known sensor and paper feed issues. These updates often include recalibration of sensor sensitivity thresholds, which can resolve false “out of paper” errors. Always check your printer’s control panel or settings menu for a “Firmware Update” option as some printers can update directly without computer intervention.
Step 6: Adjust Paper Tray Settings
Incorrect paper size settings frequently cause detection problems:
- Access your printer’s control panel
- Navigate to “Paper Settings,” “Tray Configuration,” or similar menu
- Ensure the configured paper size matches what’s actually loaded
- Check that paper type settings (plain, photo, etc.) are correct
- Some printers have a “Tray Sensor Override” option you can temporarily enable
Paper size mismatches are particularly common after switching between standard letter and legal paper or after printing envelopes. Modern printers have separate physical sensors for different paper sizes, so a mismatch between actual paper and settings can confuse the detection system.
Step 7: Run Printer Maintenance Utilities
Built-in diagnostic tools can help identify and fix sensor issues:
- Access your printer software on your computer
- Look for “Maintenance,” “Tools,” or “Troubleshooting” sections
- Run any available sensor diagnostics or calibration routines
- Some printers have specific “Paper Feed Test” or “Sensor Check” options
- Follow any on-screen instructions to complete the diagnostics
Manufacturer-provided maintenance utilities often include specialized routines for testing and recalibrating paper detection systems. These tools can automatically diagnose which component of the paper feed system is malfunctioning and suggest specific solutions. They might also adjust sensor sensitivity settings to better recognize your typical paper types.
Step 8: Check for Physical Obstructions in the Paper Path
Foreign objects often block sensors or impede paper movement:
- Open all access doors and panels
- Look for small pieces of torn paper, paper clips, staples, or other debris
- Carefully remove any foreign objects using tweezers if necessary
- Check for and clear any minor paper jams that might not trigger jam warnings
- Inspect the entire paper path from tray to output
Paper paths contain multiple sensors, and an obstruction anywhere along this path can cause errors. Pay special attention to areas around transition points where paper changes direction. Sometimes a tiny fragment of paper from a previous jam remains trapped and triggers sensors inconsistently, causing intermittent “out of paper” errors.
Additional Tools and Solutions for Printer Paper Feed Issues
Manual Feed Mode Options
When automatic detection continues to fail:
- Look for a “Manual Feed” or “Bypass Tray” option in your print settings
- This mode often uses different sensors and feed mechanisms
- Follow on-screen prompts for manually feeding paper
- Some printers allow disabling certain error notifications temporarily
Manual feed modes were originally designed for specialty media but can serve as effective workarounds for main tray sensor issues. They’re particularly useful for getting critical documents printed while arranging for more permanent repairs.
Specialty Printer Cleaning Cards
For thorough maintenance of inaccessible internal components:
- Purchase printer cleaning sheets/cards (available at office supply stores)
- Follow package instructions (typically inserted like regular paper)
- Run the cleaning cycle as directed
- These remove stubborn debris from rollers and sensors
- Use preventively every 1-2 months for high-volume printers
Cleaning cards contain specially formulated solutions that dissolve paper dust, toner residue, and other contaminants that regular cleaning methods might miss. They’re particularly effective for cleaning parts of the paper path that are difficult to access manually, such as internal transition rollers and embedded sensors.
Troubleshooting Specific Printer Brands and Common Mistakes

HP Printer-Specific Issues
HP printers often have unique paper sensor mechanisms:
- Look for the “Paper Sensor Flag” (small plastic lever in the paper tray)
- Ensure it moves freely and isn’t stuck
- Some HP models require pressing and holding the “Resume” button for 10-20 seconds to override initial sensor errors
- Check for HP Smart app updates, as sensor calibration is sometimes controlled via the app
- Many HP inkjet printers have sensors that detect paper weight—try slightly heavier paper
HP printers typically use mechanical sensor flags that can become brittle with age. These small plastic components often break or become stuck in one position, causing persistent paper detection errors. Replacement flags are inexpensive and relatively easy to install for most models.
Epson Paper Feed Problems
Epson printers commonly experience specific issues:
- Check the “Paper Stopper” position and ensure it’s correctly set for your paper size
- Epson feed rollers are particularly susceptible to glazing—clean thoroughly
- Many Epson models have a “Paper Feed Calibration” utility in the maintenance section
- Some Epson printers have a manual feed roller cleaning mode accessible through the control panel
- Try slightly reducing the number of sheets in the tray, as Epson sensors tend to be sensitive to weight
Epson printers often use optical rather than mechanical sensors, making them particularly sensitive to dust accumulation. Regular maintenance is especially important for these models to prevent sensor malfunction.
Common User Mistakes to Avoid
Preventing problems is easier than fixing them:
- Avoid mixing different paper types or sizes in the same tray
- Don’t force paper into a tray or overfill beyond capacity markers
- Never pull paper from the tray during active printing
- Don’t use damaged, wrinkled, or damp paper
- Avoid excessively shuffling paper in humid conditions as it can create static electricity that affects sensors
- Don’t use paper that’s been stored in extremely hot or cold conditions
Static electricity can cause multiple sheets to stick together, confusing paper thickness sensors. In winter or in very dry environments, consider using an anti-static spray designed for paper handling, or store paper in its wrapper until needed to maintain appropriate moisture content.
FAQs About Fixing “Out of Paper” Errors
Why does my printer say “out of paper” when there is paper in the tray?
This typically occurs when paper sensors are dirty, misaligned, or malfunctioning. The printer’s detection system might be obstructed by paper dust, the paper might not be positioned correctly to trigger the sensors, or the feed rollers might be too worn to properly grip the paper. In some cases, it’s a software issue where the printer’s firmware needs updating.
How often should I clean my printer’s paper feed system?
For home or small office printers with moderate use, cleaning every 3-4 months is sufficient. High-volume printers in busy environments benefit from monthly cleaning. If you frequently print on specialty paper that creates more dust (like cardstock or labels), more frequent cleaning is recommended. Regular maintenance prevents most paper feed issues before they occur.
Can paper quality affect “out of paper” errors?
Yes, paper quality significantly impacts detection. Very thin paper may not trigger weight-based sensors, while very thick paper might register as multiple sheets. Recycled paper typically creates more dust that can interfere with sensors. Paper that’s been exposed to humidity might stick together and cause feed problems. Always use paper that meets your printer’s specifications for best results.
Is it worth fixing an older printer with persistent paper feed problems?
For printers older than 5-7 years, persistent feed problems often indicate multiple worn components. If roller replacement kits are available and affordable for your model, repair might be cost-effective. However, if multiple components need replacement or parts are scarce, investing in a newer printer might be more economical, especially considering improved efficiency and lower per-page costs of newer models.
Conclusion
When you need to fix printer out of paper error messages despite having a loaded tray, understanding the underlying causes is key to finding the right solution. From simple steps like power cycling and proper paper loading to more involved maintenance like cleaning sensors and rollers, this comprehensive guide offers multiple approaches to resolve this common but frustrating printer issue. Remember that consistent preventive maintenance—regularly cleaning components, using quality paper, and keeping firmware updated—is often the best strategy for avoiding paper detection problems altogether.
If you’ve tried all these troubleshooting steps and continue experiencing problems, consult your printer’s user manual for model-specific guidance or contact the manufacturer’s technical support for assistance. For very old printers with persistent issues, weigh the cost of repairs against replacement with a newer, more reliable model. By following the systematic approach outlined in this guide, you’ll be able to diagnose and resolve most “out of paper” errors quickly and get back to productive printing without the need for professional service calls.
Fix a Printer Not Turning On or Power Light Blinking Issue Read More


Recent Comments